Sometimes I get really excited over food photography. People often think I am a huge photo nerd when they see me walking around a party taking pictures of food displays rather than the people! In fact, one of my favorite things about shooting weddings is capturing the details and food. Why, you ask? Because with inanimate objects you have perfectly obedient subjects that you have complete creative control over! No mood changes, emotional pressures, or behavior issues to get in the way..ha ha!
I also appreciate the time and preparation that goes into cooking and I think a nicely prepared meal or dessert is definitely worthy of a good capture. I enjoy using my creativity to style food and make it look pretty in a photograph. It fulfills some kind of creative need in me. Like decorating a room, or making a homemade card. There’s a little reward at the end, a beautifully composed photograph, like artwork, which you put thought and originality into!
I want to share with you some tips on composing and styling food for food photography. I am going to show you some example photographs and give some tips on how I achieved them.
10 Tips for Food Photography
TIP #1: Emphasize texture by using a wide-open aperture (small f-stop) and focusing sharply on one area.
Choose a part of the food that looks yummy/gooey/juicy and set your focus point there. I like to shoot handheld so I can quickly change angle and levels. If handheld, use a shutter speed of at least 1/125 to get a sharper image. Also shoot down low, at the level of the food.

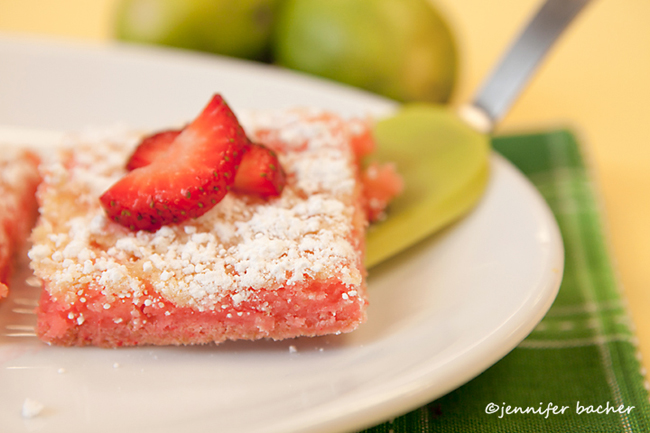
TIP #2: Choose prop colors that compliment the food.
Find props like linens, utensils, serving dishes and garnishes that go with the flavors of your food. Recently when I did a food shoot for a local magazine, I brought strawberries, lemons, limes and raspberries after I found out the flavors of the desserts ahead of time. I also brought linens, fabric, plates and serving utensils in lemon and lime colors. The mat board colors I brought for the background were also fresh, light colors that would compliment the flavors of the food. These were strawberry limeade bars. I tried to incorporate the lime flavor by using limes and background props in lime colors.
TIP #3: Choose props that may have been used during the preparation/serving of that food to emphasize a homemade look and feel.
For example, a cooling rack, a cutting board, a certain knife or other serving utensil. These are also great for added texture in the photo. In this photo I used a wooden cutting board.
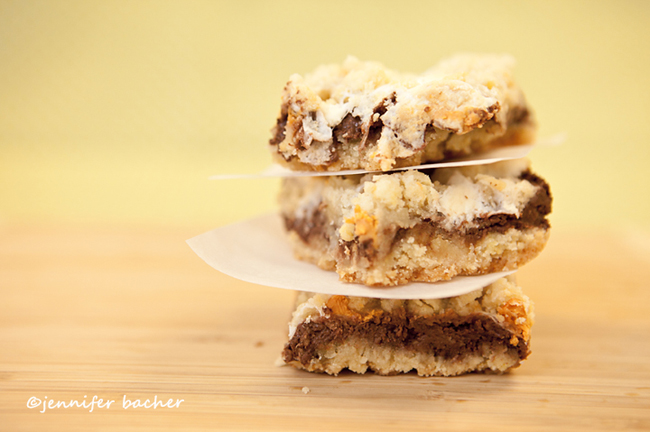
TIP #4: When photographing desserts, don’t be afraid to stack ‘em and line ‘em up for compositional depth and perspective.
What’s better than one delectable dessert? Two or three! Not only does it look tasty to see more than one, it’s fun to experiment with perspective when food is lined up in a row. Also, apply what you know about photography composition. For example, in this photo I utilized both the “rule of thirds” and the “golden spiral”. I love empty space on the side of a plate of food. It draws your eye to the plate.
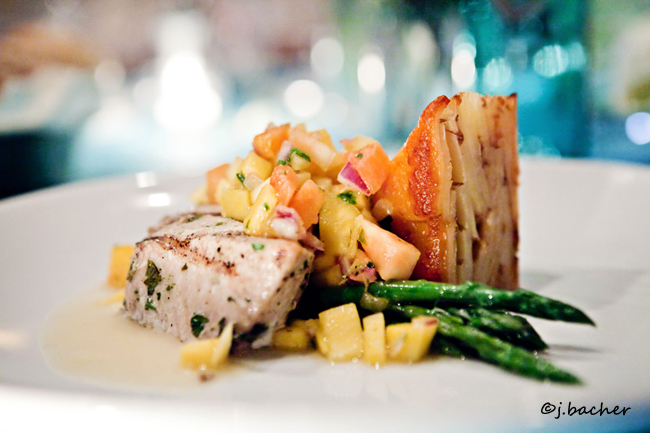
TIP #5: When possible, use natural light for softer, more natural highlights and shadows.
Indirect window light is best. You do not want the sun shining directly on your food. Try to find the biggest windows possible and place your food as close as you can to the window. Unless you want a more moody look with more shadows, move further away. I tend to lean more towards high key window light because I like bright images. If your only choice at the time is orange tungsten light, you can go back and fix the color casts later in post processing. There will be times no doubt when natural light is not available. Embrace whatever light you have to work with. I loved all the reflected candlelight/bokeh in this image (taken at night at a wedding).
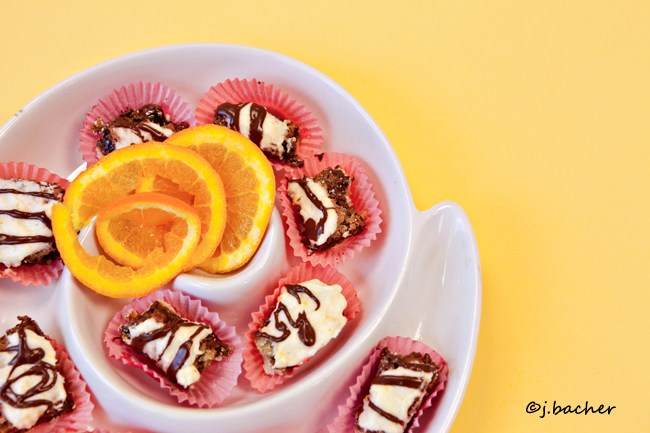
TIP#6: Don’t forget the little details in food photography, they add emphasis and identify the flavors in your food.
Garnishes on the top or at the side of your plate make it look professional and give it a finishing touch. Lemons in the background of some lemon bars, or coconut sprinkled on a plate holding a slice of coconut cream pie help identify the flavors of the food. Other garnish examples…powdered sugar, chocolate chips, parsley, mint leaves, nuts, limes or berries…all add pretty color and inviting detail nicely. For a great read, check out this book Food Presentation Secrets: Styling Techniques of Professionals. It’s loaded with more great ideas on plate styling and garnishing.
TIP #7: Be careful not to over-saturate the colors in your food in post processing or your food will look un-natural and unappealing.
The key is to make it look appetizing. Watch your reds and greens and any color casts that may be reflecting on your food. You want the person viewing the photo to start to salivate just looking at it!

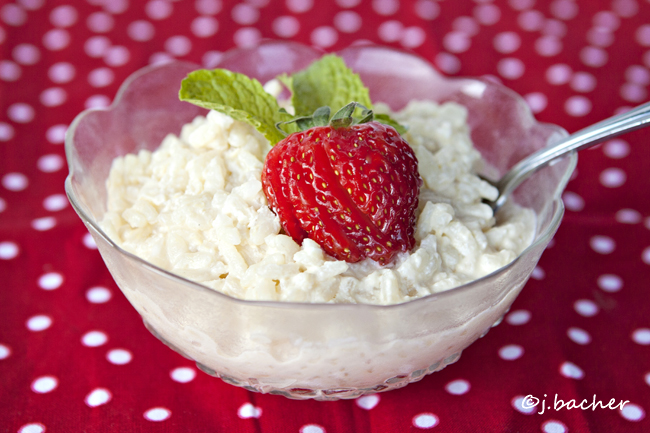
TIP #8: Use plain colored dishes and subtle prints in your linens as to not distract from the food.
White is my favorite for dishes. Really makes the colors in the food stand out. If you use a printed fabric i.e. a napkin or tablecloth, make sure it’s the only print in the photo. And the simpler the print the better. Small polka dots, subtle stripes are ok. Remember, you want to notice the food first.
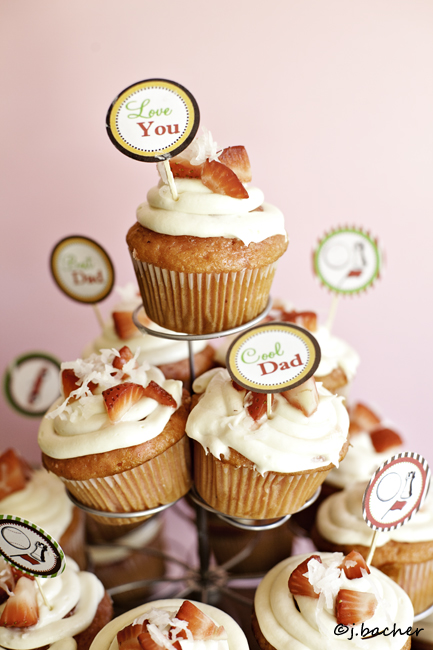
TIP #9: A plain colored or blurred background will draw your eye to the food.
I use mat board that you can buy from a frame shop or craft store. It comes in all colors. I have several on hand at home so I have a choice depending on what colors I want to emphasize in my food. My most frequently used colors for food are light blue, white, yellow, gray and brown. I have someone hold it up in the background as I shoot or place it under the plate for color if I don’t like the wood or surface/texture the plate is on. I made these strawberry coconut cupcakes for Father’s Day this year (Pinterest recipe that was amazing!) and used a pink mat board in the back to coordinate with the red/pink tones in the cupcakes.
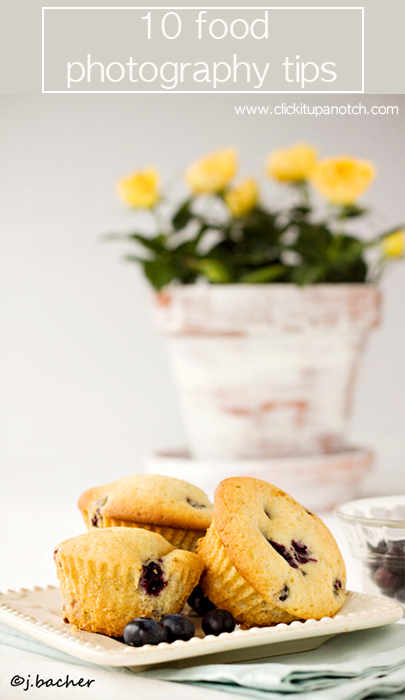
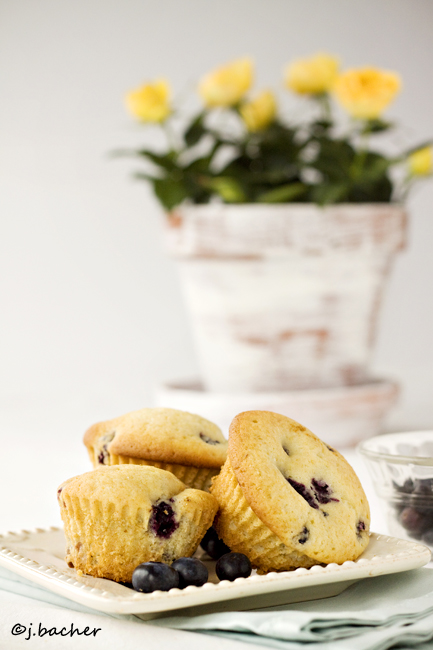
TIP #10: Create a mood with your props.
Is it a romantic dinner plate you are capturing? Include the soft candlelight and wine glasses in the background. Is it a breakfast food? Include props that remind you of morning… a bowl of blueberries, a plant that sits in your kitchen windowsill.
Read more about food photography
Do you love food photography also? I would love to hear from you! I hope these tips will help you as you practice taking better food photos. Experiment and try one or several of these tips next time you are shooting food. For more advice and helpful tips on shooting food, check out my previous posts on this blog.
Tips and Tricks for Food Photography: Part 1
Tips and Tricks for Food Photography: Part 2


Thank you very much for the informative article. These are excellent tips that I will surely put to use. :)
Thank you for sharing these tips! I’m inspired to be a bit more creative with my food shots. :)
I love the simplicity of the knowledge you give on here. I was just getting ready to look up photographing food when I say this on my facebook feed. Thank you Thank you
Great tips!!
I DO love food photography! My friend has started an “underground” dinner club and has asked me to photograph the prep, the food, etc. What I dig about photographing food is that it stays still, doesn’t fuss about not wanting it’s picture taken and it’s delicious, too! Thanks for all of the great tips! Found you on Pinterest for tips on large group shots, which is also helpful to me.
This is great, I LOVE photographing food… these tips are a really good guide.
Great tips!! I enjoyed this. do like taking pictures of food, and this will help a lot! Thanks!
Hi Jen!
This post is very timely, I’ll be throwing a birthday party for my niece this coming Friday and I am thinking on what to do with the table presentation. You just gave me an idea! Thank you so much!
Thank you for this very applicable post! I’ve been doing cupcakes for a friend as she’s starting her bakery and this will help me get better images!
(Just so you know, the link to mat boards under Tip #9 doesn’t work.)
Thanks for the tipps, just the photos alone are inspiration enough to keep me busy for a while :-)
Great tips and photos! As I am NOT a professional photographer, I REALLY need to improve my food photos on my blog. Now all I need to start is a better camera!
It’s very easy to find out any matter on net as compared to textbooks, as I found this paragraph at this web site.
Thank you! This was useful advice that I will be implementing on my food blog! As a total newbie at photography, I love the easy step by steps that you gave. I will be getting mat boards this week!
These ideas are so great. Very interested in it. Answered some questions I had.
Joanna
http://Www.jesimages.zenfolio.com
Super great tips – I can’t wait to start implementing some of them into my photography :)
Thank you. I needed this right now. I am getting frustrated with only taking pics of the kids. They are all starting to look the same. Hopefully this will give me a break
Unfortunately your lighting is far from professional. Food should be lit from above and behind, using a reflector or other fill light for the front. That’s food photography 101.
It is my professional opinion that there are no rules to lighting in food photography! Depends on the look and feel you are going for.
I’m no professional, but I certainly love your photography style. I think the most important thing is how YOU feel about it. If you love it, then keep doing what you’re doing! I appreciate GUIDING information, but as you said Jen, I think that there are no rules to lighting. It’s a matter of taste and opinion!
Hi Jen! Thanks so much for this lovely, informative post! I am just starting out as a “food blogger” of sorts, and I have found that aside from “finding my voice”, the hardest thing for me is taking great photos! I really appreciate the simple and helpful tips. Thanks for sharing! I look forward to learning more from you soon!
Good Job Jen! These are awesome! I really want to learn more about food photography. I hope you could write more of this in the coming months especially that Christmas holiday is coming. Thanks for this inspiration.
I am so excited to discover your website. I am just drinking in all the information about Food Photography. I recently discovered a love for taking food photos, so I decided to blog about my learning process. Each post is just one little skill I’ve learned. It’s like the blind leading the blind, but when you’re starting out sometimes the photography tips out there can be really intimidating. I am “getting” most of your tips and can practice them right away. Some are going to require me to learn a new term but that’s a good thing! I am so excited to try each tip and write about it. I also love the Grateful Project and think I’ll give that a try as well. Thank you for sharing all your knowledge! I’ll definitely mention you on my blog when I use your tips!
I am so excited to discover your website. I am just drinking in all the information about Food Photography. I recently discovered a love for taking food photos, so I decided to blog about my learning process. Each post is just one little skill I’ve learned. It’s like the blind leading the blind, but when you’re starting out sometimes the photography tips out there can be really intimidating. I am “getting” most of your tips and can practice them right away. Some are going to require me to learn a new term but that’s a good thing! I am so excited to try each tip and write about it. I also love the Grateful Project and think I’ll give that a try as well. Thank you for sharing all your knowledge! I’ll definitely mention you on my blog when I use your tips!
Thank you so much for sharing these tips. I am a proud foodie and I love love love photographing foods and desserts. I am currently working on developing my skills to professionally capture deliciousness in my local area. I will pick up some various props to help compliment the dish. Thanks again😀👏👏
Hey, I think choosing the right crockery and the color of cookware is also important which you said in the article. This will enhance the image as well as color contrasts add depth in images.
Thanks for sharing.
This was great thank you!
Does anyone know of a book specifically focused on making fake food look real?
Like recipes to make ice cream out of mash potatoes and stuff like that so the food lasts through the photoshoot?
Please shoot me an email if you know of any.
[email protected]
the tricks are too much work i’d rater sit on my couch and get some fortnite dubs and postmates.
ya I agree with shalissa these tricks are killing animals and i’m an organic vegan so i will be reporting this website in my grandmas basement. So please stop this animal killing.
this is cruel to my aunt’s dog that just diedhis ashes were put in mashed potatoes and staged so i will be sure to start a petition to get this animal killing bums arrested
Wow preach Merl the gurlllllll
Thank you for the excellent tips. I love baking, but even more than that I love photographing my creations. I have nothing more than an iPhone camera, but I get some good shots when I use the right lighting, techniques and sometimes filters.