Zone System: A Little History Lesson
First, we will start with a little history lesson. The Zone System was developed by the well known photographers Ansel Adams and Fred Archer. Ansel Adams was known for his black and white landscape photographs and Fred Archer was a portrait photographer of Hollywood. The purpose of the Zone System is to determine a framework or more systematic approach for determining exposure and development (in film) that can be replicated and also that represents the scene as the photographer visualized. In a nutshell, they wanted less trial and error when it came to their art.
Although the Zone System was developed for black and white photography, and for film, it can also be used for color and digital photography.
What is the Zone System?
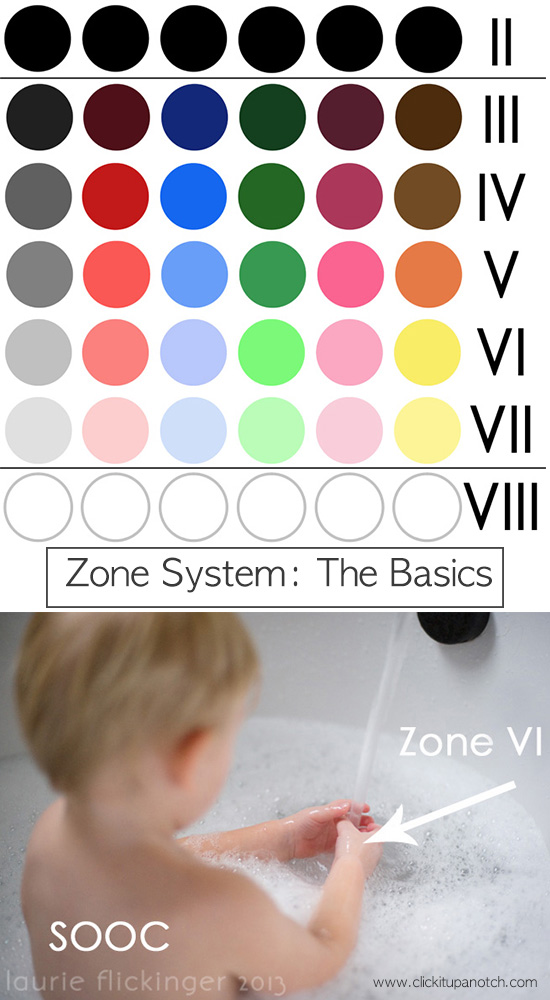
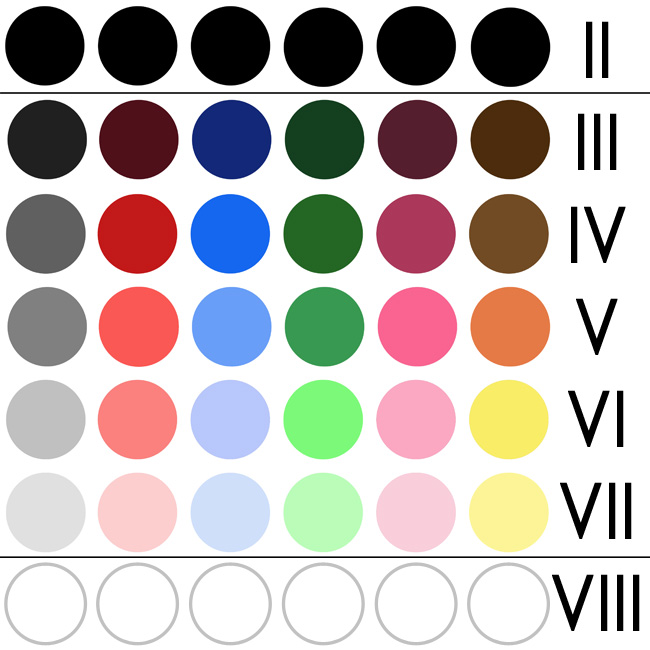
The Zone System divides the tones from white (with no detail) to black (with no detail) and all of the grays in between into 11 Zones (counting 0). And of course it can also be applied to the color equivalent of the gray tone. Neutral Gray is the middle zone, which is Zone V (5). I hope everyone knows their Roman Numerals!
Why Use the Zone System?
Many people use the Zone System exclusively. Whether you know it or not, if you are using spot meter, you are using the Zone System. Caucasian skin is metered around Zone VI (Zone 6 or +1 on your in camera meter). So, if you take pictures of people, and you meter off of the skin, you are using the Zone System. Of course we meter and adjust accordingly to get the perfect exposure. For skin on my kiddos, I meter around Zone VI. The best exposure for this little guy is about Zone VI -1/3 of a stop.
***For this post, SOOC image is unadjusted in ACR default settings (Blacks 5, Brightness 50, Contrast 25)


I meter for the skin when I am taking portraits, because the skin the most important area to me to get perfect in camera. There are always exceptions when you might under or overexpose by a little to retain detail in another part of the image. Using the Zone System helps me out the most when I’m shooting an image that does not have a person in it. While some people use the Zone System exclusively (meaning, in all images including portraits), I only use it when I am stumped at where to begin with my metering. The point is, if you have the zone you are metering for properly exposed (and white balance is good), exposure for everything else will fall into place.
The Zones Defined
There are 11 “zones” of print. When metering, you’ll basically only use the 5 middle zones. I’ll start by explaining all 11 zones, then go into the 5 useful zones in more detail.
Zone 0 (0)– Black, no detail or texture
Zone I (1)– A slight step above pure black, again no texture or tonality.
Zone II (2)– Black but with first hint of texture.
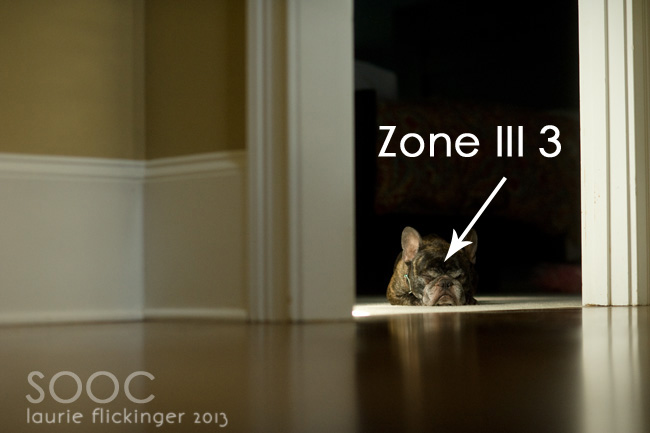
Zone III (3)– Very dark tones that shows visible texture. Includes black, dark brown, navy, and includes detail. Foliage in the shade, dark wet wood, dark rocks in rivers/streams, dark fur in animals. Will read -2 on in-camera meter.
Zone IV (4)– Royal blue, purple, burgundy, dark red, and dark green. Evergreen trees, deep blue sky, fairly dark skin, dark stone, landscape shadow. Will read -1 on in-camera meter.
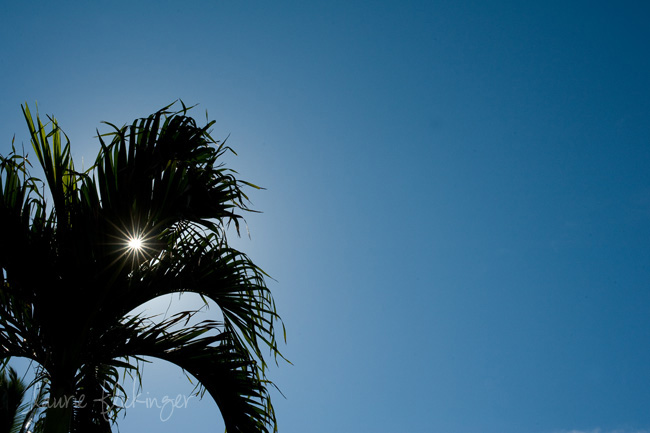
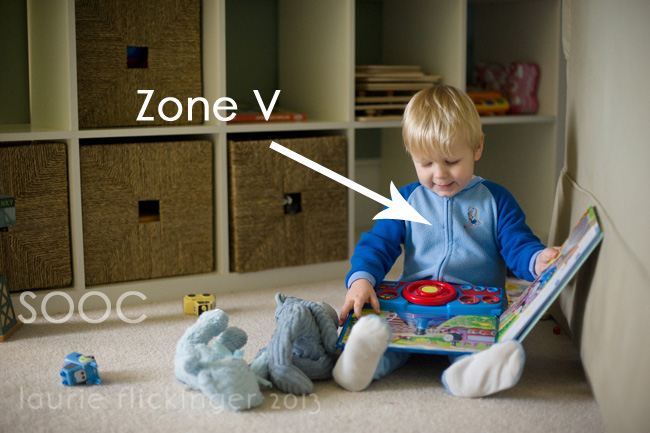
Zone V (5)-This is middle gray. 18% Gray card, average blue sky How to Meter Using the Sky, medium red, green, blue (think primary colors), dark orange, most grass, medium skin tones. Reads “0” on in camera meter.
Zone VI (6)– Average Caucasian skin tone, most pastel colors, fog, light blue sky. Will read +1 on in-camera meter.
Zone VII (7)– White with detail, white fur, white clouds, white sand, snow, whites in running water. Will read +2 on in-camera meter.
Zone VIII (8)– Whites with little detail, bright white snow in bright sun, highlights on Caucasian skin.
Zone IX (9)– White without texture, approaching pure white.
Zone X (10)– Pure white. No detail or texture.
How do I use the Zones in practice?
1. Set your camera to Spot Meter.
2. Determine what Zone you will be metering off of and go ahead and spot meter off of that area.
3. Dial in the exposure according to the charts below.
4. Double check your exposure by checking the histogram, checking blinkies, or by chimping (whatever method you normally use) and adjust accordingly by 1/3 stops.
This will be different for Nikon and Canon users because the in-camera meter is set up differently.
For Nikons, the meter goes from +……..0………-
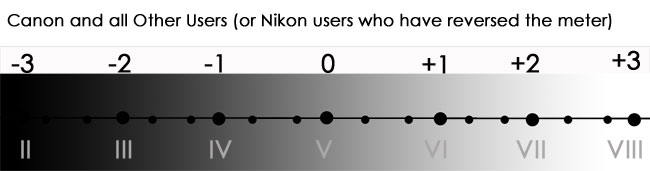
For Canon and Other users, the meter goes from -…….0…….+
Regardless whether your meter goes from positive to negative or negative to positive, the Zones are the same.
Zone III 3 = -2
Zone IV 4= -1
Zone V 5= 0
Zone VI 6= +1
Zone VII 7= +2
Below are visuals for both Nikon and Canon/Other:
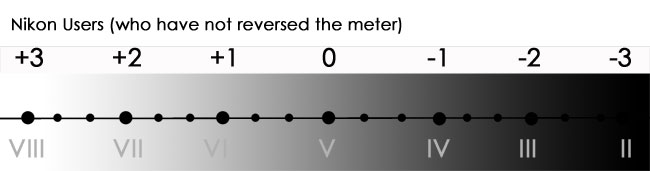
So, in metering, we usually meter for the blackest blacks or the blown whites, so the most important zones to look for are Zones III-VII (3-7). Although if you want to double check you aren’t blowing whites, or clipping blacks in an important part of your image, you may want to check your meter in those areas. As far as a jumping off point, it is best to go with Zones III-VII.
Disclaimer: This isn’t a “perfect” chart, but it is a visual to give the jest of it. And every camera may not shoot the same. If you choose to starting using the Zone System exclusively, you may want to play around with resetting your meter so that it lines up better with the Zones.
I have found using the Zone System most useful when photographing animals, landscapes, and macro.
Here are a few examples of images where I used the Zone System:
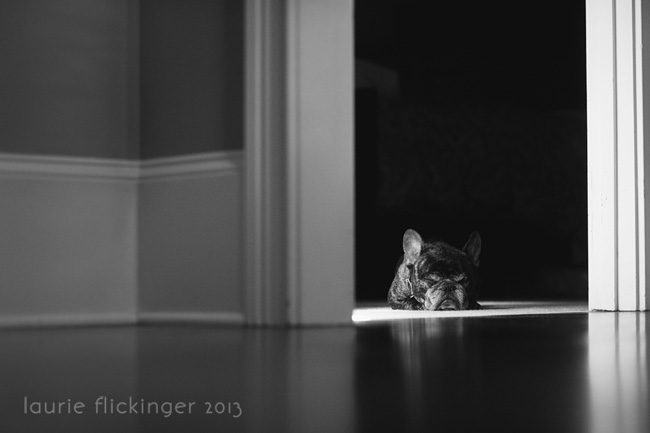
This is my dog Sanford. He is very dark brown almost black. Because he is furry, the dark brown has texture. So I metered off of his forehead and placed my meter at Zone III and -2 on the meter. I then took a picture and chimped (looked at my LCD and histogram) and moved my meter +1/3 a stop. These are my SOOC and edited versions.
Here is an example using the blue sky (Zone V):
For my kids’ skin, I normally use their skin. I usually over expose by +2/3 of a stop. Just as an example for this tutorial, I exposed for his pajamas at Zone V 5 or “0”.

Practice
As with everything else in photography, this will take a little practice to understand it. I recommend walking around the house, spot metering different objects in different light and determining what Zone it will fit into.
I hope this is helpful to those just starting out in using Adams’ and Archer’s Zone System. It is a great tool to have when double checking settings or in tricky situations. Thanks for reading!
Here area a couple of books I recommend reading if you would like a more in depth look at the Zone System.
The Ansel Adams Guide: Basic Techniques of Photography – Book 1
This one is on my “To Buy” list:
The Digital Zone System: Taking Control from Capture to Print


As a fairly new photographer I just want to say “THANK YOU” for this in-depth tutorial!! This is the best explanation I have read and can actually grasp. Very grateful!!
I used spot metering, but I never knew the zone system reasoning behind it. This is very interesting. Great info, Laurie!! Thank you!
I never heard of zone systems, but now I totally understand why I prefer to take pictures of my kids at +1 on the meter. I didn’t realize that was a CORRECT exposure – always thought I was overexposing and that was just my preference. SO glad I read this!!!
ME TOO! I just thought it was because my kids are so pale! Turns out I really do need to up my exposure for them!
You explained this so well! Thank you for making the Zone System so clear. :)
Awww! Thanks Lacey! I’m such a fan of yours :)
Awesome information. Thank you so much for sharing this. It’s an area I really struggle with, so I’ll be practising.
Thank you for this clear, concise explanation! I have been wanting to learn more about the zone system and thought it would be too overwhelming to memorize all 11 zones. How good to know that I really only need to know 5! Also, I find that this could be really helpful when photographing kids – you can get your exposure correct before they are in the frame.
thank you! :)
Ted, I understand what you are speaking about in the zone system tutorial, but I can’t seem to wrap my head around one thing. When using a spot meter which I have a couple, but they are digital meters. How through the spot meter do you determine what exposure is say zone iii and what exposure is zone v? I know on an older Pentax they converted or added the zone system to some of those. Do you have a tutorial or is there anyone describing using a spot meters for the zone system for dummies? Thx.
Hi Morgan! I’m not Ted, but I’ll do my best to help! Honestly, I’m not familiar with hand held meters, but I would think that just like an in-camera meter when both are set to spot. Lets say you point it to something that you know the correct exposure would be Zone V and the handheld says -2 on the meter and the settings were ISO 200 f/2 SS 1/800. I’m thinking you would change the settings +2 stops so that the exposure would read correctly. Each Zone is 1 stop. So your new setting would be ISO 200, f/2 SS 1/200. So you would be moving your meter to let more light in. Like I said, I am not familiar with hand held meters, but I’m guessing that when in spot meter mode, it is just like an in camera meter, where as in “incident lighting” or “reflective lighting” modes it would be different. Hope this clears it up a little :)
Hi! I usually shoot manual and never bothered with metering but would like to start. I am a little confused on the correct metering system. I have a Nikon D600 and the metering reads negative to positive.
Let say I am taking a photo of my son outside in the shade. when I look through the view finder and the metering arrow is to the left all the way in the negative side. Does this mean it will be underexposed? So to get correct exposure what would I do?
It depends on what you are metering off of. If you are metering off of your son’s skin, you should dial your meter to around +1 or zone 4. Then after you have set your exposure, your meter may jump around depending on what you are pointing it to. The deep dhadows may be off of the chart, so to speak. Make sure you have your metering set to spot. Hopefully this makes sense! Sorry I furniture see your comment sooner!
Thank you so much for this post. I love the precise easy way you explained it!!
thanx for sharing this post
UNBELIEVABLE!!!!! The penny just dropped. I have been reading (a lot of magazines) and hearing about exposing for a part of an image for some time now but I could still not figure out what they were talking about or how. This is the best explanation I have come across. Thank you so much for that. This is going to make a huge difference to the way I take photos.
Yay! Thanks for commenting :) it makes my day to know I’ve helped someone!
Thanks so much for this explanation of the zone system, the best Ive seen yet !
Thank you so much, Many have tried to explain and i’m appreciative for their efforts however you have made it a reality for me.
Thank you
:-)
Practice, Practice and more Practice!!
A friend of mine told me about your blog. I am so glad she did. I have been taking an online photography class and they do not talk about metering. I was so lost with trying to shoot in manual. I am practicing. What is 1/3 stop on the mean? How will that show up on my camera? I have a Nikon D5000. Thank you!!!
So glad you found the website! Courtney is great at getting a variety of people to share here :)
Each tiny hash mark on your meter is 1/3 of a stop. Each large hash mark is one full stop. . Depending how you have your camera set up, depends upon which way you over or underexpose . Factory set ups from Nikon, you over expose to the left I the center on the meter (make brighter) and underexpose to the right of center. That is the way I have mine set up, most other cameras are opposite. Hope this helps!
This was a very helpful article. Now to go practice! Thanks!
The zone system was figured out for film during the early days, sheet film in particular. With digital cameras,I am inclined to think that generous bracketing using matrix/evaluative metering mode would surely corner an optimally exposed frame from the lot. Bracketing is the norm these days. And thus if true, would this render the zone system obsolete for digital capture? Then there is the histogram to refer to. Would appreciate your enlightenment as I plan to acquire my first DSLR.
I still shoot mostly medium format b/w film and usually spot middle grey, opening up and stopping down according to the density of the subject and process normal. So far with the present generation of films and variable contrast paper, I do manage to churn out some half-decent prints. After reading your excellent piece on the zone system, I may not have to sweat so much in my darkroom in future. I live near the Equator. Thanks for the education Laurie.
Regards
Hong
Hi,
You’ll have to excuse my ignorance. I started off on DSLR rather late in life – at 62 – and there my learning curve is rather shallow
Thank you for taking the time to explain the Zone System. It was really helpful.
Thank you for all that you do!
Pinned,
K-
wait! hold the phone! you can reverse the meter on a nikon!? that is wonderful! how? i went from canon to nikon and that is a little bugger that the meter has the positive on the left side. wow. thanks for tip. now just have figure out how.
Don’t know if you found your answer or not, Lisa, but for the Nikon D7000 I can go into the menu, under Custom Setting Menu, choose (f) Controls, then choose (f9) Reverse Indicators, then change it there. I believe the menu’s are somewhat similar among the Nikon brands.
You are the FIRST person to explain the zone system and make me understand!
Thank you so much!
I can’t begin to thank you enough on how helpful this was! I never really took the time to figure out metering because every other article I’ve ever read was quite dull, but this was perfect! Thank you so much!
It’s like all of a sudden, I finally get it! Thank you so much for this!
what do u mean by “you meter off of the skin” ???
really great user friendly post.
thank you very much
cheers.
Thanks for this article. I am struggling with getting the zone system right in camera. I feel i know it theoritically….but practice is another ball game :)
My challenge is +2 and -2 areas. I am a Canon user. I feel when i meter an almost black object at -2, the picture looks like it is underexposed. Same for whites in +2. Everything looks blown out at +2. How can I get this right? Is the only solution to chimp and readjust my settings? which I am doing constantly i feel
It sounds like you are already on your way. If you feel that those zones are “off” to you, try looking at your histogram and trying again. Your camera may need another third or two thirds of a stop, or you may need to retrain your brain to see the depths of color a little differently. Keep plugging away! You’ll be able to “see” the scene soon enough and get your exposure spot on without much thinking.
Hi, error alert: Under “The Zones Defined” Zone 9 Roman Numeral is IX not IV. :)
Great article in explaining the zone system. So if I want to go from one zone to another, say VI to VII is that one full stop of either opening the aperture one stop or dialing the exposure compensation +1? Or is it +1/3 on exposure compensation?
Hit is one full stop per zone. You could use exposure comp or adjust your exposure triangle (ap, ss, or ISO) to compensate.
Que buena explicación gracias !!
I have been shooting in manual for years, and understood using the various methods (Aperture, shutter speed and ISO) to adjust for lighting but as much as I have read and tried to figure out, I never understood how to use the camera for metering. I’d just shoot and adjust, guessing what settings to make. I finally get it!!! Yay!!! And even if I use a different mode of metering now and then, I know what I’m looking for on the metering chart. So excited as I’m walking around my house taking pics at 10:00 at night to FINALLY understand. Thank you so much for this awesome article.
Thank you so much for your comment! Made my day :)
Thanks to my father who informed me concerning this weblog, this web site is really awesome.
http://usedofficechairs.in
Thank you for you helpful info !!!
Thank you. It took me a long time to get what “meter off of” means. :) This help a lot.
The zone system was formulated by Ansel Adams and Fred Archer. Take into account that it’s used for taking a picture and making a positive copies in the dark room (where the numbers are reversed when working with negatives),
In today DSLR word is used for taking a photograph, when working with camera raw and editing in photoshop but the zone numbers are never reversed because you get a positive raw (image) directly from the camera.
Remember that just using the zone systems literally will give you a photo that is exposed correctly from a technical view but not necessarily the correct exposure for that photo, that one is on the hands and brain of the photographer.
FWIW/BTW, Nikon DSLRs these days come with the same meter and dial orientation as Canon/Sony/etc – but you can put it back to the origial mode via the menu system. Nikon did this originally so you could ‘pull’ the match-needle meter with the top of the aperture ring. There are photographers now who have never used an aperture ring, and Nikon could hold back their system only so long for old guys like me :-).
Also, recent Nikons have a sort of semi-manual mode, where, if you’re in aperture mode, turning the speed dial changes the EV, and so speed. Vice versa if you’re in speed mode. The advantage over full M is that if the lighting suddenly changes, your exposure changes to suit. The disadvantage is that the exposure can change – and it’s pretty easy to forget that you have an EV dialed in. I alternate between this mode and full manual.
This article was written before Nikon made these changes. It’s still about the best intro to using the Zone System with digital cameras out there, but could use some minor updates…
Thank you. I already understood the concept but I was looking for a list of common things and where they usually fall. Great explanations.
Thank you!! Very helpful!