*Post contains affiliate links.
When I first started using my DSLR on a regular basis I really began to understand why having a trusted and consistent photography editing workflow when handling your images was so important. In the first few months of shooting and editing consistently, I found myself buried in a ridiculous amount of files, folders, copies of files and duplicate images. I was grasping at straws saving images all over the place without any rhyme or reason to what I was doing.
And I was frustrated.
Once I began doing photo shoots for clients, I knew it was imperative that I get a system in place. I sat down and organized my thoughts about a editing workflow and organization system for my photo shoots.
The system I came up with has been working well for me, so I wanted to share my process in hopes to encourage you to start a system of your own if you don’t already have one!
This system will work well for photo shoots or just every day general photos that you might be taking of your family, your life or just for fun!
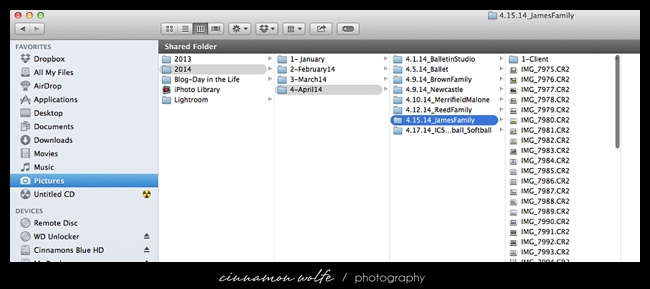
Once I am done shooting I import all the digital files from my CF or SD card onto the hard drive of my computer. I organize all of my files by year/month/date _event.
Since I sometimes shoot different events on the same day, this system works well for me to keep everything in its place and easy to find!
Once the images are copied to my hard drive, I eject the CF or SD card and put it back into my camera and format it. This way I know the card is fresh every time I go to use my camera and I don’t run into double copying files onto my computer.
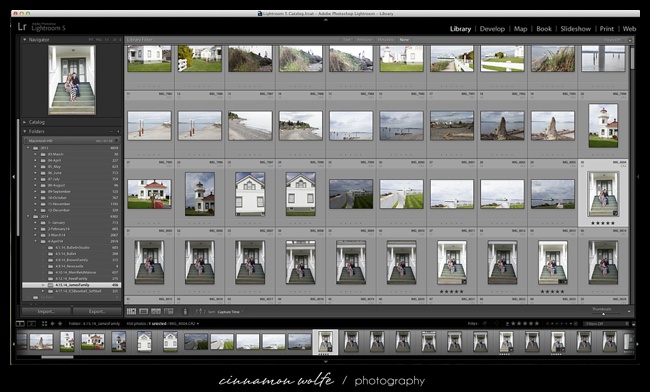
Then I open Lightroom and upload the event.
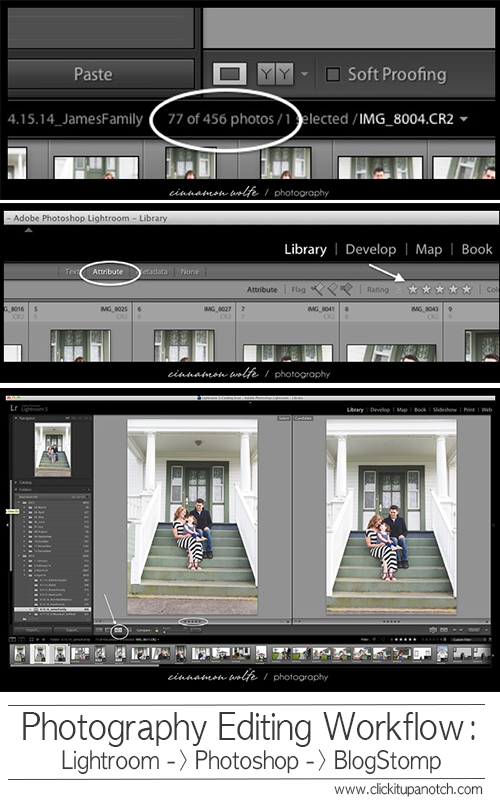
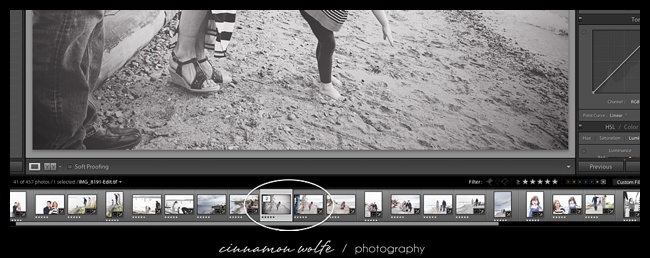
Once all photos are uploaded into LR I begin my cull. I take a run through each photo and look for a few things. I look for closed eyes, weird expressions, blurry or out of focus shots, “practice” shots, or shots where exposure was so severely missed that it really is not worth fixing in post processing. I also look for amazing shots or favorites straight off the bat.
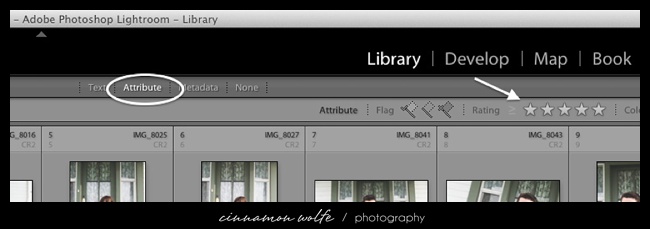
I put my fingers on the #5 key, the x key and the “next” arrow key. (The 5 key will rate the photo 5 stars The X key will mark the photo as rejected.)
If I absolutely love a photo or series of photos in one pose I click the 5. If eyes are closed or its blurry or something is really wrong with the photo and I KNOW I will never use it again, I hit the X key, and then just keep clicking the right arrow key until I get through the entire session.
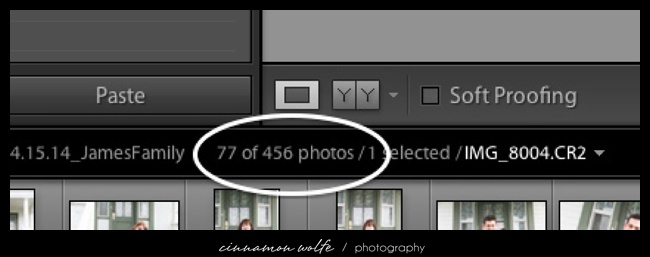
Once I get through the initial run through I check to see how many photos I have marked in each category. In a typical photo session I upload around 350 – 400 images. I usually have around 100 marked for deletion and 100 marked as 5’s.
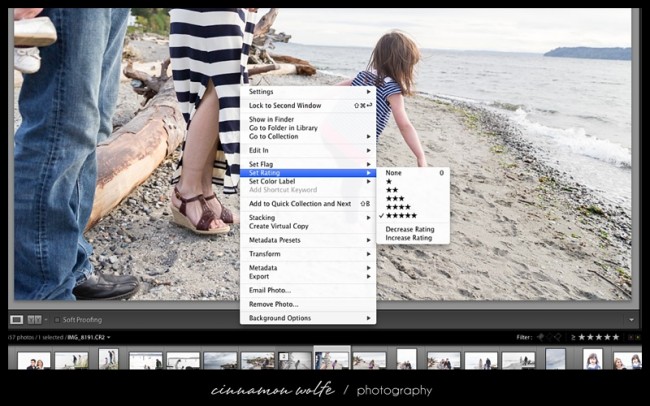
Once I am done with the initial run through I separate out my marked for deleting photos and right click, remove, delete from disk. This permanently deletes those photos out of Lightroom and off of my hard drive.
Then I select my photos marked as 5 stars.
Many of the photos I marked as 5’s will be the same or very similar image but my subjects may have a different expression. I photograph a LOT of families with small children and we all know that small children do not sit still for long and they will often will showcase many different expressions in a very small amount of time.
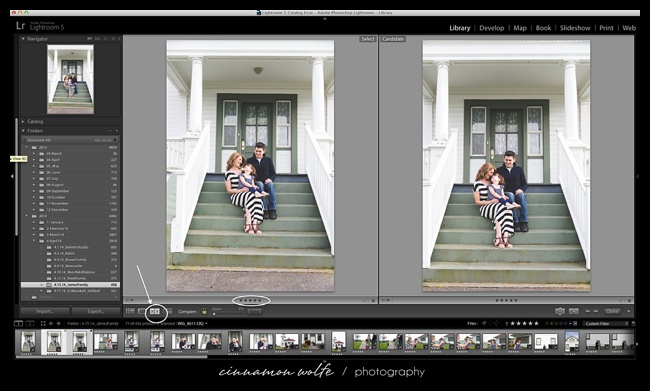
I go through all of my similar photos using the compare feature in LR and any photo that doesn’t “win” the comparison, gets marked with 4 stars which I call my “runner ups”.
I will go through all of my 5 photos and narrow down even further. After looking at the full set of my favorites, it is easier for me to pull out the best of that bunch. Anything that doesn’t make that cut gets changed to a 4 star rating.
This should leave me with between 15-40 final images that I am going to edit for my client. My photo packages come with galleries of between 15-40 images so depending on the package the client wanted, I narrow down accordingly.
Once I have my final set of images to edit, I begin going through them one by one to make minor changes to exposure, white balance, highlights, contrast, clarity, sharpness and profile correction. If I have many in the same sequence/lighting I will use the Sync feature in Lightroom which saves me oodles of time!
Once I am satisfied with the photos in LR, I will take a few over to Photoshop if I feel like they need some major work or if I want to apply a special action. The process to do this is so simple; I was shocked when I first learned how to do it!
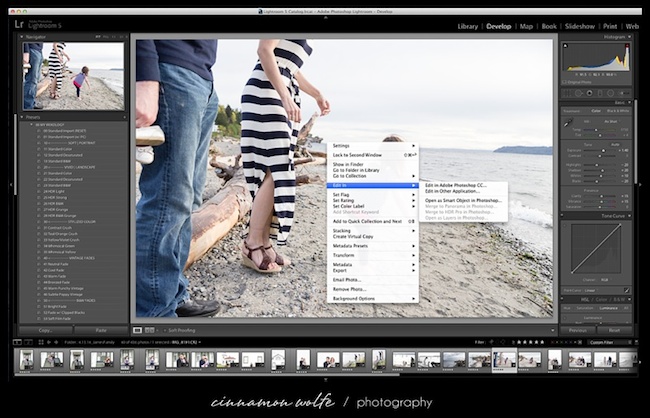
When in a photo in LR, simply right click and select, “edit photo in PS”. This will automatically open the photo in PS, and I can apply select actions or editing to the photo in PS.
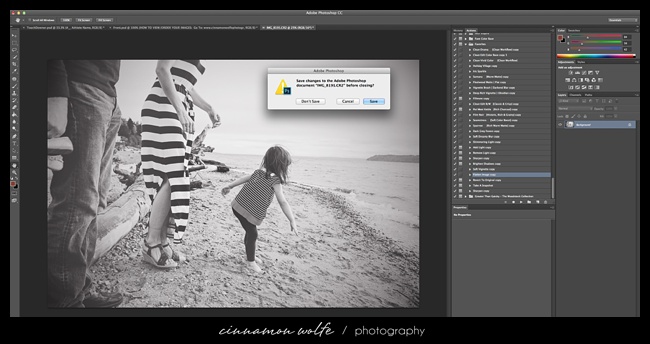
Once I am done with it in PS, I simply flatten the image, and then exit the photo. It will prompt me to save and I click yes and then the image is transported back to LR with all of my PS changes.
So now I have two images in LR, my pre PS photo and my post PS photo.
I then change the rating on the pre PS photo to a 3 and leave the rating on the final edited photo as a 5.
After I am done editing all of the photos I have selected as finals, its time for exporting!
Exporting photos in LR is extremely easy and so flexible depending on what you need. I recently added BlogStomp to my toolbox which has made my exporting process even easier!
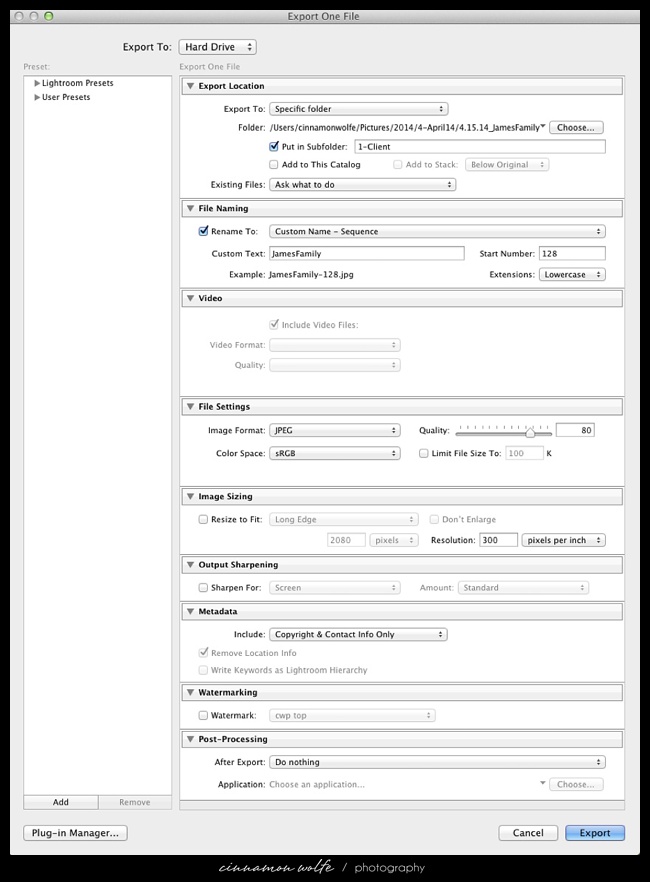
Once I am done with my final set of images, I export them back into the original file folder with all of my RAW files. I put them in a folder called Client. I export them at 80% and 300dpi.
Then I choose one or two photos from the set, put them in BlogStomp to watermark them and then save them to my shared Dropbox folder on my computer. These photos I use as sneak peeks to post to Facebook and Instagram. Since I have Dropbox on my phone and laptop as well, the photos I have saved in Dropbox are accessible from all of my devices so I can upload to FB or IG on the go!
Then I choose the entire set of images and put them in BlogStomp and create collages from the set that I will use on my blog. I save all of those collages into my Dropbox folder as well. Then when I am ready to blog the session I have all of the images sized and ready to upload into my blog.
I upload the final images to the client gallery and send them an email letting them know everything is ready.
Once I got this system down, my editing process time decreased by about 50%. That is more time I can spend growing my business or spending with my family.






Thank you for sharing! I have read several work flows from a variety of photographers and none made as much sense as this one. The beginning of my workflow is the same as yours, but I didn’t know about marking photos with an x. I like your rating system, I always feel so overwhelmed about which ones I liked or didn’t like when they are similar so I have to click on each one. I also didn’t realize that I could open PS from Lightroom. I am very excited about this new method. Thank you!
Cindy, I am SO glad this article made sense to you and will help you with your workflow!! Like you I was constantly overwhelmed with how to organize my photos after a shoot and I decided to try and make it as simple as possible and it really worked! Also, deleting the “bad” photos from the very beginning really helped me to narrow down and unclutter the set of photos from my shoot. I’m so glad I could help! =)
I just want to say thank you from the bottom of my “trash” icon on my camera. I haven’t even begun to get to the meat of your article. You had me at “I format my SD card” because I have always just deleted each picture. It isn’t that bad unless you have 300 pictures to take care of and you spend 10 minutes doing it! I use BBF so I sometimes lock an image on accident so I need to look for those. BUT NOT ANYMORE! Oh my, you have just made my life easier so thank you, thank you, thank you!!
Jen! you are VERY welcome!! I should add that it is recommended that you ALWAY format your SD card instead of deleting the images on the camera itself. When you delete them in camera they leave info behind that continues to clog up the card. It wont take long before the card reads full even though there are NO images on it. Formatting the card after every use (after you have MADE SURE that your images transferred correctly and are backed up) is the healthiest alternative for SD cards.
Thank you so much of this! I have been struggling with my workflow and it takes me days to cull and edit. This seems so much easier. I can’t wait to get going on my next session. I do have one question. I have LR4 and PSE10 . When I click on edit in PSE LR opens PSE and makes a copy of the image with .psd. However, it doesn’t open in Elements. I have to click and drag that file to Elements. Any reason why this is happening?
I’m so glad you found this helpful Carolyn! I don’t actually have any experience with PSE10 so I’m not quite sure if the functionality is the same. I would maybe google “editing images in both LR and PSE” to see if you come up with any helpful info!
Hi Cinnamon, thanks for the great article :) wanted to ask how to convert images from RAW to jpeg in LR. Thank you!
Sure thing Julia! The great thing about LR is that you don’t have to actually convert the images to jpeg. When you export the images out of LR…that is where they convert to jpeg. If you see in my picture up above in the post of my export settings, under File Settings I have jpeg selected. When I export the photos out of LR they are automatically saved as jpeg. Easy Peasy! =)
Thank you for such a quick reply, Cinnamon :) oh wow! that’s super easy! one more question – do you convert the files into dng during import? some people do, as it saves space but I’m not overly sure about it
No problem Julia! I do not change them to dng. Haven’t really had a need to as this workflow has been working out really well for me.
Great read!! Great ideas!! Any words of wisdom about using presets during editing?
Sybil, I love presets as well and since those are in LR you don’t even have to go to PS. You can basically follow this same workflow and apply your presets as part of your normal editing process and then just skip the transfer to PS and back step. I have a couple of go to presets that I use on top of just basic correction of RAW images and don’t take every image over to PS so it saves even more time! Thanks for asking. =)
Great article. I need to delete some of my photos that are not up to par.
Madonna
MakeMineLemon
Madonna- I recently did this myself. I found myself keeping so many images just for the fear that I would one day need them or use them for something. But that space adds up quick and really could be used for something else. So recently I went through all my sessions and really cleaned out all of the RAW files from sessions that were OK images, but I didn’t edit or give them to the client nor will I ever really need them for anything else. It cleared out so much space! And in all honestly it felt really good to do it!
Thank you SO much! I love having client sessions but usually get overwhelmed in post processing and it takes up ALL of my free time. I’m excited to try your workflow and I greatly appreciate you sharing!! :)
Samantha I can totally relate. I figured out right away that if I didn’t get a handle on this it would totally get me overwhelmed. This process has really helped to make things simple and straightforward so I dont feel intimidated by the process anymore. =)
This post was so helpful! I can’t wait to get some free time to go through and organize all my monthly photo sessions with my son. I have a question on the first step – how do you import the photos directly to your hard drive? Every time I plug my camera in or import from the card, iPhoto opens and I end up importing them there but then the photos aren’t organized on my hard drive so it’s always a headache when I try to find the file to edit in PS Elements. I’m a new-ish Mac user, so at first, I thought iPhoto was great but now would like to use another way to keep photos organized.
Kara…I totally know what you mean!! iPhoto was driving me insane as well when I first started using Mac. I was so used to windows that it just didn’t make sense to me. I can’t remember if I disabled it, but when I insert my SD or CF cards it doesn’t open anymore. I simply open up my Finder and navigate to the appropriate file under Pictures and then create the folder for whatever I am uploading. Then I open the SD file and copy/paste all of the images over. If you have LR open when you insert your SD card, it will also try to instantly import the images so you will have to cancel that out as well so it doesn’t copy the images there first. That would result in the images being in two spots on your hard drive taking up even more space. I’m sure if you go into your settings in iPhoto you can change it to no longer open upon insertion of a card. Hope this helps!!
I love hearing about other workflows, thank you! I was wondering if you use multiple catalogs for clients or events or if you just import to one main catalog. I struggle with the “tweeners” since there seem to be many more of those than the real winners. I don’t want them slowing down my catalog.
And, I have one more question, do you keep all of your images on your hard drive?? I keep hearing that is bad. (I do have an online backup). Thanks!
I have not done multiple catalogs until recently when I read that once a catalog gets to somewhere between (10k and 15k, I think?) images it will start to really bog down and run slowly. So now what I am doing is creating catalogs in 6 mo increments. So this year I have a Jan-June catalog and a July-Dec catalog to continue on with my yearly/monthly organization flow.
I also have issues with the “tweeners” as you call them. Love that name btw! If I shoot 300 images and delete 100 and keep 50 that still leaves me with 150 images just floating around not doing anything. I do have trouble getting rid of them, but now when I switch catalogs, I take a day to go through and delete all of the tweeners. Its hard but it has to be done!! =)
And I do keep images on my hard drive but they are also backed up on a external 2TB hard drive as well as my Apple Time Machine!
Hi Cinnamon
Thank you for sharing your workflow ideas. It showed me some interesting insight to other people struggles which are not completely different than mine… ;-)
Maybe other could find inspiration in my workflow:
1) Overall organisation:
I have a similar file organisation than you. I have folders named “year-month-day event” (i.e. “2014-08-21 Weird Breakfast at Tiffanys”) since I want a flat structure as possible. Having all events in one level, its easier to search for the event you had somewhere last month.
Below this folder, I have folders that describe my workflow for each event. All RAW images from the camera are going into a folder called “0 RAW”.
2) Selection 1:
Here, I use the software Nikon provides for free: ViewNX 2.
I go through all my pictures rating them with 1 to 9 by simply using the number buttons on the keyboard. Images I do not like get a 9 – images I like get a 1 to 4.
After going through this, I should have about 30 to 50% of all images rated as 9 (to be deleted) and about 50 up to max. 80 images rated as 1 to 4. The “9” get all deleted, erased, terminated, full stop.
3) Selection 2:
All the better rated images are now loaded into Aperture. I love this software, because the handling is soo easy. It was a shock to me hearing that Apple discontinues this great piece of software but I am still very confident that they bring something similar next year and do not leave the place for Adobe.
In Aperture, I can do easy and fast clippings, adjustment etc. And if needed, PS is just a click away.
Here, I can do further selecion just by removing the image in Aperture – the original RAW file is still in the raw folder.
4) Additional Photoshop Editing
If I have very intensive Photoshop editings, I store them in a separate folder called “1 PS”. So here, I can gather all the special cases and editings in a project. After finishing, I also import the .psd files into Aperture.
5) Exporting:
All the images left in Aperture (max. 30 to 50 is the goal – but I don’t meet it all the time…) are then exported from Aperture as JPEGs to a folder called “8 Publish” in original size and additionally as web compatible versions into “8 Publish small”.
6) Clean up:
When I am confident with the result I exported, I can easily go back to my RAW files and wipe all the files that have no rating at all – because I have selected all the best I am confident with.
The Aperture project is then getting exported as a new mediathek and stored into the folder “9 Aperture Lib” and the whole project is getting archived to the NAS. That will free up my computer for new projects.
Sum up:
The hardest step for me is step 2. But there are two good psychological helpers behind me:
a) NO ONE EVER wants to see more than 50 images of a single event. Not even clients!
b) The internal harddisk is already crowded and every single deleted image brings me back some space.
Hope this helps some people out there…
Thank you for sharing Nathalie! I totally agree with you that clients never want to see more than 50 images. Its just to overwhelming for them. I used to have trouble deciding which images to actually show them because I wasn’t sure which one they would love more (smiling or serious for example) so now part of my packages is that they pick their favorites. I know from experience that when I am given 50 images of my family, I will LIKE all or most of them and I will LOVE about 10. Those 10 are where its at.
( My website is under construction so have popped my FB page as my website for the moment. )
Hello, Thank you for the edit/work-flow tips – I pretty much do the same, although I tend to do my basic edit in LR as you do, but then run actions over all my images in PS so have to send all my images over – the way I do this is by highlighting them and seining them to edit in PS – apart from this slowing me down quite a bit, the problem I experience is that not all the images go over, I then have to jot down all the file names of all the images in LR, then go to PS and cross off which ones have come over, then go and re-send the ones that didn’t make it over – obviously this is hugely time consuming!! but I haven’t managed to come across a solution for this yet – I wonder if any one could help me?
Michelle- i haven’t tried to take all of my images into PS before, but I can totally see how that would be so frustrating. Have you tried maybe taking them over in batches? Maybe like 10 at a time? Not sure if that would help or not, but its an idea!
Yes, I do it in batches, and every time it misses out a random few – even in batches as small as 10 – I think 3-5 it just about manages – but it is still so time consuming and frustrating – but thank you anyway – I will continue my search for a solution :)
Hi, Thanks for sharing I can’t wait to try out your culling process :) Just curious why do you export at 80% and 300dpi?
Thanks
Sheila, thanks for the question! I export at 80% mostly because that reduces the actual files size that exports. If I export at 100% the file size is around 5GB and when I upload them to my online gallery the upload process takes FOR.EV.ER. I found when I export at 80% that reduces the file size to around 2GB and they upload much faster. Quality remains the same with 300ppi so they can still print big!!
I am wondering the same as Sheila! Why do you export at 80% vs. 100%??
When my question posted you had apparently already answered but I didn’t see it b/c I had not refreshed my screen in the last hour!! :)
You shared that when you export at 80% then the file size is about 2GB. Is that the size PER image, or for the total final client folder?
I ask b/c I am looking to get USB drives to use for clients photos instead of CD’s and I was looking at 2GB drives, but if that is per image I am in a different boat than I thought!
Sorry about that I meant 2MB per image not 2GB. That would be pretty ginormous. LOL. Each image ends up being about 2MB each as opposed to 5MB. A 2GB drive should work well depending on how many images you are planning to put on the drives! =)
Thanks for the article. You and I have very similar workflows. My questions is, why do you copy to hard drive first instead of uploading straight to LR? I have seen others photographers do this to and wondered about the benefit. When I am done, I save my “fives” and their original to a external hard drive and delete the rest. Also, do you find that the 2MB file size will still print a nice large image for the client? I would like to size mine down too. Unfortunately, when my instructors covered file sizing, my eyes glazed over :/
sorry, I see the answer about file size!
Hey Tracy! Apologies for the delayed response to your question. The reason I import right to my hard drive first mostly has to do with my organizational system. I have a very specific way I want my files organized on my hard drive and when I was importing through LR it kind of messed up my system. I could have taken the time to figure out exactly how to make LR name and file everything the way I wanted it too, but I didn’t feel like investing that time was worth it. I already had a system for organization so it made more sense for me to use the alternate method of importing to HD first and then importing to LR. Thanks for the question! =)
Thank you so much for sharing I went straight to doig this the other night after my daughter went to bed. I felt like I was never going thru the family ones and dumping. I feel cleansed and I have now done it for a recent shoot!! I have a question kind of random but when you are offering a client edited images on dropbox and you referring them to a site to print. I have been debating doing a digital images and not just prints especially for mini sessions..any tips or suggestions?????????
Nicolle, I am so glad this workflow has helped you!! I’m not entirely sure I understand your question, but let me take a crack at it. Sounds like you currently offer prints but want to switch to digital transfer through dropbox? I actually used to use dropbox for file sharing with clients but found that I ended up over-sharing because I wasn’t entirely sure which the clients would love the most. For example, say they purchased a package of 10 digital images from their session, I would end up providing them 20 because I couldn’t personally narrow it down to 10. I would have similar images with different expressions and would end up providing both b/c I wasn’t sure which one they would love more. My main goal is for my clients to LOVE their images, so I switched to using Shootproof. I can upload their gallery and they can pick which 10 they want (and purchase more also!) That way I am not just giving away the images for free and the client values them more because they chose to pay for the extra images. If you are looking for a reputable print company to refer clients too, I have heard MPIX is pretty good out of the online providers and personal experience I have had good results from Costco. None of them really match the pro labs but for the price they are decent prints. I hope this helps and if you have additional questions feel free to email me or find me on facebook. I am happy to help! =)
Thank you for sharing! My process is very similar to yours but I picked up a some helpful tidbits that I didn’t know!! Such little things but such big aha! moments.
Thank you!!
You did amswer my question perfect thank you. My follow up to that question is if u are using shootproof to pick say their 10 fav out of 20. Do u give them the digitals out of those or do u offer packages. If they purchase prints do they do it thru the site or do u take those favorites and apply them to your package how u think best. I offer print packages and having trouble finding a way without meeting with them to get them to see and pick their favorites then apply them to the package. I have just considered going to al a cart with a min order amount??
Love this!!! Thank you! I have a question and hope it is not silly… how do you format the card? Through your computer or when it is in your camera? :)
Hey Marissa,
It may depend on your camera but I have a D700 and I hold the delete button and “mode” button down at the same time and it will delete my images and reformat the card for me. So you do it in your camera :)
Thanks! Got it :) I have another question, sorry! You wrote this: “Once I am done with the initial run through I separate out my marked for deleting photos and right click, remove, delete from disk.”
How do you separate the photos you marked with an “x”? Thanks again!
This was very helpful, as I’ve just spent waaaay to much time trying to get somewhere with my Project 365 photos. But, do you upload to Instagram through your phone? I’m guessing you go to the dropbox on the phone, find the pic you want & the “share” to instagram? I want to post my project 365 to IG but can’t figure out how to get it from my computer to IG.
I looked through the comments above & didn’t see anything further on this.
Any reply would be appreciated!!
Yes, you can do it through dropbox or you can email it to yourself, open it on your phone and save to your phone and upload to IG that way. Good luck!
New to Lightroom but love your system here, I am going to sound really crazy. But…. once I edit my photos in LR then export, what is the deal with the catalog, I have no idea what the catalog is, why I need to back it up etc. Example if I edit and kep 15 out of 20 photos that I ave imported, well once edited and exported back to my drive…do I still need to worry about a Catalog back up every few months. I keep every photo I want to keep in 3 spots. Online and two separate Ex drives. I am so confused!
Also, if I ever want to edit an image in PS at a later date, that I have previously exported from LR, is that like starting from a JPEG?
This is SO helpful, thank you! I was just thinking last week now that business has picked up, I need to get a good system in place moving in to 2016! I’m going to try this out and likely adopt it!
I have a question about importing and exporting.
I understand and like how you download you photos from the card to the hard drive rather downloading using Lightroom.
This part is hard to explain, I was wondering after you do your sorting in light room, what happens to the files you have chosen to delete using Lightroom, outside of Lightroom. Are they not still on the hard drive, do you delete them some how or does light room some how remove them?
Thank you
Thank you for sharing this! It was extremely helpful to read. I am just starting out in photography, having bought my first DSLR a little over a year ago to document my family life with a new baby. I have a couple of additional questions for you, if you don’t mind. How do you back up your photos? Do you use an external hard drive or cloud storage or a combination? Also, do you eventually delete photos from your regular hard drive? I have thousands of photos and they are taking up a lot of room on my computer. I’m curious as to what people do when they are taking hundreds of photos a day. Also, I am in the market for a new desktop computer right now. I am a PC user, thinking of converting to a Mac. Is there anything I should know about selecting a computer screen for editing photos? Thank you for reading this.
Personally, I upload all my images directly to an external hard drive and use CrashPlan to get my photos backed up daily. Definitely can’t back them up enough. Macs are pretty true to color so if you switch to Mac just make sure your brightness is half way and you should be good to go.
Thanks for this tutorial. I will say that immediately deleting the pictures from your CF or SD card sounds extremely dangerous, what it something happens to your computer and you lose the images? I always make sure they are in at least 2 places before re-formatting my cards. Those 2 places are usually the computer and at least 1 EGD, usually both of them (and then monthly I back up all the folders to the Amazon Cloud that comes free with prime membership)