
Learning how to get the strongest technical photo straight out of camera will be one of the biggest keys to being able to achieve your creative and artistic visions. To do that you have to properly use exposure tips in photography.
Technical skills in photography aren’t everything. What is that saying about rules being made to be broken? But, it helps if you learn the rules before you break them.
Table to Contents
How do you get good exposure in photography?
There are a few steps to getting perfect exposure for every photo when you click the shutter button.
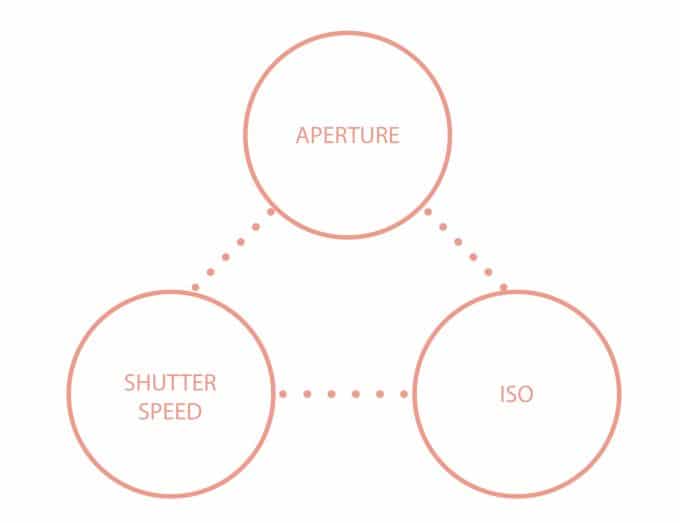
You need to know how the exposure triangle works and how each of the three areas impact the photo.
Two other important skills are learning how to read your in camera meter and learning to read the histogram. Let’s break those steps down.
Read more: Zone System: The Basics
How to get the right exposure in manual mode
In order to get correct exposure when you are shooting in manual mode, you will need to learn how aperture, shutter speed, and ISO work together.
When you change one of these three things it impacts how much light the camera will allow in to make the photo.
Once you understand what each part does, you can use them to help you make the best creative choices to allow you to achieve your creative vision.
Aperture
Aperture will impact the depth of focus for the photo. If you choose to shoot wide open, like f/1.8, then you will be letting a lot of light in. This photo will have a shallow depth of focus (less of the photo beyond your subject will be in focus).

If you choose to shoot closed down, like f/11, then you will be letting significantly less light in. Then you will have a wider depth of focus (more of the photo will be in focus).
Just for you: Simple Guide to Understanding Aperture (and How to Use it)
Shutter Speed
Shutter speed allows you to freeze motion (or could create a blurry photo if the shutter speed is too low).

The lower the shutter speed (like 1/50) the more light you will be letting in for exposing the photo. The higher the shutter speed (like 1/4000) the less light you will be letting in.
You will need a lower shutter speed in low light conditions and a higher shutter speed in bright sunny conditions.
ISO
Finally, ISO is the third part of the exposure triangle that allows you to let in more light for exposure.
When you increase your ISO you let in more light. This is often the last part of the triangle that I will adjust.
If I have set my aperture at f/2.8 and my shutter speed at 1/100 (and do not want to go lower) but my image will be underexposed, then I will increase my ISO.
The more you increase your ISO, the more digital noise you will see in your image so there are benefits to keeping it as low as you can.
The most important part of this is to use the shutter speed, aperture, and ISO together to get correct exposure. If one part of the triangle is off then your photo will be under exposed (too dark) or over exposed (too bright).
Read more: How to shoot in manual mode
What are the 3 exposure photography tips?
#1: Use your camera meter
When you are shooting in manual mode one of tools you can use to help set correct exposure is the camera meter in your camera. You can see it when you look through the viewfinder. This exposure tip will help you properly expose your photos.
Cameras have an internal light meter that reads and analyzes the scene to determine whether your photo will be properly exposed based on the settings you choose.
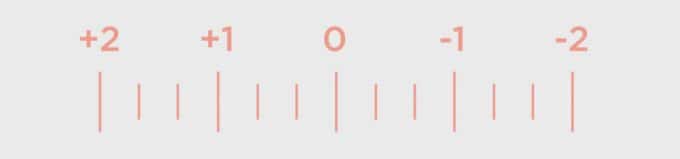
You can use the meter reading to determine if you need to make any changes to the aperture, shutter speed, or ISO to get proper exposure before you click the shutter. As you make adjustments to your settings, you will see the line on the camera meter move closer or farther away from the center of the meter (which is zero).
This is what the camera meter looks like when you look through the viewfinder. The line below the meter will move to the right & left as you change your setting to indicate whether you are over or under exposing the photo.

This doesn’t mean that you always want the meter to be exactly at zero. Sometimes you will need to expose a little to the right or left to get correct exposure.
This will depend on the light where you are shooting, the metering mode you are using (spot, evaluative, partial) as well as your artistic vision for the photo.
#2- Read the histogram
The histogram is a graphic representation of the tones in the image from darkest shadows on the left side to brightest highlights on the right side.
It is a great tool to use when you want to check to see if your exposure is on target. This exposure tips photography can show you how balanced the light in the photo.
Doesn’t have to be even
It does not need to have an evenly distributed histogram in order to have correct exposure. Sometimes the histogram will have more information towards the right or left side depending on the circumstances.
But you do want to make sure that you are not leaving gaps on either end without any information. That kind of histogram is showing you that your exposure is off.
Histogram examples
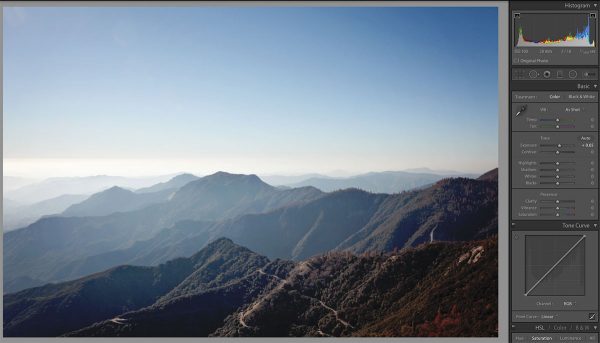
You can see the histogram on the LCD screen after you take a photo. Then use it to immediately adjust your exposure. You can also see the histogram in Adobe Lightroom after you upload your photos to the computer for post processing.
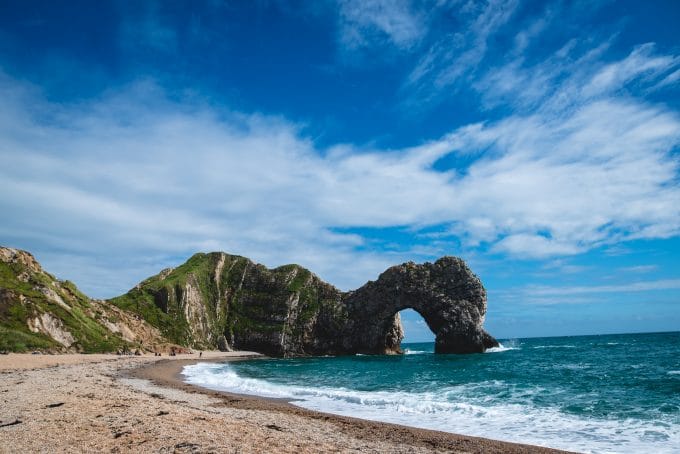
Here is an example of the histogram for a balanced photo. The box in the upper right corner from Adobe Lightroom. You can see that the pixels are evenly distributed from dark to light across the histogram.
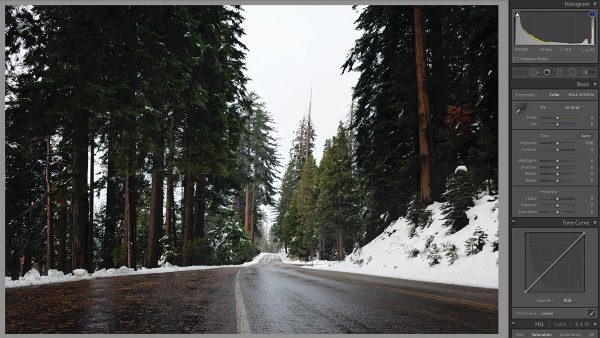
Here is an example of the histogram for a darker photo. See how the pixels are stacked farther towards the left? This indicates more shadows with a jump on the right showing the brightness from the sky.
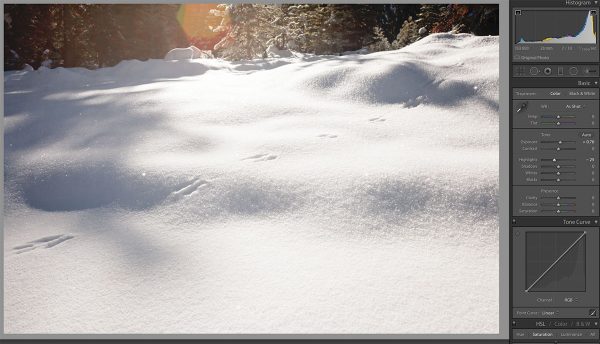
Here is an example of the histogram for a brighter photo. You can see that the pixels are stacked farther towards the right indicating more highlights because of all the snow.
#3- Use the Highlight Tool
Turn on the highlight warning on your camera. This will help you check the histogram. After taking a photo you can see from the blinking areas if you have clipped any highlights.
If you have over exposed your image the highlight will flash. It can also happen on areas that aren’t important to your scene. For examplea sky on an overcast day even when your subject is properly exposed).
Read more: Complete Guide to Understanding the Exposure Triangle
Exposure Tips Photography FAQs
A properly exposed photo is a beautiful photo. If the photograph is under or over exposed the subject will not be shown the way it deserves. Also these photos will not be sharp or crisp.
Underexposure is when there is not enough light in the photograph. Details will be lost due to the lack of light.
Over exposure is when there is too much light being let into the photo. This causes colors and details to be lost as well.
You can fix some exposure problems in post processing but it is not guaranteed you can fix it all. If you shoot in RAW vs. JPEG you are more likely to get more details out of your photos.
There is a few ways to fix this in Lightroom. The first is the exposure slider. This will help immesenly. You can also adjust shadows, and highlights in Lightroom. But just note not all photos can be fixed if not exposed correctly.
Just for you: How to fix an underexposed Photo in Lightroom
As you can see you are able to get correct exposure right out of your camera. Learn the exposure triangle, read your in camera meter, and utilize the histogram. These will all help you to get correct exposure straight out of camera.
Use these exposure tips photography when you are shooting and the easier post processing will be.
What are some tips you have for shooting in manual mode and ensuring you get correct exposure?


Your Barcelona Real Estate Agency
http://www.locabarcelona.com
Donald Hawkins Jersey.Beautiful price of Edawn Coughman Jersey?
Cannot miss the Nike Packers 12 Aaron Rodgers Green Team Color
Mens Stitched NFL Elite Jersey too.