
We all do it, we all start out in Lightroom and we see the panel on the right full of choices to manipulate that photo you’ve just taken of your adorable baby. For some it’s an exciting playground of opportunity and for others it’s completely terrifying.
No matter which category you fall under I bet we all start in one place when it comes to brightening a photo… exposure.
But today I’m going to show you how stopping there is not the only answer. I believe the BEST way to brighten your image doesn’t fall on just manipulating your exposure, but in three different ways! So today I’m going to share those with you.
Read more: 3 Lightroom Tricks You Did Not Know About
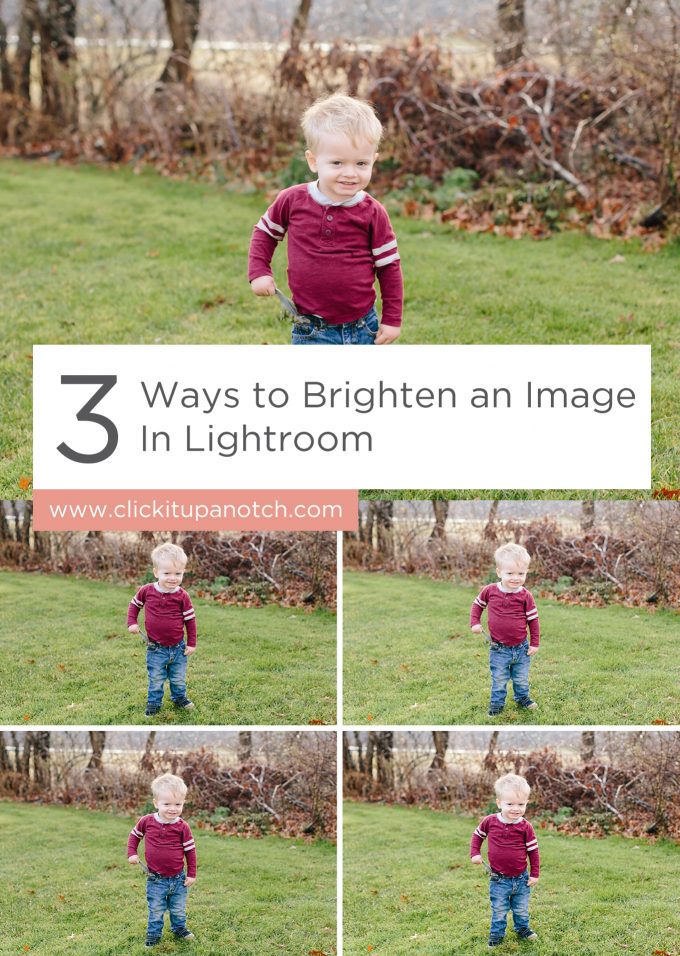
To start I’m going to share with you an image that has my own basic edits applied without the use of exposure, keep this as a reference point.

-
No.01Exposure
Next, I just manipulated the exposure by +.30 as you can see, the image overall has gotten brighter BUT you’ve lost quite a bit of ‘punch’ that the image originally had by using the exposure adjustment. This happens because exposure is brightening the image as a whole.

-
No.02Shadows
So moving beyond exposure, let’s work with shadows. Shadows is a great option when you still want to have a subtle adjustment but this time, rather than making the whole image brighter, this is only going to affect the shadows in the image. Adjusting this works great if you’re editing images from a dark location, say a wedding reception. By adding some light to the shadows you will bring back some of those details lost in those types of situations.

-
No.03Tone Curve
The third option I have for you all is actually my favorite. If you’ve never worked within the tone curve in Lightroom then my friend, you’ve been missing out! We won’t dive into anything beyond the lights in the tone curve today though. Adjusting the lights is a great option to brightening an image while still maintaining the pop to your image. Of all three options I feel that this one doesn’t need nearly as much manipulation to achieve the desired look you want, so go easy with the lights slider!

If I’m being honest, when I work on my own images I do a combination of all three but I manipulate one more than the others based on the desired look I want and the image I’m working with.

So I hope this mini tutorial helps you find ways to brighten your images beyond that basic exposure slider!


Should we be bringing the shadow slider down or up And do u have any more info tutorials on the tone curve.
Incredible quest there. What happened after?
Good luck!
fotballdrakter
I loved your tips here! Each little piece of Lightroom that someone makes understandable…every tip makes such a difference in this journey. Some days I feel I just will never make enough headway to make shooting in manual and raw and then editing…worth it, without someone sitting beside me! Today you “sat beside me”! Thank you, Judy Cramer –
This an amazing work which proves your efficiency! I feel strongly about the image bright and love learning more about image editing tips. If possible, as you gain expertise, would you mind updating your blog with more information.