Hi all, today I wanted to show you one of my basic clean edits that is in my workflow. I love this photo of my daughter that I took with my Lensbaby Spark![]() but as you can see it needs some brightening and warmth to it. So we will start with my SOOC photo.
but as you can see it needs some brightening and warmth to it. So we will start with my SOOC photo.

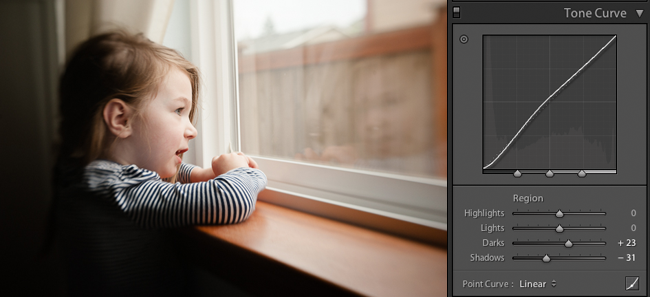
First I start with my photo in Lightroom![]() . How much editing I do in LR is on a picture by picture bases. But I can almost 100% guarantee that I use the tone curve on every photo. Below you can see the adjustments I did on the tone curve and I also warmed the photo up by adjusting my White Balance.
. How much editing I do in LR is on a picture by picture bases. But I can almost 100% guarantee that I use the tone curve on every photo. Below you can see the adjustments I did on the tone curve and I also warmed the photo up by adjusting my White Balance.
After that I head straight into Photoshop![]() and put the finishing touches on my photo. I always start with my skin. I either drop two or three points and check my CMYK values. I found that it was still slightly cool in spot so I used the curve layer and increased the yellows just slightly.
and put the finishing touches on my photo. I always start with my skin. I either drop two or three points and check my CMYK values. I found that it was still slightly cool in spot so I used the curve layer and increased the yellows just slightly.

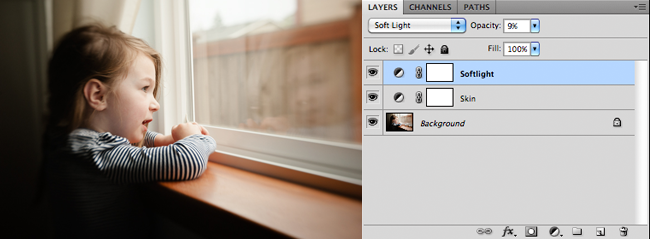
My second step again is to use a curve layer and change my blending mode to soft light. I love doing this because it gives my photo a slight pop. You must use this blending mode with a light hand or it can look over done. As you can see I only used it at an opacity of 9% and it gave the perfect amount of pop!
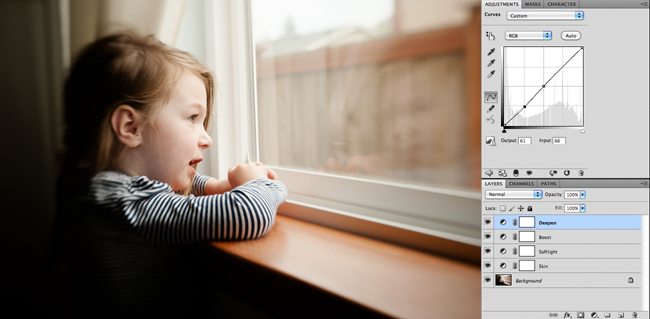
Next is a midtones boost, it just brightens up the photo and anything that seemed a bit dull has some life now. To do so, just grab another curves layer (are you noticing how much I love curve layers) and drop a anchor point right in the middle and drag it up to your liking.

After I do a midtones boost I always go back in and deepen my shadows that might have been brightened when I didn’t want them too. I always set a anchor point in the middle because I don’t want my midtones to be affected by this layer and erase everything I just did. I again drop another anchor at the half way mark between the bottom and the midtones and drag down to my liking.
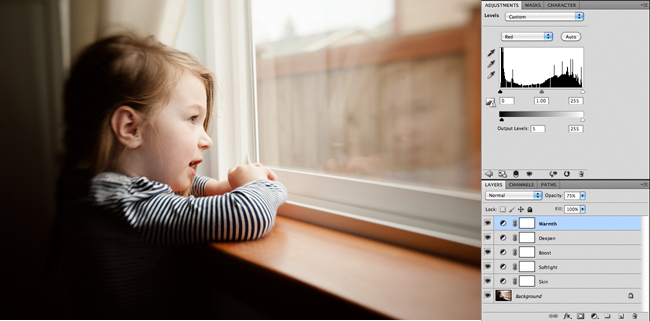
Last but not least, I am a lover of very warm photos. So sometimes I will use a levels layer to warm it up just a bit more. So with this one I went onto the RED and increased it every so slightly to +5 to give it that extra warmth that I love.
And here is a before and after of the finish product. Please let me know if you have any questions!

Disclaimer: This post contains affiliate links. Thanks in advance if you purchase something and support Click it Up a Notch.


Love this! So simple. I hate how my photos always look ‘dirty’ when SOOC. Then I end up going overboard. Which takes a long time. Which more importantly takes time away from other pictures. Which makes me a “one-snap-wonder” :)
Thank you so much for sharing this! I have been using LR and the RGB values for my curve/skin adjustments. Can you link me to a tutorial using photoshop CMYK values?
Do you happen to be a ClickinMoms member? If so I can link you to a great tutorial on there. Also they have a skin workshop in their store that is an incredible in depth book on skin tones for both LR and PS. It’s a bit pricey but CM is having a sale right now and you can get a bit cheaper. It’s well worth the price though, the book has an amazing amount of information.
NIce job Melissa! Great edit!
I would also like to know more about using photoshop CMYK values , do you have a link to somewhere I could learn more?
Do you happen to be a ClickinMoms member? If so I can link you to a great tutorial on there. Also they have a skin workshop in their store that is an incredible in depth book on skin tones for both LR and PS. It’s a bit pricey but CM is having a sale right now and you can get a bit cheaper. It’s well worth the price though, the book has an amazing amount of information.
Just found this article :) I too would love to know the values – i sign up for the newsletter – is that the membership you are referring to?