Earlier, Courtney posted a tutorial on how to make a watermark in Lightroom. Today, I’ll do a quick tutorial using screenshots on how to make a watermark in photoshop.
I’m using CS6 but this also works in Photoshop Creative Cloud, (Editors Note: In the video above I/Courtney recreated this same process, but in Adobe Creative Cloud on its newest version) but the steps should the same or similar in other versions of Photoshop.
Watermarking your images is very important when using your images on your blog or Facebook. This is a good way to advertise your business name to future clients as well as protecting your images from be used by someone other than yourself.
For those not in business, it is one way to protect your images from theft. And while watermarking won’t protect your images 100%, at least it is one more step to deter potential thieves.
I’m taking a Film class soon, so I need to make a watermark for my film work for this year. Let’s walk you through the steps on how to make a watermark in Photoshop. It takes all of about a minute if you have your logo pre made. If not, it takes about 2 minutes.
How to make a watermark in Photoshop
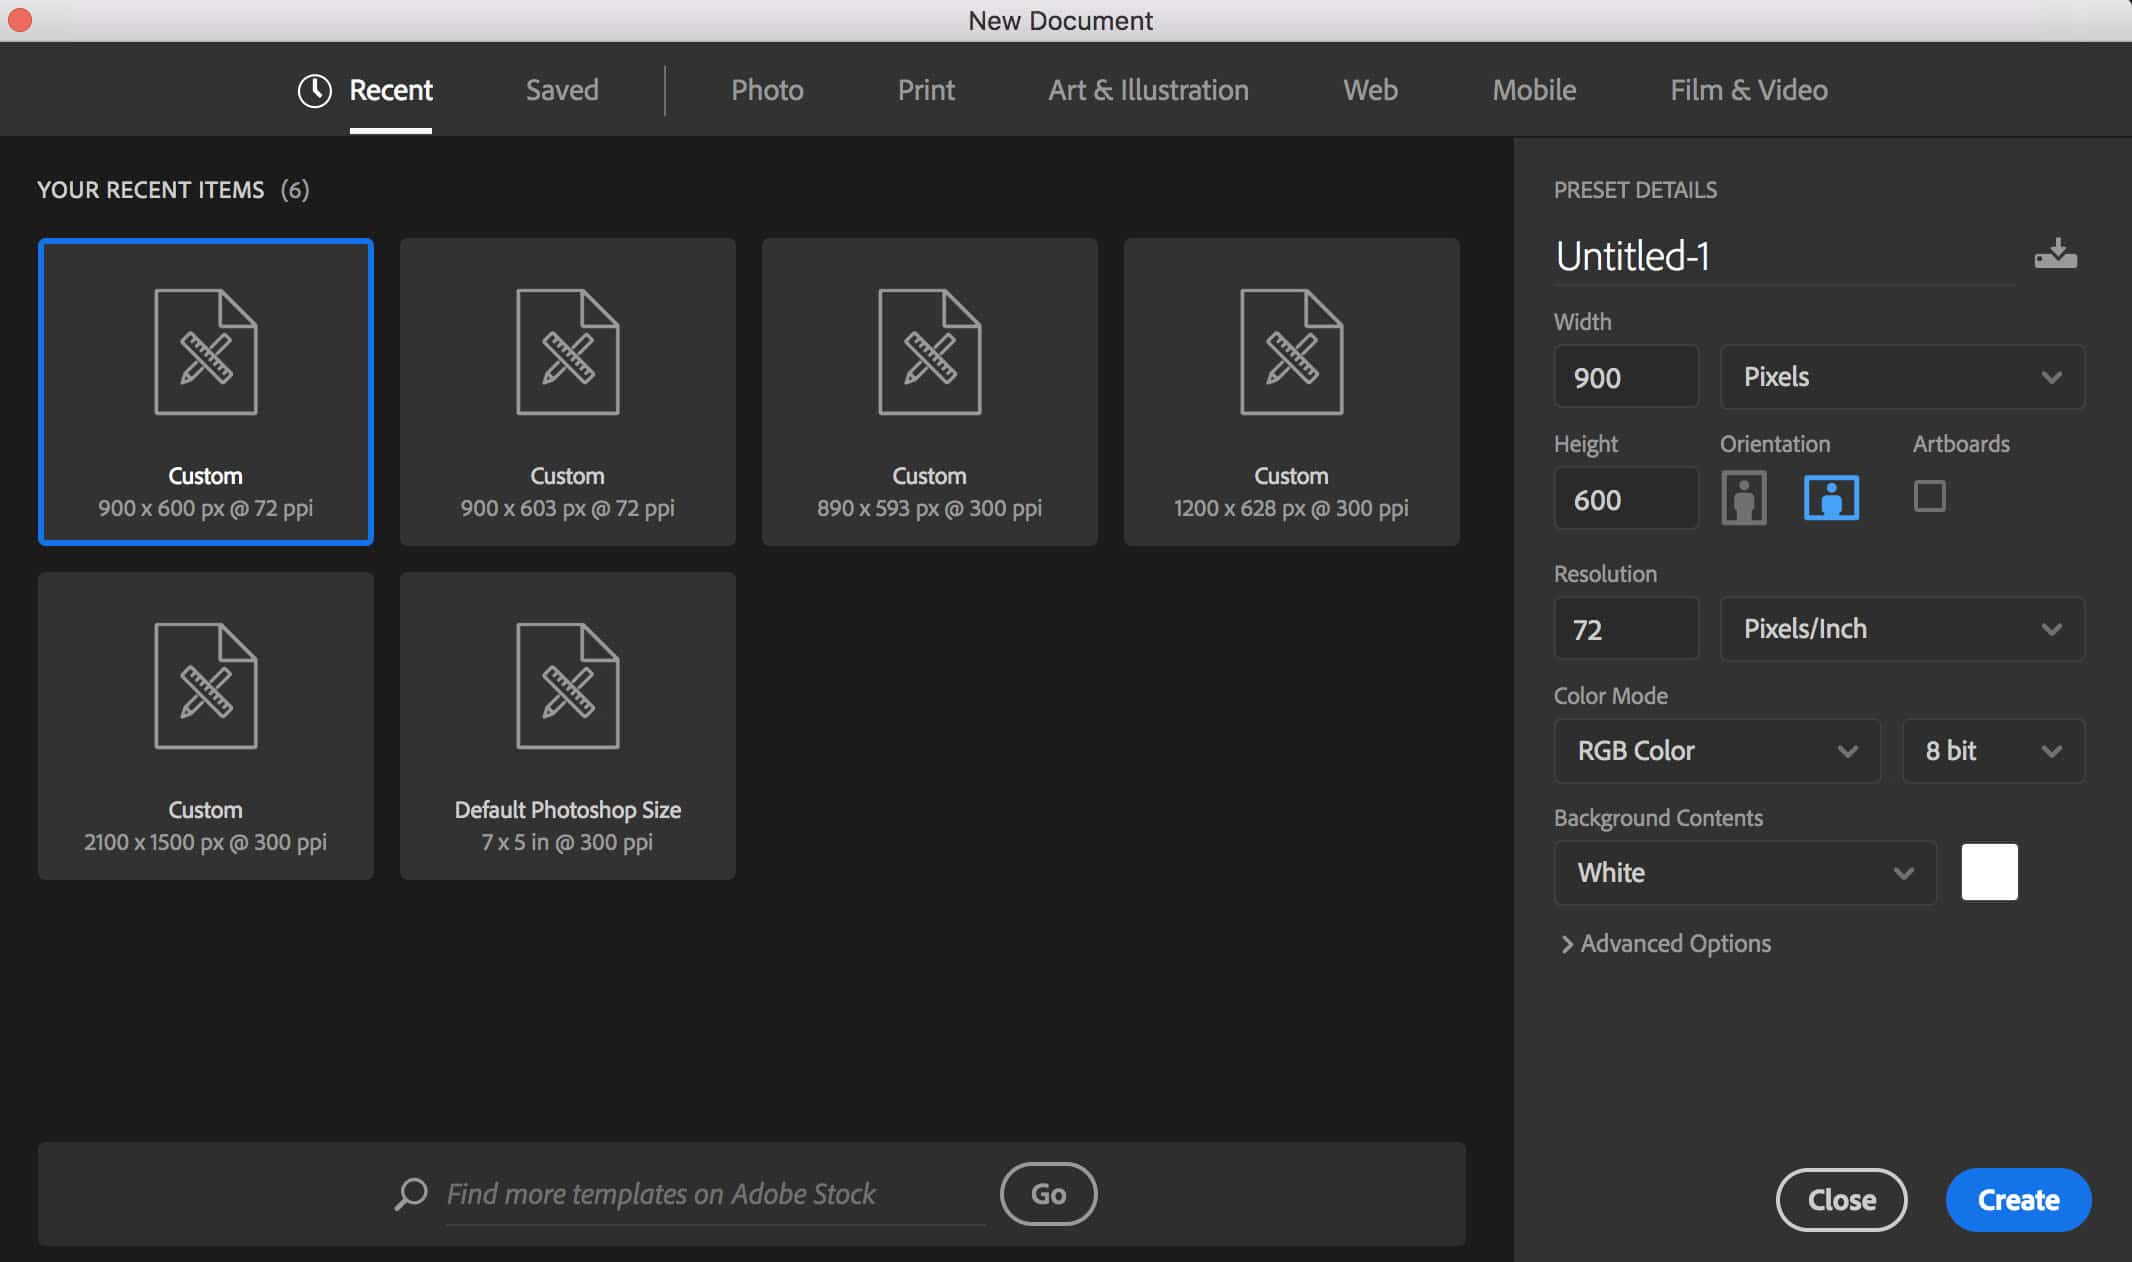
1. Open Photoshop and create a new document by going to File>New.
Now is when you decide the size of your watermark. If you are only watermarking web images, I recommend sizing the new document to the size of your web size files.
My blog uses 900 px x 600 px images. If you plan on watermarking full size images, I would recommend making your initial file 2500 px by 2500 px for a high resolution watermark that can be used on full size images.
So, I typed in my blog image size dimensions into the document, and set the resolution to 72 (for high resolution, I would recommend 300) and clicked OK.

2. Next, you can either pick out your fonts or copy your logo over onto the new document.
I use a couple of different fonts for my logo, so I went ahead and typed out my watermark. Use black as your color. If you want a multidimensional feel, you can use other shades of gray.
For a colorful watermark, go ahead and convert it to grayscale before moving it over onto your new document.

As you can see, I typed my logo the entire width of my image. I made it larger than the size that I’ll actually be using so that the quality isn’t compromised if I choose to use it larger than the “norm” for me. If you plan on using the same size every time, you could make it the size that you want it to appear on your images here.
Just remember, you can always make it smaller without it becoming pixelated, making it larger is where you will run into pixelation problems.
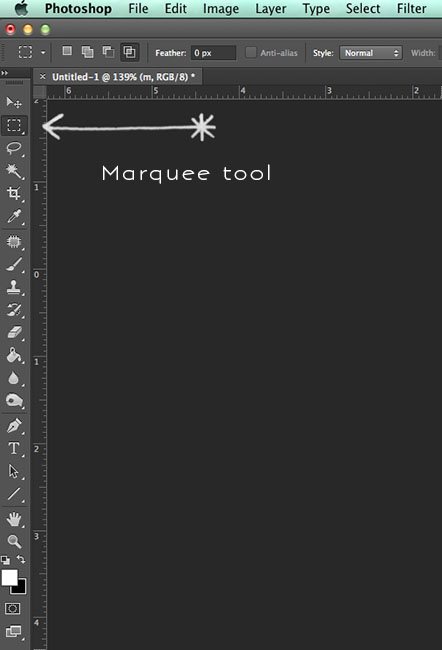
3. Grab the Marquee tool and draw a rectangle around your watermark.
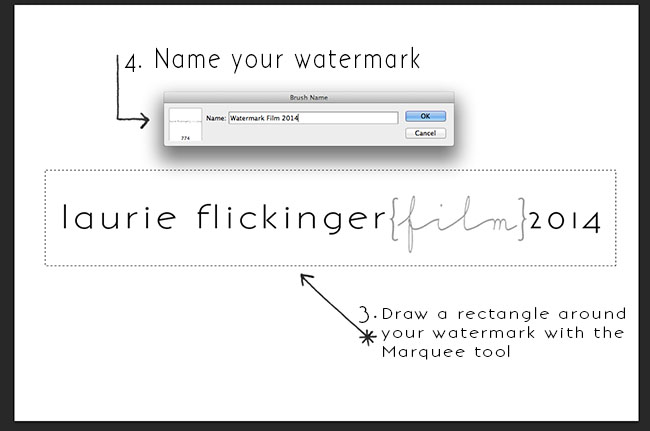
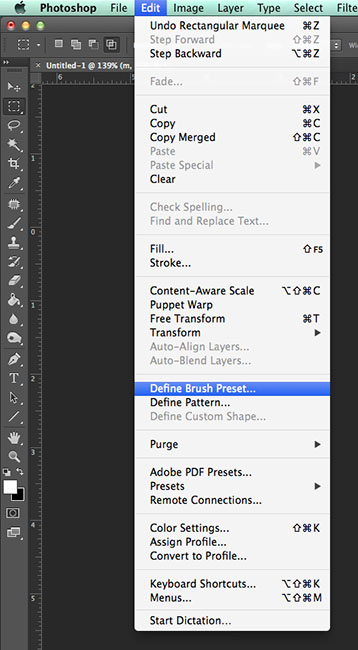
4. Next go to Edit>Define Brush Preset. Name your brush and click OK.
5. Your new brush will be in your brush catalog.
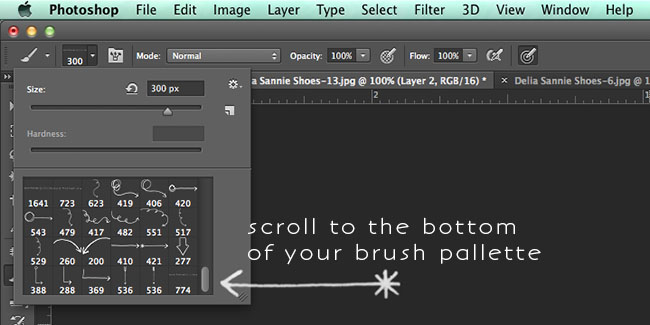
I like pictures, but you can also click the little box and show file names.
You can decrease the opacity of the brush or change the color. Easy peasy. Now watermark those images!
The underexposure here (even after a little work in Photoshop, which defeats the purpose of film) is why I’m taking a film class!

*Links below are affiliate links. Thanks for your support.

Nikon F100 | 85mm 1.8D | Fuji 400H
Nikon F100 | 85mm 1.8D | Fuji 400H

Nikon F100 | 85mm 1.8D | Fuji 400H


This is so cool! Thank you! Just FYI – it works in PSE too!
Can you do a water mark in Lightroom 5?
Yes, there is a link at the top of this post how to create a watermark in LR5.
This post helps me a lot! Thanks for writing this post and helping all of us who need this information!
Where would be the best place to put a watermark? I’ve personally had trouble finding a place in my photos that willnt take away from the photo but will be seen without really having to look hard. I feel like having one right in the middle of the picture takes away from the picture. Any advice?
Thanks
I think it all depends on how you are using your watermark. For client purposes and to discourage printing low res images from blogs, etc. I would recommend placing the watermark in an area that isn’t easily cloned or cropped out (ove an important part of the image…skin, subject). It may take away from the image, but it will provide more protection. For my personal blog, I watermark in either the lower right or lower left corner. I switch between the two areas depending on the image. Some photographers choose to watermark in the same spot regardless of the composition of the image in hopes that it will “disappear” to regular viewers. If it is in the same spot every time, it will over time become less noticeable. Hope this helps!
I have different colors and shapes and it didn’t save as the color I made it as. How to save exactly how I made with colors.
You’ll need to make your watermark and save as a .png file, then copy paste. Brushes can’t be saved in multicolored files. You can change the color of your brush, but only in one color after the fact.
Once you’ve made the watermark in PS is it possible to transfer it to LR?
I did a little internet search and you can either just make your watermark in LR from the start following the link at the beginning of the post, or you can make a .png image out of your watermark (with a translucent background, not white like in this tutorial) and load that into LR. I always bring my images into PS, so I prefer making a brush.
I was wondering when the photo critique will open up? I have been waiting this morning to submit my photo, but it hasn’t opened up.
It’s up right here – http://clickitupanotch.com/2014/03/critique-me-submission/
Thank you so much! I was hoping you’d do a tutorial with Photoshop. You’re the best!
Oh, thank you so much for sharing! I’ve been doing it a much longer, more difficult way for so long. I’m going to try this tonight. Question – do you have to save two copies then, one without the water mark and one with? Mine are all personal projects but I don’t want all my photos printed with the water mark and I haven’t been able to get it off w/o saving it twice.
You’ll need to save twice :(
This is great! PSE is more creative and LR is limited. Thanks!
THANK YOU! I’ve been watermarking my images by opening a png file and copying and pasting it onto my photos. You’ve just helped me upgrade to faster, more efficient editing!
How do you added a flower or something like that to your watermark???
You would need to add that image after your text (or before) by dragging it to your later from another file. It will be in monotone though. Brushes cannot be saved as multicolor images.
I have Corel PaintShop Pro X7, how do I use watermarking in it? Thanks
I’m not familiar with that program. Best of luck!
Hello ! great tutorial thanks for sharing .
Than you so much! Great tuturial
Hi!
I have done and still do this technique all the time and it works great for me. But for some frustrating reason I am facing this issue today that the Define Brush Preset is grayed out. Anything I do to fix it, is just not helping. It remains grayed out. Think you can help me with this? Would be a relief! Thanks ♡
Make sure your file is smaller than 2500×2500 pixels for a brush! Hope this helps!
This was the easiest tutorial I’ve ever done, thanks so much!!
How do I change the color of the watermark on cs6?
Select the brush you want then choose any color from the color palette.
Thanks for the super easy and super useful explanation!
fantastic tutorial!! Thanks so much for sharing it!
THANK YOU THANK YOU THANK YOU!!!
You are the best!! I never knew this was so easy. I have been using the boring photoshop premade fonts for years.
Thanks for helping me make my work look unique!
Gary
Hi, I loved your tutorial and it was so easy. But now I can’t find the brush anywhere?! I saved it and used it on some images and now it’s gone. Please help
Once I’ve made it how do I apply it to the photo. Error message said no layers selected.
Click on the layer of your photo in the layers pallate, then try using the brush. Or you can make a new layer.
What an awesome tutorial!!! I was wondering if you knew he name of the font used in your watermark? I love it! (The font that Laurie is in) thank you!
Hey Rebecca, I was wondering the same thing. I love the font style. The tail on the g and tilted e are so unique. WhatTheFont did not identify it correctly. I’ve been searching font sites with no luck. Have you had any luck?
https://www.fontsquirrel.com/fonts/bonvenocf
Here it is! Sorry! I didn’t see th3 comment from Rebecca!
Thank you. I love this. So much easier than how I was doing it before.
Ok this worked great! This might be a really stupid question, but how do I delete the water mark when I’m ready to print ? Was I supposed to save a separate copy ?
Heidi, I make 2 copies when I edit. One for print and one for web (with the watermark). If you have layers, you can click it on and off and save without the layer with the watermark.
This is so helpful!! Thank you for sharing!!!!
Well described post. Thanks for sharing this useful information to water make in photoshop. As always awesome content, I love reading your articles, much appreciated!
Excellent guide, I always liked this effect, but I did not know how to do it in Photoshop. You will also like this http://fixthephoto.com/blog/retouch-tips/double-exposure-in-photoshop.html
Cool and awesome tips. Thanks for sharing with us.
Thank you very much for this guide, it was extremely helpful and just what I was looking for.
This is really good. Thank you so much for this. It’s really helpful
I HAVE CREATED A WATERMARK WITH COLOURFUL GRADIENT..BUT WHEN USING BRUSH IT COMES IN BLACK AND WHITE
PHOTOSHOPCS3
Great tutorial. I found it very helpful and it will be a simple way to tag my stuff.
Thank You. I have watched about 30 tutorials, this was fast, simple and direct. Exactly what I was looking for.
So glad to hear that!
Thank goodness I found you and your article about watermarks. This was the only site that I could understand and actually follow the directions to creating and saving my watermark in Photoshop. Thank you for your clear, practical and precise explanations. My watermark looks pretty darn good and I can make subtle changes to it depending on the photograph I’m watermarking. AH!
Thank you, thank you, thank you! This was easy peasy and now I have a watermark that looks great!