*Post contains affiliate links. Thanks in advance if you support Click it Up a Notch.
If you are anything like me, you’ve been dutifully practicing all of the amazing tutorials Courtney and her contributors provide on a weekly basis on this blog. Perhaps you purchased Courtney’s ebook The Unexpected Everyday and have been working through her photo prompts and creating quite a nice collection of images.
But now what? Are you letting those photos sit on your hard drive?
If so, you are not alone. I know so many who have great intentions to print their photos or make a book yet get tripped up for one reason or another. But here is the biggest secret I’ve learned in my years designing photos books:
It doesn’t have to be painstakingly designed with perfectly edited photos of beautiful compositions. It just has to be printed.
Do you think your kid will ever pick up a photo book (either now or 20 years from now) and ask why you didn’t add a rich edit to the photo? Or why you didn’t use a stylish font for the page titles? No, not likely.
So let’s forget these hang-ups and get this first photo book done and in your hands. You’ll realize how amazing it feels to actually see your printed photos that document your passion, your work, your progress, your life.
Now that you know my biggest secret, I want to share with you 3 simple steps to completing your first photo book. It starts and ends with one amazing word: AUTOMATION. Ah yes, the power of automation.
3 ways to make a photo book in Lightroom
Specifically, I’m going to show you 3 ways to use automation in the Lightroom (LR) Book Module (LR4 and LR5).
To illustrate my 3 Amazing Automation Actions (I had to get some alliteration in somewhere ;) ), I’m going to use my photos inspired by Courtney’s The Unexpected Everyday to make a book.
1. Smart Collection
Perhaps you’re familiar with Smart Collections, if not, you can read more about them here – Lightroom Smart Collections. When using collections for a photo book, you should already know your book concept, how many photos you want and what type of photos you’re looking for.
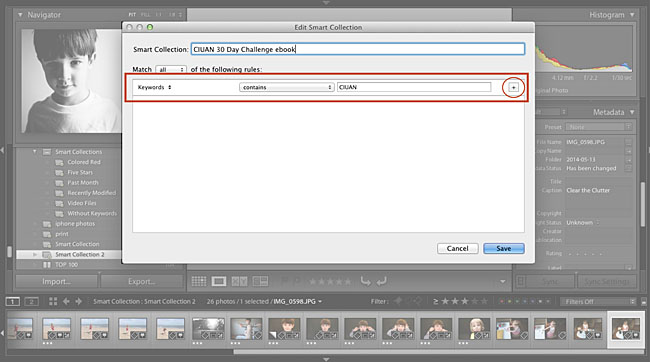
With this project, I’m looking for 1-5 great photos illustrating each photo prompt. All of these photos get a keyword tag: “CIUAN.” Then in the Caption field (under Metadata), type in the photo prompt. Here’s how I labeled the photos in my Library Module:
Then I’ll create a “CIUAN” Smart Collection that intelligently grabs all of these tagged photos.
2. Autoflow
Next step is to automatically place the photos from this Smart Collection into pre-determined layouts in a photo book. Select your smart collection, head to the Book Module and set your book parameters.
Now, you can easily select “Autoflow” which will populate the pages with one click. But there is a smarter way.
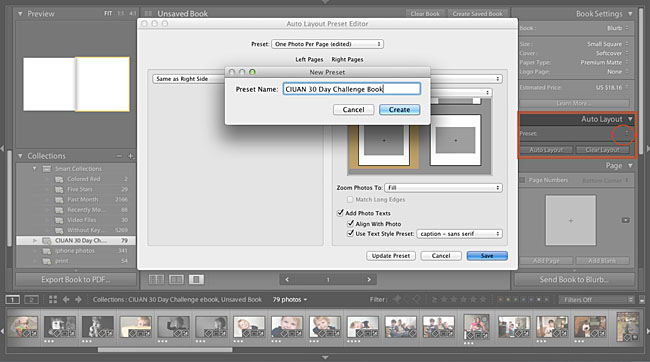
Under the pull down menu of the “Auto Layout” tab, select “Edit Auto Layout Preset”. Find the type of page you want on the left and right side of the page. For my book, I’m featuring a singular photo on the left and right page.
At this point, you may have to adjust some photos or pages. This is simply done by dragging and dropping the photos into the proper page spot.
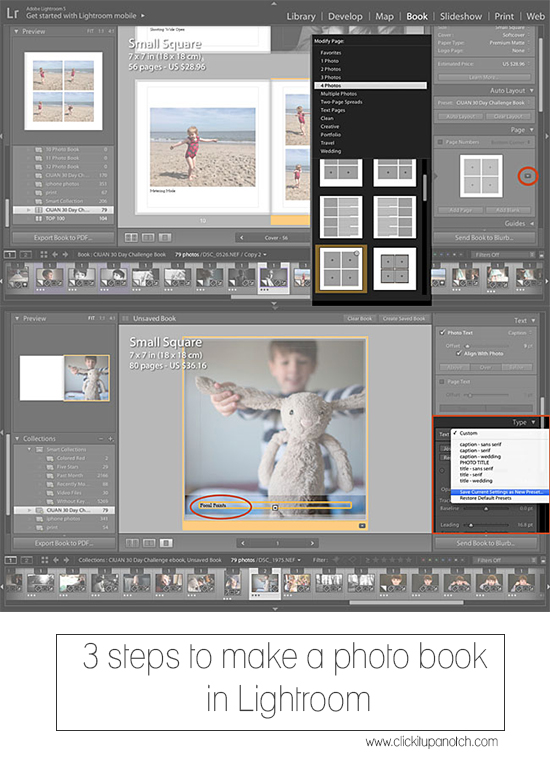
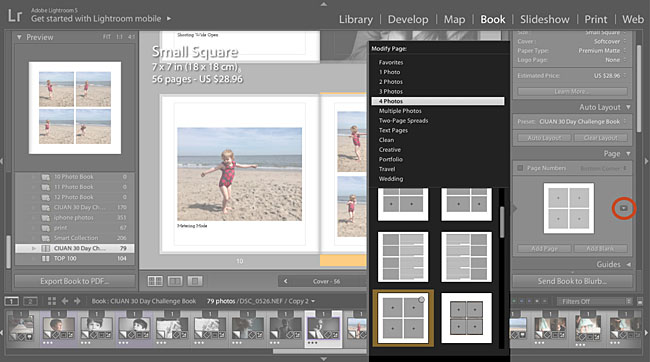
To change the page layout, highlight the page (in yellow) and use the “Page” pull down menu to find a layout that fits the photos better.
3. Text Style
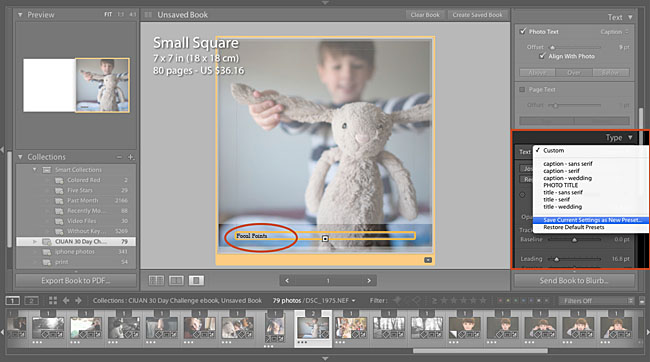
Finally, let’s add some text. And yes, in the LR Book Module, you can automate text as well. First, for the photos you want to caption with the prompt, highlight the photo box then under the Text panel select “Caption.” Now the photo prompt you typed in the Library Module will automatically appear in your book!
The next step is to highlight the text and establish the proper font style, size, color, and alignment you want. Once your font is set, go to the Type panel (right below the Text panel), the first line says “Text Style Preset.” It’s set to custom but by selecting the pull down menu option “Save Current Settings to Preset” it will save these exact font settings.. I’m calling mine, you got it, “CIUAN.”
Once this is done, whenever you want to include text on any additional pages, all you have to do is select this preset and in one click get the text features you want. Couldn’t be easier!
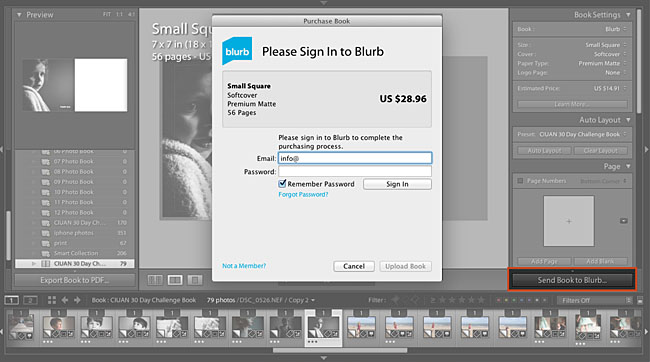
After these basic steps, you are ready to order your book!
If you want to see over 25 screenshots and videos on how I made this LR book (and others), join me in my Intro to Photo Book Design Workshop.
It’s your turn
Now, don’t just read these steps and think, “Wow that was helpful!” – I want to see your photo book from Blurb!
Share a screenshot on the Click It Up A Notch facebook page and tag @bookthisproject. I’ll be sharing mine and can’t wait to see yours!




That is so awesome! Can’t wait to tr it out! Thanks so much!
Fantastic Chaitra!!! I’d love to see your finished book. I promise, you can start these steps by Friday and order your book by Sunday! It will feel so good to have your photos in a book!
Thank you so much for this!! I really need to get into printing my pictures. I have a goal to do a book a year, but life is just so crazy busy all the time!!
Awesome Katie!!! I know making a book can take time – but it’s so worth it! Hopefully the tips in this article will show how you can efficiently make a book using some automation tools. You may not want to use these for every book – but if you’re finding it difficult to get to your book finished – definitely use these tips! You can do it!
Hi. Is there a way to do the same or something similar on PSE?
Hi Juliana, you have to be within a book design program (such as LR Book Module or BookSmart) in order to use the automation tips. However, I do show how you can use PS / PSE to add interest, variety and creativity into your photo book. My workshop just kicked off if you want to join us – http://www.thephotographerwithin.com/workshop/intro-photo-book-design or to find out when the next workshop kicks off, you can sign up: http://eepurl.com/sahoD
Hi, love to be able to do this, but can I do in photoshop cs6
Hi Denise – As I mentioned to Juliana, you can only use these automation tips within a specific book design program. PS doesn’t have the ability to group together pages in order to utilize an autoflow or automatic text fields. InDesign is the specific Adobe program I would recommend in order to make a book. I have an amazingly thorough workshop on how to use InDesign too!
Designing a book within PS can be quite cumbersome and not what I recommend. However, I do think PS can be a great asset as you’re designing your book. I show how I use PS to elevate books within BookSmart in my Photo Book Design Workshop! http://www.thephotographerwithin.com/workshop/intro-photo-book-design
thank you so much! I was just clearing out my email inbox and came across your newsletter. I cannot tell you how timely it was! We are just beginning the steps toward domestic adoption and need to create a family album to share with birthmothers. As a hobbyist I don’t print pro albums for anyone so I was wondering where to start rather than going the standard Shutterfly route. What providence that your newsletter was right there! Thank you!
That is awesome! Best of luck with your adoption :)
This is great! Where is a good place to have the photo book printed?
Hey Jennifer,
There is a link in the post you can use for Blurb which is one the company we recommend and goes well with Lightroom.