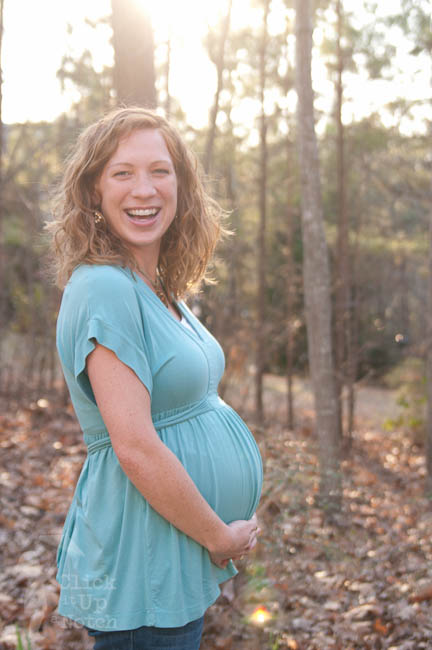
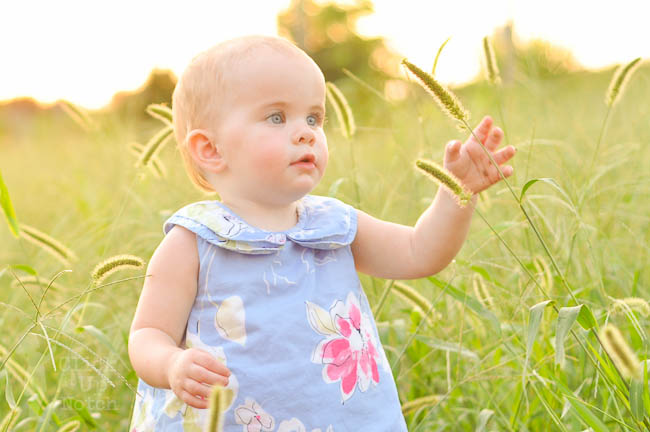
I was recently asked how I achieve haze in my photos. Creating a haze effect in your photos is probably easier than you think :O) Don’t forget to remove any lens guard you may have since one of it’s job is to prevent haze.
1. Find the sun. Unfortunately, it would be really hard to achieve haze in your photo without some great sun.
2. Position your subject in front of the sun. You want the sun to be in or near by your shot.
3. Shield your lens with your hand. You want to cover your lens like you are shielding your eyes from the sun. Just use your hand and place it on the side of your lens so that the sun isn’t pouring in.
4. Meter off your subject while your hand is shielding the sun. Trust this metering once you have removed your hand.
5. Focus on your subject. Sometimes it is hard to lock focus once you have removed your hand.
6. Remove your hand and let the light spill in.
**If for whatever reason you have more haze in your picture than you would like, you can correct it in post-processing by adding more “black” to your photo. Thank you to Laurie for teaching me that valuable trick!
Go out and have fun with the sun :O)
Read more:
Backlighting Photography: Master Backlighting in 8 Easy Steps
Everything You Need to Know for Unique Lens Flare Photos


Lovely!! I think the haze effect is so pretty and fun.
Great tips – I can’t wait to play around with them.
Haha! Thanks for the shout out! :) We are all in this learning together! One way to add some haze in PS is to do a solid color fill layer in a light tone (white, off white, pale yellow, etc) and then change that layer to screen. I’m sure there are other ways also…but I found that out by accident. :)
Same might have a play around today. I live in WA Australia :-)
I love that you posted this, because my SOOC shot for shoot and edit is a haze shot of Bennett. I will be posting the SOOC shot tomorrow and the edited version on Thursday. So it’s funny, because my “What I Learned” was going to be haze and backlighting.
I am in my final week of Natural Light and it has been great. I am bummed that I have not got to do Silhouette shots yet, bc the hubster has been out of town. Hopefully, I will get them down tomorrow, so I can turn them in by Tuesday.
can’t wait to enter the top 5!!! thanks for all the work you put into this website –
i look forward to your post’s everyday!
Thanks so much Elizabeth, that means a lot coming from you :O)
nice I like this, I am going to try it when we get some sun around these parts. ;)
What a great and simple technique! I can’t wait to try it. :D
If you were shooting a sunrise shot, would you need something to protect the lens? because of course you would be pointing the lens right at the sun.
Thank you so much for all your great tips ! Photography is the best thing I have discovered in years.. but also very frustrating at times …Just when i think i get it …I DONT !….so so Much to learn and practice so thanks again your site is of great help ! :)
I agree!! Photography is fantastic…you just can never learn it all :) Don’t get frustrated :)
I can’t wait to try this. Thank you so much!
Thank you very much, I really appreciate all the information you share!
Thank you! will try this on the weekend if the sun shows up :)
What does meter off mean? And how do I do that?
When you are shooting in manual mode and you put the red dot or square (which ever your camera has) on your subject, your camera will tell you if the image is going to be over exposed or under exposed or properly exposed. Maybe this post will help – http://clickitupanotch.com/2010/09/shooting-in-manual-the-basics/
Thanks for the tips – I didn’t realize it was so easy, if I get haze it’s usually by mistake- lol!
These are so beautiful! Would you mind sharing what ISO/f stop and shutter speed you were shooting at in these photos? And with what lens? Thank you!
Hey Cami,
I don’t know the settings off hand. However, I believe they were all taken with my 50mm 1.8 or Tamron 28-75mm f/2.8.
Oops I sent that too soon sorry. I just wanted to say as well that I really love your website and have learned so much from it…and I’m an Air Force wife as well :) Thanks for sharing your knowledge with others and building such a great resource.
Thank you so much :) Love meeting fellow AF wives :)
Hi Courtney,
Love your website, have picked up many things that will and are helping my pixel shooting. I have a request for you, could you please add what f/stop, speed, and ISO you to any photo that you put up on your site.
I look at some of these photos and think, wow, wonder what the settings were for this picture. I read someone asked you this question and you mentioned your 24-70 and 50 were used but you don’t remember which for which photo.
I’m sure this will help many of us… thanks
Mike
Hey Mike, I’ll keep that in mind. This post is over 3.5 years old though so I won’t be updating it with the settings. Also, due to the amount of time it takes to put the posts together, I don’t always have time to go back and add settings.
Many moons ago a haze shot was considered an awful photograph. Its still considered awful or many non photographers. They always think I ruined the shot. It definitely depends on who you shoot a haze shot for. Most older people don’t get it for sure!
Yes, sometimes people like what you do and some don’t. Can’t please everyone :)
Make a Donation. Click here to view find a charity.Aid for Africa is a unique partnership of select nonprofit organizations, all dedicated to solving the complex, inter-related challenges facing Sub Saharan Africa. Whether we are distributing books to school children, introducing medical strategies to combat the spread of HIV/AIDS, supporting small businesses for women, or finding new approaches to protect endangered elephants and lions, Aid for Africa members are working to build a better future for Africa’s children, families, and communities. Our charity organizations: Are fully vetted, meeting some of the strictest tests of fiscal accountability, governance, and programmatic impact in philanthropy. Have a track-record of introducing innovative solutions to seemingly intractable problems. Partner with each other and share best practices for maximum efficiency and top results. A one-time or recurring donation to Aid for Africa helps support the work of all our member charities. Empowers poor African children, women and families to escape poverty through community-based self-help programs that improve health, expand education, create businesses, and protect wildlife. We accept donations in Bitcoin! We believe this is important for two reasons. It represents our strong belief in the value of Bitcoin as a medium of exchange. It automatically makes the Foundation’s assets public information—allowing Bitcoin users to see how much we have received in donations and emphasizing our commitment to transparency. To donate, copy and paste our bitcoin address below. Static Wallet: 1EfvKh39SCuj7LMuVdDZpVnuNBj85mU6bE
sand dams http://thewaterproject.org/
There’s definately a great deal to know about this topic. I love all the points you made.
http://body.videoulybka.ru/