Probably the single biggest question I get about food photography is lighting. Just like photographing anything else, food photography lighting can make or break your food shots but let’s talk about something more than just finding the best natural light in your house. What if you are one of those people who can only shoot at night? Or how about that daylight’s savings time, hey? Things like shorter hours of sunshine, long dark strings of winter days or only being able to shoot after 5pm can make a foodie photog want to pull out her hair.
Give me a bright, slightly overcast day any time & I’ll be a happy girl. But knowing how to use a lamp for night shooting is sometimes the only option you’ll have & it can also help to stretch your creative muscles when you’re feeling a bit uninspired. Here are some tips to help you get your best shot (hopefully without too many tears, because there shouldn’t be any crying in food photography).
Food photography lighting
1. Get the Right Gear
When I shoot at night I use a Lowell EGO tabletop fluorescent lamp. You do have to assemble it when it arrives but after that, it’s about as user friendly & simple as any table lamp could be. You put it where you want it & plug it in. It’s perfect for food photography because it’s small & lightweight. It can easily be stored away when you’re not shooting. You can place it on the floor or your table & it has a long cord in case your outlet isn’t right next to where you’re shooting. It also comes with a reflector card to use for bouncing your light.
Speaking of reflectors, I sometimes use more than one. I like to use inexpensive foam boards from the craft store.
I’m also a fan of using a tripod when I shoot in low light. Shooting food in dark light can be tricky. Sometimes you’re bent over at the waist if you’re subject’s on the ground or you’re squatting if your subjects on a small end table. Rarely are you standing in a perfect position with two feet firmly on the floor. This can be problematic when a high ISO, slow shutter speed & shaky hand all meet together! I use a Manfrotto tripod.
2. White Balance
This is one of those situations where white balance can easily ruin your shot if not set correctly. I use Kelvin for white balance. Since I’m dealing with a florescent lightbulb, I adjust my Kelvin anywhere from 4000K to 5000K. If you’re using a camera that doesn’t allow you to adjust white balance in Kelvin I would suggest starting with the setting used for fluorescent light.
3. Consider Diffusing your Light
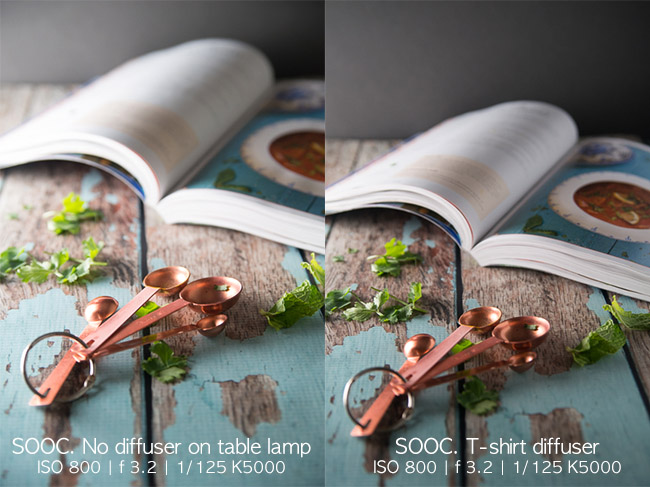
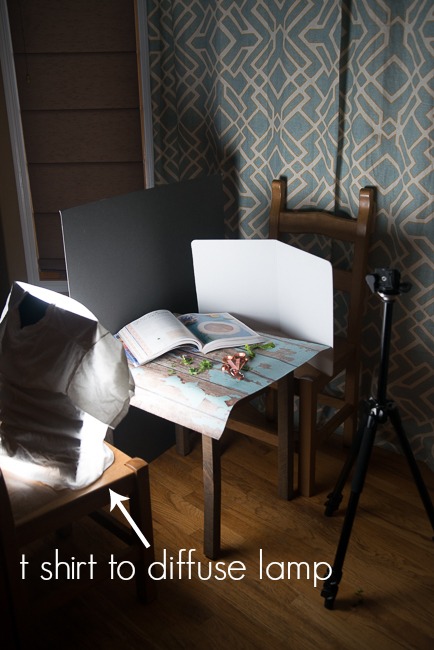
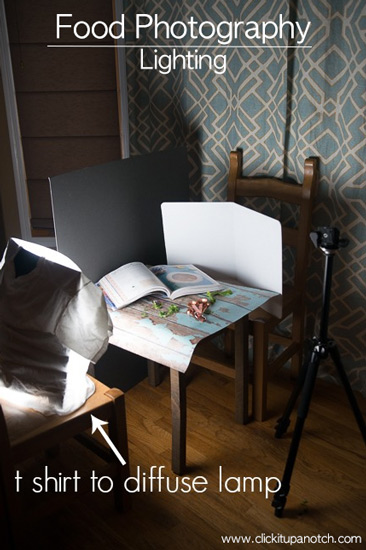
That table lamp can get awfully bright & sometimes it seems to cast a harsh light on your frame. If you’re feeling frustrated that your shot is either blown out or underexposed, consider diffusing the light with a white curtain or sheet. A lot of people are a fan of using a thin, white, cotton t-shirt too. Experiment with different ways to diffuse your light & again, be aware of what you’re using & how it could affect your white balance.
Below are examples of using the table lamp with & without a diffuser. You can see how adding a t shirt to diffuse the light gives it a softer light. All images are SOOC.
4. Use your Reflector (or Two)
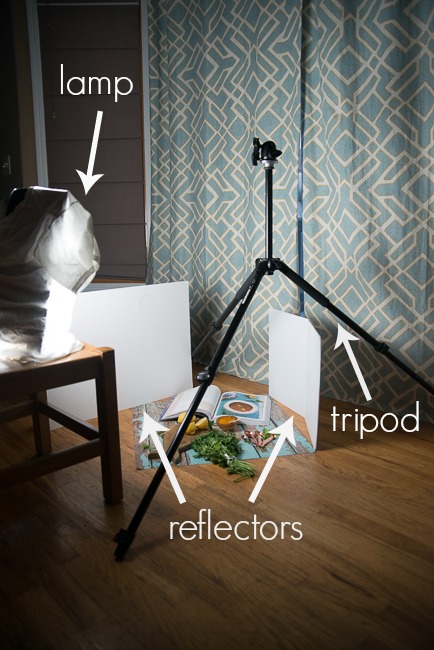
In a dark room with a bright light pointing at your plate, shadows will start popping up fast. By using at least one reflector, you’ll be able to bounce that light back into your frame. If you still find there are too many shadows consider using a second reflector. As I mentioned before, I’m a fan of inexpensive foam boards you can buy anywhere.
These images are all SOOC & shot with the same settings of ISO 800 / f3.2 / 1/125 K4550
Here’s a pull back of my 2 reflector set up. The lighting & reflectors provide a sutler change but enough that I think you can see it might be worth using two reflectors if you want more even light in your shot.
Hopefully with some practice & these helpful tips you’ll be able to create images at night that are just as lovely as your natural light images!




Thanks for sharing this, Trisha! This is awesome :)
Thanks Hannah!!! You’re awesome! <3
Great tutorial. Where did you get your wood paneling? Did you distress it yourself?
Hey Meg! So this is probably the SECOND most asked Q I get. ;) It’s from an etsy shop called Swanky Prints. Highly recommend. https://www.etsy.com/shop/SwankyPrints
Thanks for taking the time to respond!
Great tips! I think I need to invest in a light like that. Winter food photography is so hard! Can you tell me where you got your barn wood background? I love it.
Hey Jamie! Thanks! It’s from an etsy shop called Swanky Prints! https://www.etsy.com/shop/SwankyPrints
Hi!
This is a great post! What other type of lamp would you recommend for people who are not professional food photographers? Anything a bit more affordable? Thanks!!
Hey Claudia! For the record, I’m not a professional either! ;) As of right now I don’t know of any lamps of equal quality priced lower than the EGO but I think I’ve seen people online build their own light boxes. If you are into DIY that might be a good option to try!
Fab post, I have just bought this light and was finding it a bit challenging. I also love the backdrop sheet, would you mind sharing the details of where you got it?
Hey Jane. I totally agree. It definitely takes some getting used to. In fact, I bought this last year, got frustrated with it & put it away for almost a YEAR! I finally got it back out & started playing around & suddenly found myself much more successful. Seriously, white balance is half the battle. Then positioning the light far enough away & at a good angle (with a diffuser) so your light isn’t so harsh. Good luck!
Nice touch with using the t-shirt as a diffuser, would not have thought of that myself :)
I see that in the beginning of the article you the position between the light and the food is almost on the same level, while in the photos at the end the light is coming from above. Besides the obvious difference in shadows, does the bigger distance from the light affect the result much as well?
Hey Danny, thanks! I have actually used a sheer curtain as well but found the slight tint in the curtain made my light look too yellow. To answer your Q, yes, I do think the position can affect the light – whether it’s higher (farther away & softer) or lower (closer & more bright). I believe every time you move this lamp it will affect in some way, how the light is in your frame. As far as shadows, you’d just need to continue to move the lamp around & be aware of any areas you may find a shadow. Just like natural light from the sun, if your lamp is on the same level of your shot, the shadows would be more harsh. Hope that helps!
Hi,
Thanks for the answer. I’m currently trying to figure out how to make good photos indoors (the days here in Estonia are getting really short already) so want to learn more about lightning techniques. You helped me a lot :)
Really neat and helpful post. Honestly, I had never thought to use floor drops for food shots or anything like that. I guess I always assumed those people who post food pictures just have beautiful floors, ha.
Hey Cynthia! Yes! Totally get yourself some wood backdrops. It changes up everything! ;)
Love this post! Where did you get your background paper? I got some cool ones from Dick Blick the other day!
Thanks, Emma! It’s from Swanky Prints on etsy.
Good tips! Reflectors can really make a difference.