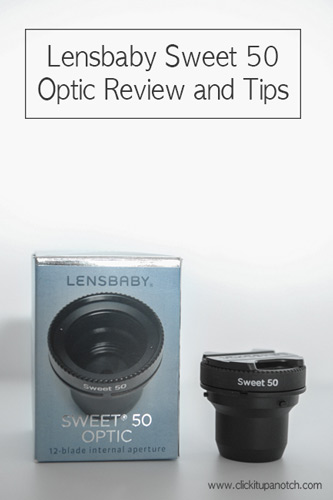
Lensbaby sent me their newest optic that was released this month, the Sweet 50 Optic, in exchange for a review. I of course was so excited for the opportunity and I couldn’t wait to try it out! I’ve been playing around with it for a few weeks and I want to share with you what I’ve learned, along with some tips on using it.

Magical. Mysterious. Dreamy. Surreal. These are words that describe what I see in the images I’ve taken with the Sweet 50. Portrait, travel, and landscape photographers wanting to push their creativity to a new level will love this lens!
The Sweet 50mm Optic is an addition to Lensbaby’s Optic Swap System that is compatible with the Lensbaby Composer Pro, Muse, Control Freak and Scout lens bodies. If you are not familiar with Lensbaby, it has several optics with different focal lengths or capabilities that can be removed from the lens body and switched.
*Important note, you need the Lensbaby Composer Pro in order to connect the Sweet 50 Optic to your camera.
The Sweet 50 is a selective focus 50mm lens that goes from apertures of f/2.5 to f/22. The aperture is changed on the exterior of the lens, rather than in camera. When changed, it controls the depth of field, and the size of the sweet spot of focus. The sweet spot is the area of the image that is in sharp focus, surrounded by increasing blur to edges of the frame.
The 50mm focal length is versatile for all types of photography. It’s considered a normal length, so it also works well for portraits. I have the Sweet 35 Optic as well, so I was able to compare it to the 50. The only noticeable difference between the two was the focus distance to the subject. The Sweet 35 focused at a distance of 7.5 inches, and the 50 focused at 18 inches away. So you will need a little more room to work with the 50. It is compatible with macro converters if you want a closer focus. I loved the 50 the most for travel and landscapes. Inside the house in tight spaces I prefer the 35.
In order to get both mom and baby in focus in this next image (using the Sweet 50) I stood about 10 feet away and used an aperture of f/5.6.

Portraits are a little trickier with the Lensbaby and take some practice. You will need a subject who can stay still while you select the sweet spot and manually focus. However, the beauty of the Lensbaby is the blurred effect. Some may desire an out of focus subject, depending on the look and feel they are trying to achieve.
For example, in this next image of my little guy I wasn’t as concerned with perfect focus as I was with him running towards the tree in the light. He’s slightly out of focus, but it lends to the dreamy feeling of the image. Also note that I took the next two images of the tree with my film camera. I wanted to compare the optic using film vs. digital. Both cameras gave me similar results with the sweet spot & blur, as well as with how the lens performed. I was happy to find out I could use it for both types of photography!

The blur gives an ordinary image a unique creative twist. This is the same tree as the image above. Might be a boring shot without the Lensbaby. Using my focus points on my camera, I chose the tree branches as my sweet spot, and used an aperture of f/5.6. This created a slice of focus that leads the viewer’s eye to the tree. What I really love about the effect of the Lensbaby is the blur actually appears to be moving across the image, which seems to rush your eyes to the sweet spot.

FOCUSING TIPS
Focusing the Lensbaby takes some practice. You must manually focus. The Lensbaby Composer Pro (holds the Sweet 50) tilts in any direction. When tilted it gives different effects of blur to the image. For example, if you tilt the lens upward, it places the sweet spot in the upper ⅓ of the image. Tilted down, focus is in the lower ⅓ of image. This film image was shot tilted up. The tilt gives the blur a stretched effect, which almost creates the look of leading lines!

And this one tilted down.

When using the Lensbaby, I found it easier to achieve sharp focus when:
- Aperture is set to f/4 or above. Start small, then increase your f-stops until you get what you want in focus.
- There’s plenty of light to work with. I found the lens grabs focus easier in areas of high contrast between light/dark.
- Tilting it up/down rather than left/right…but focuses best when it’s in the middle. Not sure why it’s weaker on the left/right tilt, but it is.
- The sweet spot is placed in the center of the frame. All lenses focus better in the center, so this is no surprise. But don’t let that limit you. Start practicing in the center, then experiment in the outer focus areas once you’re comfortable with how it works.
One last tip on focusing. Sometimes its hard to tell whether you have achieved focus. Pay attention to the green dot focus indicator and the two arrows on either side of it. You will see them at the bottom left when you look inside your viewfinder.
When these symbols appear it means:
Dot: subject is in focus.
Arrow to right of dot: Focused on an area between camera and subject.
Arrow to left of dot: Focused on an area behind the subject
I found that I could use my focus points to select the general area of my sweet spot, but I still had to move my camera slightly up/down or left/rt until it grabbed the right area. Watching for the green dot to appear helps you know when you’ve nailed focus.
I shot images with the lens at every aperture. The only aperture I didn’t care for was f/11 and f/22. You need a lot of light to work in these apertures, which I could only find in bright sunlight. And in my opinion, the effect of the sweet spot and blur wasn’t as pronounced in the upper apertures either. So it appeared to look more like a normal lens. And that defeated the whole purpose of the creative look of the lens.
MY RECOMMENDATION
The more you play with the Lensbaby and Sweet 50 Optic the more you will like it! I honestly didn’t love my first Lensbaby product when I first got it because I wasn’t familiar with how it worked. After experimenting with different apertures and sweet spots I had more control over focusing and composition. I found that the most compelling images taken with the Sweet 50 were ones that had an interesting focal point. Look for that first, then play with the various apertures/tilts until you get the look you want.
Overall, the lens performed as expected and advertised. I was pleased with the results I got from it, and I would definitely recommend it to a friend! I’ll end with a couple more images of my hometown of Salt Lake City, taken with the Sweet 50 Optic. If you get in a creative rutt, buy this lens! It will turn an ordinary image into something extraordinary, and you will see things in a whole new way!


Read more about Lensbaby:
– Lensbaby Composer Pro with Sweet 35mm Optic – 6 Lessons Learned
– Lensbaby Inspiration


thank you for a neat review! huge fan of LB! i currently owned S35, S50 and E80 with the macro converters! love these lenses – a huge and much welcome change from my freelensing days :)
one thing though…in your review – you didn’t mentioned which camera you used although your bio did indicated what you owned ;) some of us are Canon users – so i presumed that the dot only appears on Nikon camera? …so green dot doesn’t apply to us Canon users :(. also, using Live View on camera will help in achieving a better focus too :) when stopped down.
both S35 and S50 gives rounded bokeh around the sweet spot, whereas in the E80 – the focus is sliced ;)
overall, nice review and thank you for sharing!
Yes, I shoot Nikon, thank you for mentioning that. You are correct, the green dot won’t apply for Canon users. I like the idea of using live view, and good to know on the bokeh for the different optics as well!
Thanks for the review. I just got my S50 in the mail this week. I started playing with a few of the Lensbaby optics a little over a year ago. I have LOVED learning how to make my photos more original with them (favorite spot was at mountain passes in Park City during early summer with all the wildflowers…and my daughter). Unfortunately, I haven’t played with my camera for a while, and have been out of practice with my Lensbaby optics. I am hoping breaking in this new optic will get me going again. Thanks for the tips. I can’t wait to try it out.
Thank you for your posts. I have enjoyed reading and learning. I enjoy photography as a hobby but always want to learn and improve.
Thank you for this review, and especially for the tips. I’ve just received my first Lensbaby (Compoer Pro + S50 and the tips will help a lot.