
Have you ever edited a photo in Photoshop and at the end wish you could go back and change an edit you did, but you already flattened the image and you have long passed the 20 items your history allows? Well I am going to show you a quick tip that you can put in your workflow that will allow you to go back to any point in your photo editing.
I am talking about the snapshot feature.
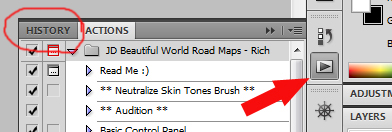
You can find it right next to your panel column on the right side of the screen. You can look for the arrow button that brings up your actions, or you can click the button above it with the three dots and arrow (that is the History button).
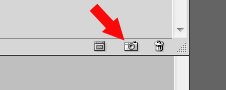
After you are in the History panel, look down in the bottom right corner. You will see a little icon of a camera. This is the snapshot feature.
So how do you incorporate this into your editing workflow?
I always break my photo editing into stages. I have the “clean edit” in which I make exposure adjustments, adjust contrast, etc. Then I flatten my layers so I can do any cloning or clutter clean up. After that I flatten, do some dodge/burn, flatten again, then do artistic adjustments and maybe an action. I then flatten and do a final touches like a vignette or sharpening.
If I just completely lost you, you should check out this tutorial on understanding Photoshop Layers
But what if I wanted to undo an edit I did when I was dodging and burning? Do I have to start all over??? The answer is no. After each section, simply take a snapshot.
Do your clean edit (or the first step in your normal workflow). Go to the History panel and then take a snapshot by simply clicking the camera icon. It will look like this.
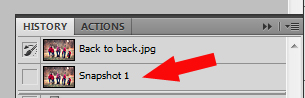
You can double click on it and rename it. This helps you keep track of which snapshot is which other than just 1,2,3…
BE SURE TO TAKE THE SNAPSHOT BEFORE YOU FLATTEN YOUR LAYERS. Your snapshot will actually save the layers for you!
So now keep on editing as you would normally, just take a snapshot before you flatten your layers. Here is an example of my History panel with the snapshots after I have finished editing.
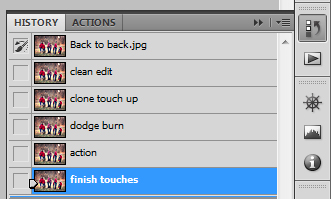
You can save your image just as you would when you are finished editing. Now if you want to go back and experiment, change something, or convert to black and white simply go to your History panel and choose which snapshot you want to start at. The snapshots at the top are earlier in your editing process. Now you can edit from that previous spot. You can click on any snapshot at any time to go back to that stage in editing.
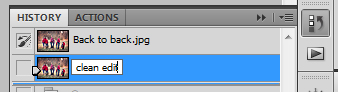
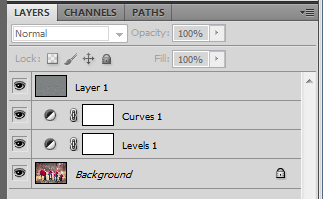
Don’t like you re-edit? Go to any other snapshot and your photo is exactly how it was at that point. You will see your layers panel still has all of the information it had to adjust or keep. Here is my clean edit layer panel that I clicked on.
You can access your History panel and these snapshots at any time. Even after you have saved an image! As long as you do not close your photo you can go to your snapshots. Once you close it, your snapshots are gone.
I hope this helped you learn a new aspect of Photoshop and now gives you the peace of mind and freedom to experiment a little more with your work. Step out of your comfort zone and stretch yourself.


Thanks so much for this tip! I don’t even want to talk about how many times I’ve started completely over in PS. I’m still a beginner & having to start over has been a big deterrent for really experimenting. Yeah for snapshots!
This. Is. Lifechanging.
Mandy I agree. This is good. I am just starting out in PS myself for my blog and I make 3 copies just because I know sometimes I have to start over or did something I didn’t like
Hi
Thanks so much for this post. I’ve been wondering how to do this!!! One quick question- will this only work if you save your file as a .psd or will this work if you are in Lightroom and choose to edit in Photoshop->save back to LR too. My experience has been that once back in LR if you choose to re-edit a psd you can’t access any layers. Will this change that?
Thanks
Shannon
If you are editing in LR you will not be able to access the layers in PS. They are two different programs so you can transfer the image from one to the other, but not the information of the layers etc from a snapshot. That is strictly an in program function.
Love this tip!
So useful! Thank you…
[…] Photoshop Editing: Snapshot Feature – a great tip from Click it Up a Notch. If you use Photoshop and you do a lot of editing on each photo, you may find the “snapshot” feature to be life changing. Save snapshots along the editing process so that it’s easy to go back to a particular spot if you screw up one of your edits. Cool. […]
You could do this with Smart Objects or proper layer management and stamp visible layers (cmd+shift+opt+E)
Why flatten anyway? I never ever flatten my images, I just simply save the psd with all my layers. And I can always go back to change whatever I like to change. Simple as that.