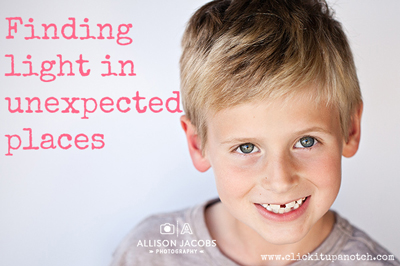
If you could see my garage, you would know why it may not be the first place someone would think of when trying to find a place to set up for great photos.
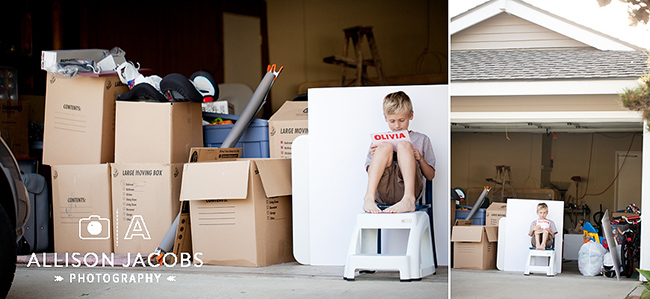
Well, you will get to see my garage in just a second when I bravely show you a pull back that includes tons of moving boxes that still aren’t unpacked from the last move. But, unpacking isn’t the point here.
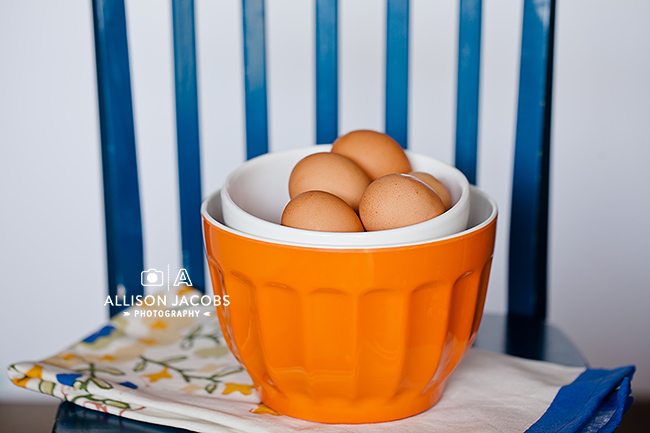
Finding good light is the point. And, isn’t it wonderful that sometimes good light can be found in unexpected places. Typically I use my garage for food photography because I am not worried about catch lights in the eyes so I can leave the big garage door down which keeps the boxes hidden from the neighbors (and still get really great light) and use the light from a window in my garage. The image below was shot in my garage with a piece of white foam board a few feet behind the chair. The eggs were facing the windows behind my back as I took the shot.
But, I really, really love the nice light that comes from opening the garage door and placing my subject at the edge of the garage. For the image below I had my son sitting on a chair (actually his choice and also the chair used above for the eggs…I guess it was the chair of the day) right at the edge of the garage.
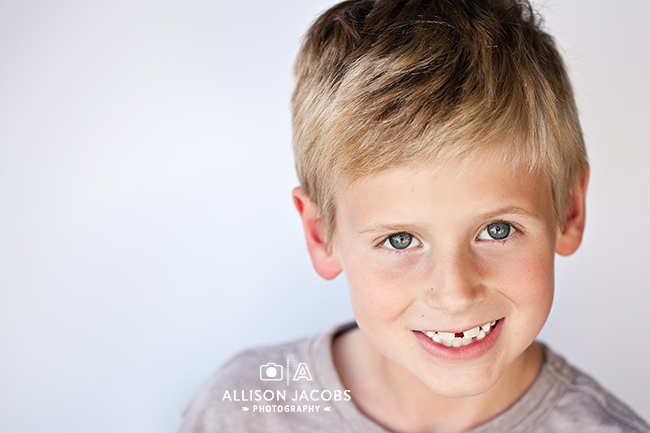
This had him covered by the garage overhang and completely in the shade of the garage. I propped up a large piece of white foam board behind him for an impromptu backdrop. In the pullback below you can even see my thunder gray seamless that I was too lazy to pull out. For this image I wanted a bright light feel to it. I wanted it to feel happy and I wanted to eliminate shadows. When I was shooting it, I was already thinking that I would leave this image in color when I edited it.
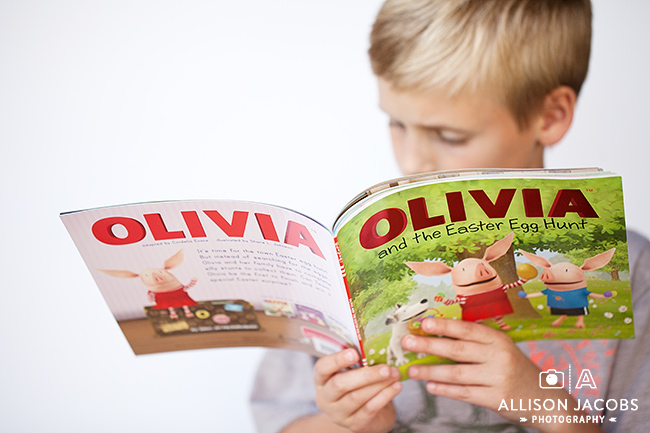
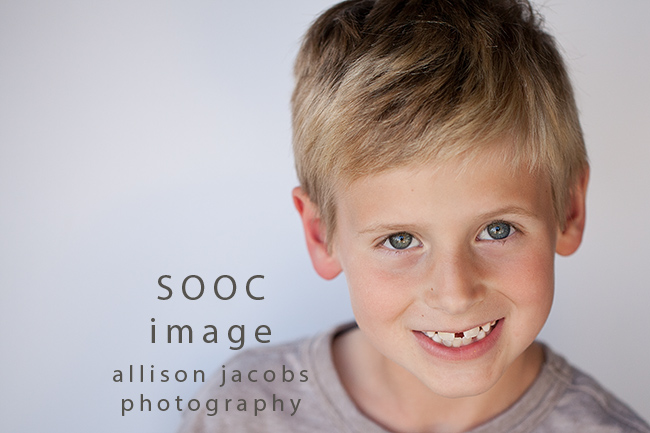
He is looking at a brightly colored book and having fun so I wanted that to be reflected in the portrait. I also had another piece of white foam board to his left to reflect some light back onto his face. You can see a pullback of where I had him sitting in the image below (just ignore all the boxes).
When he would look up at me I could see the light in his eyes and I knew I had the shot that I wanted. I shot this as a RAW file and I used my Expodisc to custom set the WB and this helped give me really great color SOOC as you can see in the image below. In Adobe Camera Raw (ACR) I adjusted the exposure just a tad (+0.15), bumped up the brightness to lift the midtones to +54 (from the default of +50), increased clarity to + 8, decreased blacks to +0, then decreased the shadows to -13 and decreased the darks to -6 to add some contrast. Quick and easy. I didn’t need to sharpen or touch his eyes because of the natural light shining in from the garage set up.
Just to illustrate how you can create a completely different effect in the same setting by altering just a few details I also wanted to show this second image I took. Same day, same time, and the same place. For this image, I told my subject he could stand on the chair. This got him up above all the boxes so that there wasn’t anything behind him until you get to the very back wall of the garage. It also provided a much darker background with lots of great shadows behind him. If he had given me more of a pout than a smile it could be a much moodier image than the one above.
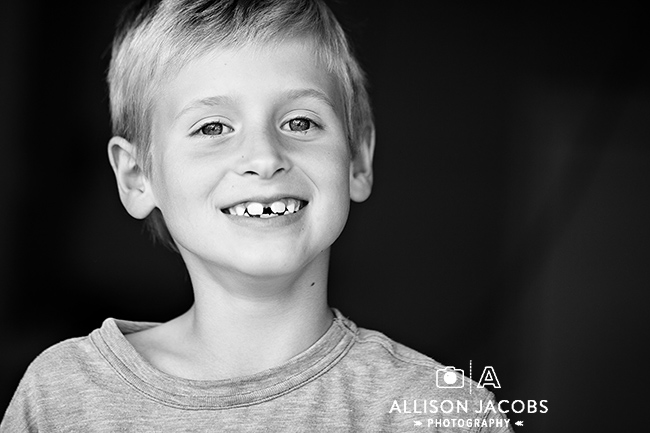
In ACR I did minor changes just like with the other photo but this time I really increased the shadows & darks so that the background is much more solid behind him and covered up some of the shadows of objects that may have been there as a distraction (like a ladder behind him). You can get creative with the lighting, your angles of shooting, and the backgrounds all right there in your garage.
What locations do you have at your house that you can use to get great light and offers more than one type of image? Go lift your garage door and start there!
*This post contains affiliate links. Thank you if you purchase something and support Click it Up a Notch.
Read more fun ways to use light:
–Easy Steps to Create a Starburst Photography Effect Day or Night


Love this tutorial. I often complain about lighting, but it’s really up to you to make the most of any lighting situation.
Thanks Rita! I agree, sometimes it can be surprising where you can find great light!
Lighting seems to be the hardest thing for me to figure out. This article is great. I love the visual. Can you tell me if it makes a difference what direction your garage door is facing? Does the time of day in which you take the picture make a difference? I love that I found your webpage and hope to learn alot from you. Thanks for sharing your talents.
Hi Joan, I think those are really great questions and I think that it may depend on where you live. For me, since my house faces the east, I know that the afternoon is the best time to shoot at the edge of my garage like I showed in my example. This is when there is still enough daylight to get that soft cover from the garage while also getting the light in the subject’s eyes. I would suggest heading to the garage at a few different times of the day to see how the light is shining to help decide when you want to shoot there. I hope that helps!
There is also a great iphone app if you aren’t sure the best time to shoot, it’s called LightTrac and it gives you the direction of the sun at any time of the day for any address, including sunrise, sunset, shadows, golden hour etc.
It’s fantastic for planning a shoot at a new location, or deciding which time to head out to play! I’m obsessed :)
Great article!! I really like the pull backs so you can see that beautiful pics can be taken outside a “studio”. It gives me hope. LOL!
Me too!
Thanks Vanessa! I always love seeing pullbacks of where people have taken shots so I try to remember to capture a few when I am shooting too if I am planning to share. I am so glad you found it helpful!
Garages definitely make a great photo location! I took this one of my sister a while ago –http://www.flickr.com/photos/amyejohnson/8007088309/in/photostream. I should do it again with her in a brighter color shirt — love the idea of using white foam!
Your sister is adorable! I agree, a lighter shirt would be good to try next time. I find sometimes when I am looking to get the background pretty dark that the lighter shirt helps define the subject better.
Thanks so much for sharing your tips!! Great article!
Thank you!
And I thought my garage was bad;)
Thnaks fo rthe ideas, we need to think outside the box!
Should have reread before I posted, oups!
Thanks! Yeah, we really need to get unpacked! lol
Great article Allison and wow! That pull back is great and you’ve given me some great ideas for garage work!!! :D
Thanks Celeste! You could work some magic in the garage with your gorgeous b/w conversions! :D
Wonderful Allison! I always love your portraits of your boy and your food photography! I love to see where the magic happens. You’ve inspired me to play in my own garage! :)
Thanks Sarah! I would love to see what you get from shooting in your garage!!!
Wonderful article, Allison. I loved seeing the steps you took to achieve these beautiful images. I’ve yet to try garage light and you have inspired me to get out there and try. :)
Thank you Lisa! It is a great place to find different kinds of light!
wow…Allison…this is an incredible article.
your images are amazing!
i am so inspired for our next portrait theme.
thanks so much for sharing this!
Thanks Melissa! I can’t wait to see what you come up with for garage lighting….you always blow me away!
Two things. First, these are absolutely gorgeous shots. The light is beautiful and the energy you captured in your son shines through.
Second, OMG I am SO GLAD I’m not the only one with a mess in my garage! This inspires me to go ahead and open it up and see if I can capture my little guy in that great light. Thank you for sharing the shots and the pullback!
Allison… Beautiful work, of course, and I love how you demonstrate that the most important aspect of photography is the 6″ behind the lens. Great ideas here! Love seeing your son, too. :)
I love this….I am new to Click it up a notch and came across your article. So awesome. Can you let me know what settings you used outside?
Thank you so much! :)
Jaime
Love your tutorials! I saw a Natl Geo photographer light a couple at sunset by having them turn towards his car’s tail lights! It gave a warm glow as the sky was in twilight. Also, he used a portable battery powered light to light some lions in a tree in very low light. Just some more ideas.
Nice article, but like many light is the toughest to figure out. Your blog on black and white images seems to be most helpful regarding flat lighting and directional lighting. I’ll keep studying that and practicing. I will look at images to decipher flat or directional. I think i need to look for depth or shadows on the subject face, not even light…right?
Yes, shadows are important as well when it comes to the light on a subject’s face. You don’t want the shadows too harsh but shadows are great in an image because it gives your subject dimension.