*Post contains affiliate links. Thank you in advance if you support Click it Up a Notch.
When I named this article “Speed Light Photography for Beginners” what I really mean is, I got my flash less than a week ago and I’m going to show you what I’ve learned so far. If you have been using your flash for more than a week, just go ahead and stop reading. I’m kidding. Hopefully, my research will be fruitful for all beginners. But if you’ve been shooting with it for a while, I hope I don’t completely waste your time.
I have been shooting in natural light for years now. To be honest, using a flash is a bit intimidating to me. I feel like I’ve got my brain wrapped around shooting in all types of natural light and with using constant nontraditional light (like iPads, flashlights, lamps, etc) but a flash? I feel lost and confused! So, what is the first thing I did when I got my new Nikon SB-700 Speedlight for Mother’s Day? Well, I let it sit in the box intimidating me for a few days….then I skipped reading the instruction booklet and finally just took it out and played.
Speed light photography for beginners
I have shot in natural light for so long for a reason. I love the look of natural light. I love the way it wraps around a subject. I love how it can range from soft to hard and dramatic. I love how it can be manipulated in so many ways to get the look that you want. Flash can be used in many ways as well and can give you more freedom in the evening hours or indoor areas where you are lacking natural light. This is what I’m hoping to gain from using flash, but I also want my flash to give me “natural looking” light. So, in this short and sweet tutorial, I’m going to show a few different images and point out what looks “flashy” and what looks more “natural” to me. I hope that these images will be a guide for you to critique your own images as you learn to use your flash.
100% Natural light image
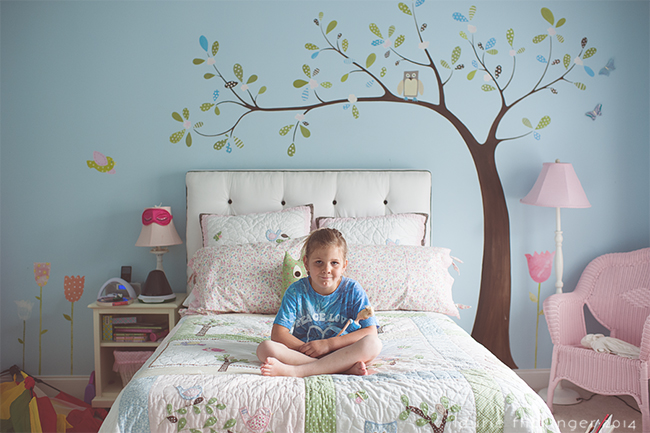
First off, here is a 100% natural light image. The light is coming from a set of big windows camera right. All of the shutters are opened to let in ample light. It is an overcast day, so the light is soft. Because the light is coming from only one direction, it is directional light. The light is perpendicular to the subject, which creates a split lighting scenario. Notice how half of her face is lit, the other half is in shadow. There is a mirror over a dresser camera left, which bounces a bit of light back into the shadows camera left (my little girl’s right). And her arms are much more tan than her legs. Looks like we need more time at the pool!
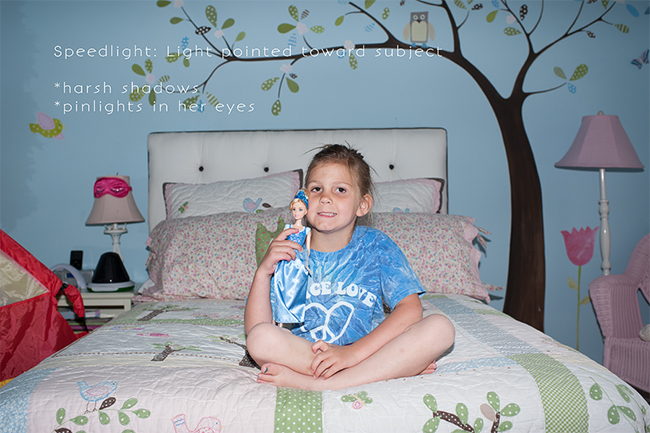
Speed light pointed straight at subject
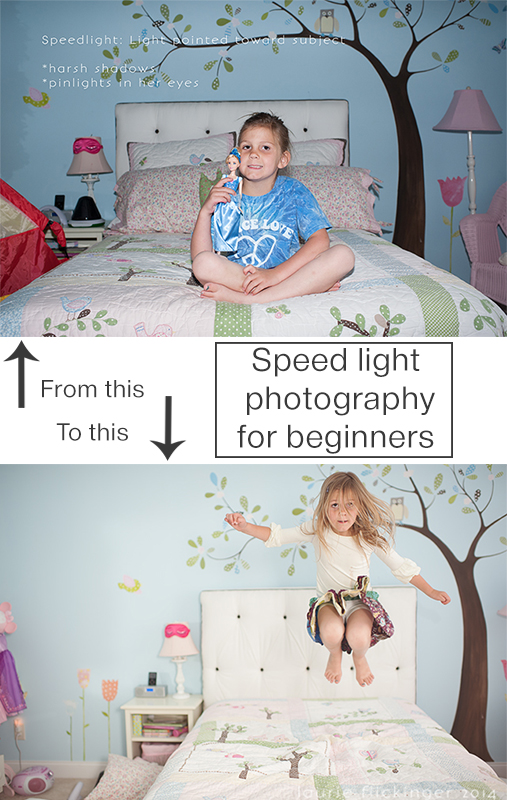
This is an extreme example of the look I’m not going for (and the look that any seasoned Speedlight user isn’t looking for in their images either). This is the speed light on and pointed straight at the subject. Basically, it’s being used as an expensive pop up flash. Subject is in the same location on the bed. In this image I closed the shutters on the windows, so the room was very dark. There was little ambient light coming through the closed shutters. Notice the differences in the shadows in the images. This would be considered “hard” light. It is coming from a small light source. The shadows are harsh and have very defined lines. There are even shadows projected onto the wall camera left that are from a boa hanging from her dresser mirror. I can’t think of any positives in this image.
In the following images, I’m using my trusty Nikon D700, Nikon 35mm 1.4G, and newest toy Nikon SB-700 Speedlight.
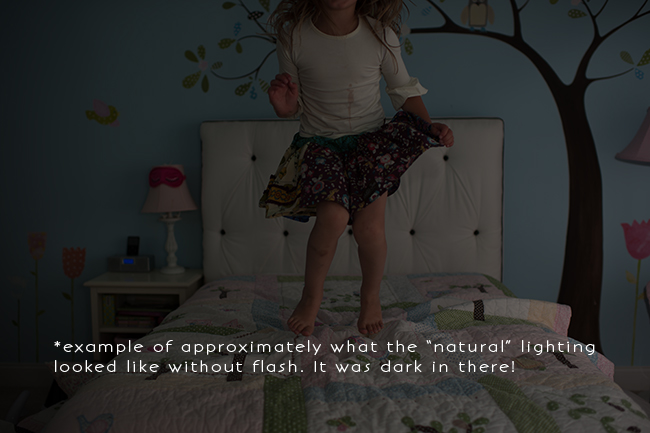
No flash and blinds closed
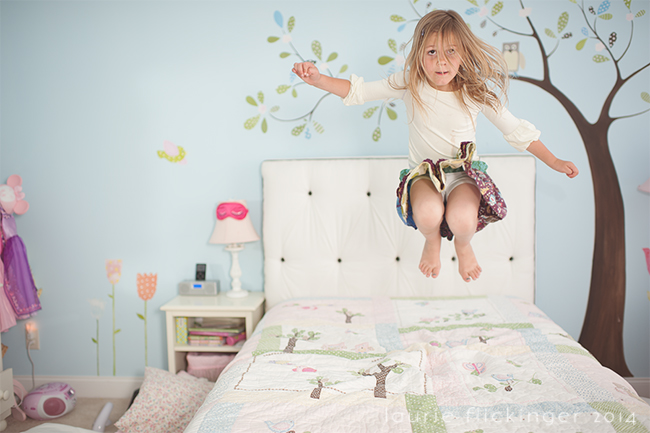
An example of what the lighting actually looked like to the eye with out flash and with the shutters closed. Without the flash, I would not have been able to get my shutter speed up to a point where I could freeze my subject mid jump in the air. The results would have been grainy and blurry, as the day was overcast and there was less light because it was later in the evening. While for any other day, I would not have even attempted these images in this type of lighting situation, I would have waited for a bright, sunny day, and opened up the shutters to let tons of light in. Since, I was trying out a new toy, I think this situation was perfect.
Bounced light examples
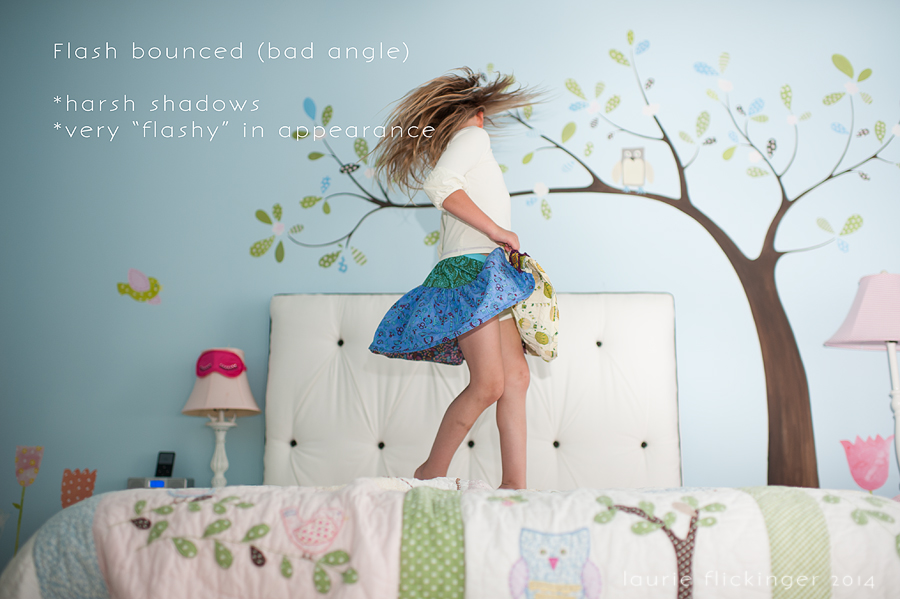
Here are some “bounced” light examples. In the following images, I played around with bouncing the light from the speed light off of the closed white shutters camera right. I was “attempting” to bounce the light so that it could look more natural. I played with different angles…turning the flash from 90 degrees to 45 degrees, and then changing how much the light was pointed up or down so that I could look at each result. Let’s analyze a few of these images and think about what works and what doesn’t work.
This image looks very “flashy” to me. The flash was bounced off of the shutters/wall camera right but there is also too much light coming from straight in front of her. I like the look of the shadows that are cast from the lamp and bed. I like the light fall off from camera right to camera left. Notice how the wall gets darker as you move from camera right to left. That is much like the natural lighting scenario in the first image of this article. On the flip side, the shadows of her body on the wall and headboard are bad, bad, bad. So, I kept trying other angles.
Again, soft shadows camera right, but harsher shadows camera right, as well as the shadow on the wall behind her. So, I tried again. Different angle.
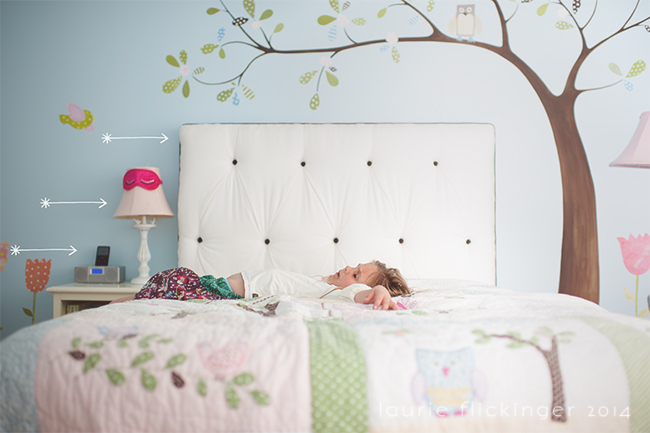
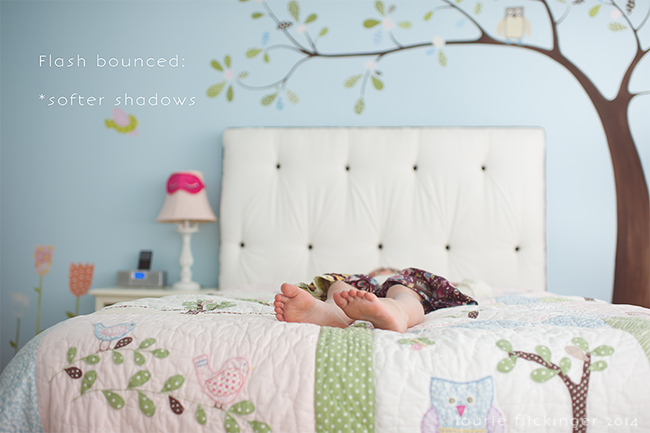
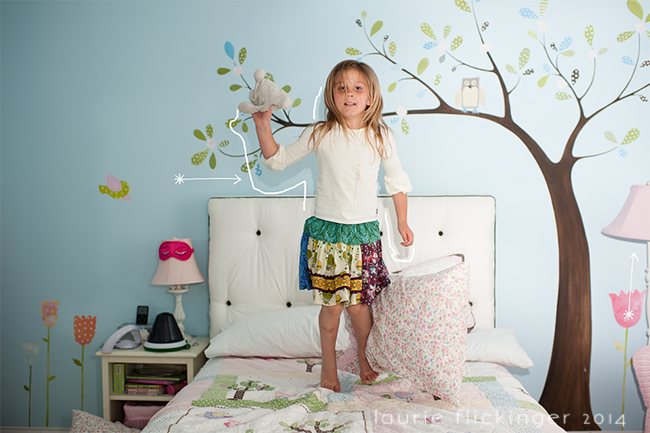
This image looks a little more natural to me. The lighting is pretty flat and even, but the shadows are softer behind her. I think the speed light was pointed at a 90 degree angle toward the window. The amount of light still coming from the flash in front of her makes for a more even lighting situation, as well as the light then bounced from the shutter to the mirror camera left. Notice the shadows of the lamp in this image are placed camera right from the light bounced from the mirror (bounced from the window). How confusing does that sound? Light does a lot of bouncing around. So all types of reflectors should be accounted for in natural lighting and even more so in flash lighting, I’m finding, because the lighting is much more intense. I also noticed that the farther away my subject was from the background, the less noticeable the shadows are on the background.
This is what happens when you tell your kid she has permission to jump on the bed……she was exhausted! Here are a couple that are passable (for me). The lighting looks much more natural to me. The way the shadows fall look more natural. The lighting is more directional (which I love) and less even (like the image above). The shadow of the lamp camera right is a dead giveaway though.
Do you have a speed light? What have you learned? Tell us in the comments below.




Great article about using a speed light! I have one that I seldom use, I prefer natural light whenever possible! Maybe I will have to bring out my speed light to practice :)
Thank you for this article! I can’t wait to read more about flash use!!
another thing I noticed with my own novice speedlight work is how close the subject is to the background. In the first pictures of the speedlight (the ones that produced shadows on the headboard) she was a little closer to it. In the image of her jumping, and the two of her lying down, she’s not close to the headboard. So I agree that the adjustment in the bounce angle of the flash was an improvement. But even just moving the subject away from the background a few feet can help reduce harsh shadows too.
Great article! I also have the SB700 but haven’t played with it enough!! Quick question, in your last couple of images was the flash pointed towards the window with closed blinds and what were camera settings?
Thank you!!!
Gina
THANK YOU!!! I got an SB700 right around Mother’s Day as well and I am still scared to use it. I’m a total chicken with flash photography, but I know I need to learn it. I will be a huge follower of this series. Really appreciate it!!
I hope to get one soon, so I loved this post! The information here is very useful…thanks for sharing!
Great post (As always) Laurie!! I need to get my speedlight back out and try out your tips!
This is a great article. I’ma complete photography novice, so I can’t wait for more articles like this!
xoxo,
Jessica
Really great article and fantastic pictures – what a difference bouncing the flash makes. I’m trying to get to grips with my new Speed light too and it’s inspiring to see how you just dove in and experimented. One thing that would make this article even more helpful would have been some quick sketch diagrams showing the angles. When you said 90 degrees did you mean the flash was pointing directly at the window shutters? Did you change the vertical position at all? Looking forward to reading more Speed light articles from you in the future.
Super fun read! Thanks so much for posting this!! I love using speed lights as I would use any other tool or lens… when appropriate… and to get the look that I am planning to get. Totally agree that if used correctly you wont even notice them… or, you might really notice them if you are going for crazy back lighting or nighttime portraits…. But that shocked over shadow-y look is never good!
Wow what a gift! Makes my breakfast and dinner gift pale in comparison. How do you all afford these expensive cameras and equipment?! I had to buy the nikon 3200 and still have the kit lens. And my husband and I bring in $140k combined.
THANK YOU! I was just thinking today that I need to learn how to use my speedlight better. I, too, have the SB-700 and just mess around with it. But I really NEED to learn how to use it properly. Thank you for sharing your experience!
Great article! I bought a Speedlite, but I bought a Japanese one and all the instructions are in Japanese. I put it on the camera a couple of times but haven’t actually made it flash yet. This may sound silly, but do you put the flash on your hotshoe on the camera or do you use an attachment which is off camera? I can’t work out how you do those angles. I think it’s time I got it out I’d the box and had another look!
So excited to have read this post today! I’ve had my speedlight for 3 years. It mainly sits in my camera bag. Super intimidated by it. I’ve tried to take pictures indoors but never been able to achieve a “natural” light look. I get harsh lighting and therefore have given up on the speedlight. Hope you post more on how to use the speedlight. I have two little ones I’d love to capture their shenanigans ;)
Thanks for this post!!! I have yet to get a speed light but this post is changing my mind, I know if you, a professional was feeling imitated then this sure helps me to not feel so scared. I will be back to read more of this post after I get to have my quiet time. Thank you for all your helpful info.
Wondering what you light may have looked like if you bounced the flash on the ceiling? Also just to let you know a great resource, Scott Robert Lim has a great little chart to help you figure out your settings for manual flash. Here is a link to it.
http://shatteredimagesphotography.blogspot.com/2013/06/sunny-16.html
It is also available as an iPhone app.
Diffusing your flash is also an option. One of my favorite diffusors is called The Wing Light.(Sorta looks like a flying nun habit)
https://www.youtube.com/watch?v=jCN_uk9agDo
I attended one of Scott Robert Lim’s workshop a year ago and the flash chart he gave us helped me a lot. Whatever your settings are, it gives you the flash power needed for that shot. If anybody needs it I can send them a copy.
Great article on bounced flash. Not sure I saw you mention but be careful with bouncing flash, because the color of the walls you’re flashing against will get picked up in the shots. The light will become the color of the wall. Great article though.
I bought a Canon 430EX II speedlite about a year ago and just took it out of the box yesterday. I have been working hard on learning to shoot in manual mode and felt like I was beginning to make some progress. After reading a few pages of the speedlite manual, I feel more confused than ever. It’s going to take me awhile to learn how, when and where to use it.
I love this! Thanks! You’ve inspired me to purchase this as well. :) I should have it by Wednesday. Can’t wait!
I just recieved my SB-700 a few days ago and haven’t yet tried to use it. have read most of the manual but haven’t tried it. I got it because I have a wedding on Saturday and its inside ….. i know, i know, i know….. shouldn’t wait until last minute… it will be fine i am certain
Yea! i’m so excited for this tutorial and to see more on using a speedlite. I bought one but am not in love with it yet. The photos usually turn out too “flashy” looking. I know this is user error, so I’m looking forward to learning more!
I just wanted to say that this is a great type of exercise to do to learn how to get the results you are looking for and even though I am a professional photographer, I thought it was interesting to see your results and your notes. I too appreciate natural light and use it as much as I can but many times I do feel the need to “bring the light” to the image. There are many techniques that can be used. One guy you may learn some cool tricks from is this guy http://neilvn.com/tangents/ he likes to use “indirect” flash and I think you might appreciate it.
Thanks for the reminders and helpful advice. Flash can be tricky and this reminds me i need to practice with it more!
This is so helpful! Thanks for the breakdown of what to look for. I’m still using a plain old point-and-shoot camera, nothing fancy, but you still gave me ways to improve.
Thanks for this! Playing today if my flash I received yesterday and if I feel confident enough with it, I’ll use it a little bit during a wedding tomorrow! I know last minute isn’t ideal, but I got a bit of extra money and I thought this would be a good investment. And know that if I’m not feeling confident enough with it, I will NOT use it! :) It’s a small wedding and they are friends of the family (my father in law is the officiate) and are a very relaxed couple and I will not compromise the day by using it if I don’t feel I should. :) So no worries.
This is a great article! Thanks so much! I just started a Real Estate Photography business which is pretty much built around making a flash look natural! I am learning so much:)
How do you get your little girl to be so clear. I struggle with this shutter speed and lighting.
Hi Stacey! Flash “freezes” motion, so it is much easier to use a slow shutter speed with flash than without. Break that flash out!
So when using speed light, take the camera OFF “L”??
It is a great artucle.. helped me a lot!!!! Cant wait to try out all the possibilities! Thanks a lot!!
Any thoughts on a good beginner flash for a Canon 7D user?
Hi Erica! With Nikon there are several options. I think it will really depend on what you use it for. I am a hobbyist, and chose the middle priced one. The more expensive, the more light it can out out, faster recharge time, etc. If you are planning on shooting weddings, you may want to invest in the one that puts off the most light. For my home, the one I have is fine :) I’m sure there is a Canon equivalent. :) hope this helps some!
I too have a speed light and I too have been intimidated. Thanks for this tutorial, I feel a little more confident now and will pick it up after letting it sit in a box for month and start playing.
Thankyou for this article! I’ve been playing around with macro photography and have decided to get more serious and buy a Speedlite (and diffuser of course) to give me more freedom to explore this amazing type of photography. Like you I am a lover of natural light and flashes scare the heck out of me, but I’m also excited to combine a speedlite and tripod (a recent addition) together in hopes of being able to really try for some creative shots! I found your article at just the right time! ❤️
computer
https://www.virginiamn.com/obituaries/john-franklin-staver/article_dad7b28a-7745-11e8-a065-17c721582b2e.html
It’s not hard, it just takes practice and experimentation.