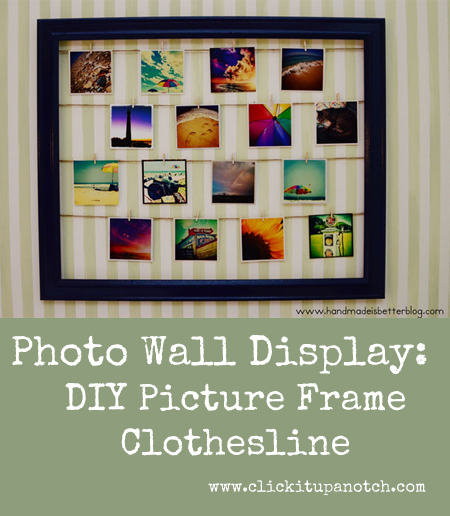
Confession time- how many of you have a severe case of “my pictures are stuck on my computer and never see the light of day” syndrome? Hands up, come on folks- admit it! I know I’m not the only one with this syndrome, and since I’m not alone, I have a project to share with you today that will help you get those photographs out of the computer and on to the wall for all to enjoy.
So get all of those wonderful photographs that are hiding on your phone/computer/memory card to see the light of day and upcycle an old picture frame in the process. Good for your computer and good for the environment – score! This photo wall display DIY Frame Clothesline will have your photos on display for the world to enjoy in an hour or less!
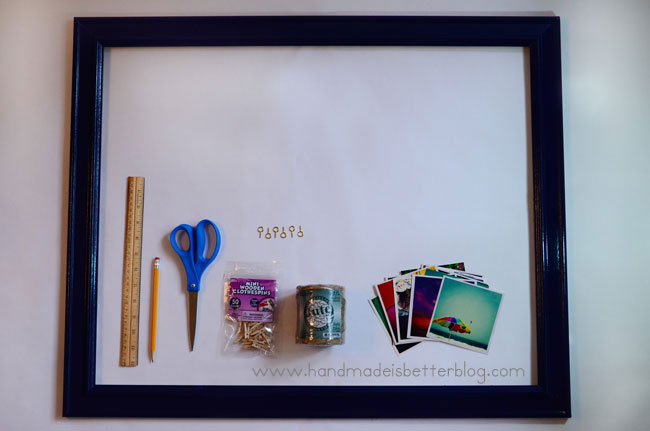
What you’ll need:
- 1 empty frame (the older the better- check garage sales, thrift stores or your neighbor’s garbage pile). You’ll only need the frame – discard the glass and backing. If you want, hit it up with a fresh coat of spray paint, or leave it au-natural! It can be any size you wish. Want to display just a few select pictures? Grab a smaller frame. Have a whole host of pictures ready to shine? Get the largest frame you can find!
- A package of jute (or whatever you would like to use to make the actual clothesline out of. Some other suggestions include wire, ribbon or thin rope)
- One package of miniature clothespins (check out the wood aisle of your local craft store). Paperclips could be used in a pinch, or if you scored a large frame, regular sized clothespins would work as well.
- As many pictures as your little heart desires! I chose Instagram pictures because those poor little vintage masterpieces never seem to get printed! I printed mine 4×4 (Hint- for best printing, drop your Instagram picture onto a blank 4×6 template in Photoshop or Lightroom, and then just trim the ends off after printing, or find one of those new companies that print Instagram pictures for you!).
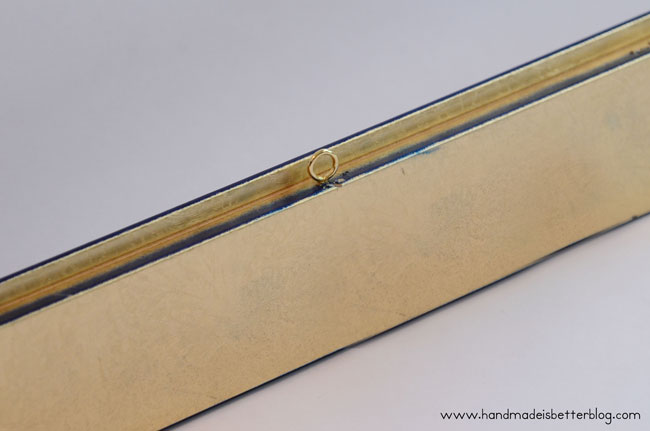
- A package of screw-in O-hooks. These can be found in hardware stores or craft stores near the picture frame supplies. If you can’t find them, you can always substitute hot glue or a strong stapler! If your frame is not wooden, then you’ll need to skip the O-hooks or stapler and use hot glue.
- Pencil or permanent marker
- Scissors
- Ruler
Before you get started:
Begin by removing the glass and backing from the frame if you haven’t already. You won’t need either of them so you can discard or upcycle them! Decide if you want to leave your frame as is, or paint it a different color. I chose to spray paint mine navy blue.
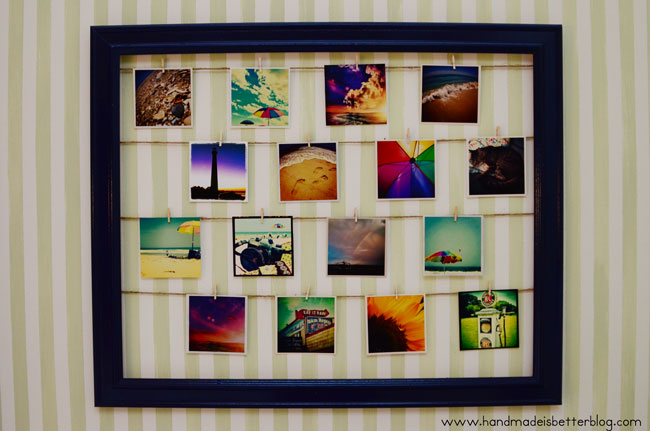
Decide if you want to hang your frame horizontally or vertically. I chose horizontally, but it’s totally up to you!
How to Make Your DIY Photo Wall Display:
1. Begin by measuring the inside dimension of your frame. If you picked to hang your frame horizontally, measure the inside dimension of the short side. If you picked vertically, measure the inside dimension of the long side. Decide how many rows of photos you want in your frame. For example, my frame measured 22 inches on the short side. My prints measure 4×4, and I want a little bit of space between the rows, so I did 4 rows at 5 inches apart. Make sure to take into account how big your pictures are! If you printed 4×6 pictures, and some will be hung vertically, I suggest having at least 6.5 inches between rows. If you have Polaroid pictures to hang, I suggest at least 5 inches between rows.
2. Turn your frame over so you are looking at the back. On the back of the frame, on the inside ledge, use a pencil or permanent marker to mark off where you’ll want your wire or ribbon to attach. In my example, my marks are at 5 inch intervals, and since I had an extra 2 inches to play with (because my opening is 22 inches) I started one inch down from the top. My marks are at 1 inch, 6 inches, 11 inches, and 16 inches. You don’t want to put any marks too close to the bottom because the picture needs to hang below the clothesline, and if it’s too close to the bottom of the frame, the pictures will hang over the bottom edge of the frame.
3. If you are going to be using hot glue or staples to secure your jute, skip ahead to step four. If you are using O-hooks, simply screw them into the inside of the frame ledge at the intervals that you marked in step two. You may need pliers to help you screw in the O-hooks, or to steady the hook while you make the first few turns.
4. To determine how long to cut your jute, measure the width of your frame (the opposite side of which you measured in the first step), and add a few inches. My frame measures 28 inches across, so I’m going to cut my pieces 30 inches long. Cut one piece of jute for each row of your frame. (Hint: If your jute is ultra-curly, soak it in a sink of warm water for a few minutes, then lie it outside in the sun to dry flat.)
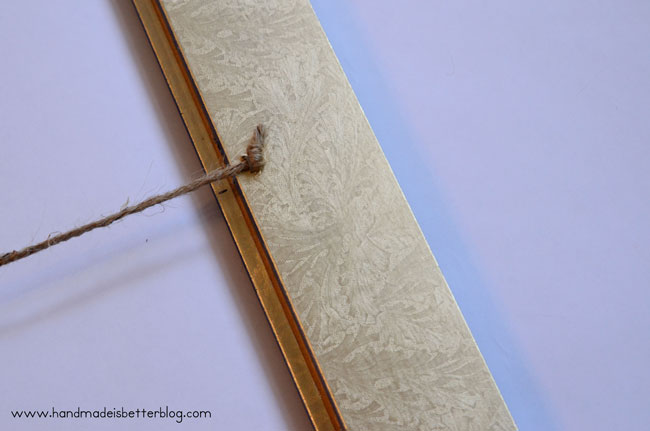
5. Attach the jute to the back of the frame. If you used the O-hooks, tie the jute to the hook, secure it with a good knot, and trim off any excess.
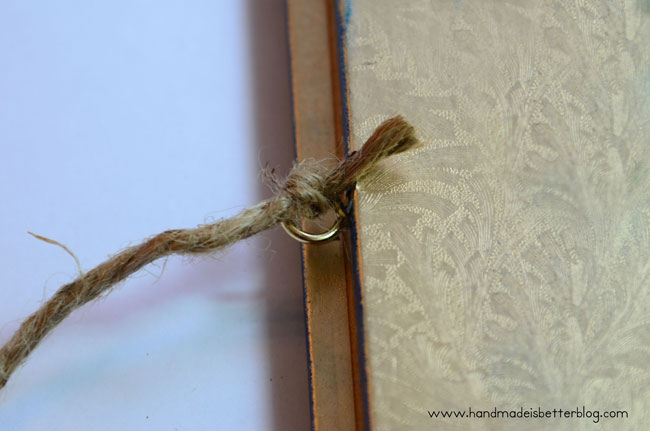
When you tie the jute to the opposite O-hook, make sure the jute is nice and snug. The pictures and clothespins are going to pull it down a bit, so if you have any slack in the line now, it will be even worse once you start decorating with your pictures. If you are using hot glue or staples, simply glue or staple the jute to your frame where you marked. If the ledge of your frame is wide, you can glue it right inside there for a neat, finished look, but if it’s small like mine is, you might have to glue or staple it right to the back of the frame. If you use a stapler, I suggest tying a knot into each end of the jute to prevent it from slipping.
Repeat with the rest of the jute for the remaining rows.
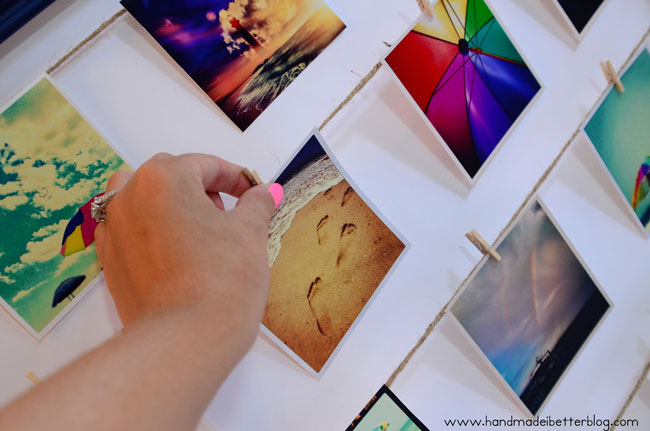
6. After your jute is secure, now it’s the fun part! Turn over your frame and break out the mini clothespins and your pictures and arrange them any way you please.
7. Hang in a prominent location, stand back and smile. You’ve freed all those wonderful pictures, and the world can now enjoy them in person!
Take it a step further:
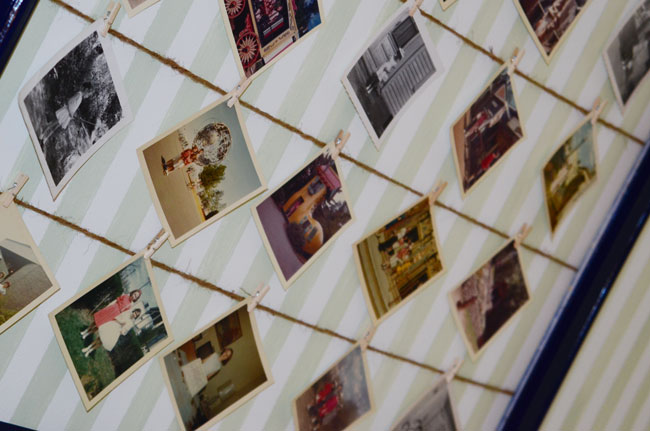
- Update and change photos as needed! Christmas? Hang up all your holiday cards in the frame! Halloween? Hang up pictures of your children dressed up in old costumes from Halloween’s past!
- Grandparent’s birthday? Find old pictures of them as children and hang them up!

Who says the pictures have to hang straight- tilt them for added interest. - Going to an anniversary party? Gather old pictures of the happy couple and put it on display for everyone to reminisce!
- Have a budding artist in the family? Grab a larger frame, and put only one or two rows of jute inside the frame and let them proudly display their artwork!
- This makes a wonderful gift for a new parent, a newlywed couple or grandparents who want an easy way to proudly display pictures of their grandchildren!

The possibilities are endless!
![]()
 Dana Vastano – Guest Post
I’m Dana- the crafter, photographer and writer behind the Handmade Is Better blog. Growing up in a crafty family has led to my extensive knowledge on sewing, photography, cooking, fiber arts, fine arts and more! I strive to show others why handmade is better on my blog and love posting crafting tutorials, photography tips and yummy recipes. I grew up on the Jersey shore but recently relocated to the state of Washington. When I’m not crafting or taking pictures, I love exploring the local area, running or relaxing on the couch watching TV (usually reruns of 70’s and 80’s shows, the Big Bang Theory or How I Met Your Mother).
Blog | Facebook | Etsy | Pinterest | Instagram


Hey, My name is Laura and I blog about tips for displaying printed Instagram photos. I have been doing lots of looking around to find unique ideas and I just want to let you know I love this idea! I love seeing the crafty ideas that people create to display their Instagram photos! thank you for sharing. I really hope this idea inspires people to print their Instagram photos!
Glad you enjoyed it! I agree, people need to print their photos!
I did something similar for an english project of mine a few months ago! It is such a neat idea!
Love this idea! So clever and so much easier to change out pictures from time to time! Thanks for sharing!
Hi there! I’m trying this idea out and I’m finding that the clothespins flip around so that they are upside down and the picture is sort of facing upward. Any thoughts on how to weigh the pictures down so that this doesn’t happen?
Easy diy project and I will have a try.
I tried this using old black and white photos! It looked fabulous! However, after a while, the corners of the pictures all curled. Any idea on how to flatten and reinforce them so I can continue displaying them? Your idea was the best. Thank you, Nancy
Thanks! They may curl due to paper quality. I would consider investing in some higher quality prints.