When I began shooting, white balance was the last thing on my mind. But as my technical skills improved, so did my eye for color. It is really amazing how things seem to come together.
Read more: How to Shoot in Manual Mode
During the second year of doing a Project 365, one of my goals for the year was white balance. I felt like I had tried every kind of white balance tool and method, and nothing was working consistently. Then, a friend, Megan Cieloha mentioned using Kelvin for white balance. Of course I had seen the Kelvin menu on my camera before, but I didn’t really think anyone used it!!! Well, evidently, I just didn’t get the memo. Really, a LOT of people are using Kelvin for white balance these days and the reason why is because it is much easier to get consistent white balance every time.
Read more: 7 Tips to Take a Sharp Photo
Kelvin? What is Kelvin?
Kelvin is a scale for measuring temperature (as in heat). Color temperatures can also be described in kelvins. This could get really nerdy, really fast, so I’ll cut to the chase. Basically, the Kelvin scale that photographers use was made by determining the color of a big chunk of metal (black-body radiator) heated at different temperatures. At lower temperatures, it turns red, then orange, then yellow. As it gets hotter and hotter, the metal turns white, then blue. This change in color is what we use as a basis for the color temperature of light in photography.
Read more: 5 Tips for Freezing Motion in Photographs
The Temperature Chart
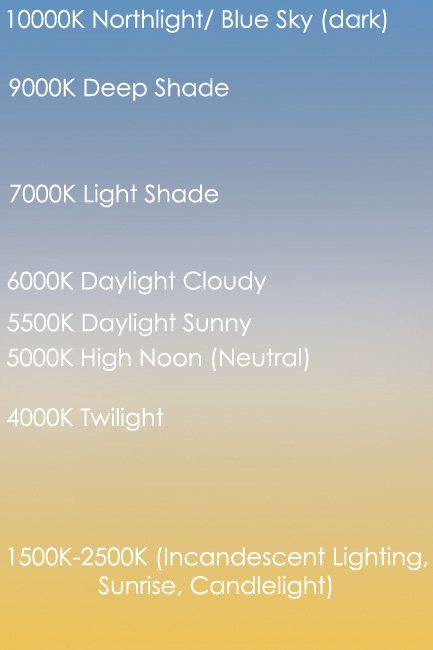
Disclaimer: This is not an “official” Kelvin chart. I’m not sure there is an “official” one, but this one I made in Photoshop because I didn’t want to rip off anyone else’s hard work. By googling “Kelvin Temperature Chart” or “Kelvin and Photography” you will find more sophisticated charts. This one will suffice as just an example to show that the lower numbers are for more yellow/warmer light, the higher numbers for bluer/cooler light.
How to Apply Kelvin Temperature to Photography
Basically, when shooting in kelvins for white balance, you should think about what kind of light you are shooting in. Does the light look yellow? or blue? or neutral? Let’s say you are shooting an image in the evening under tungsten lighting. The light will look yellow, and your subject will look jaundiced. If this isn’t the look you are going for, change your settings to around 2800K as a starting off point, and go up or down from there. It should immediately look better, but will likely need some tweaking. If it is still yellow, use a lower temperature, like 2500K. If it looks blue, use a higher temperature, like 3000K. I tend to chimp (check the LCD repeatedly) until the image on the LCD looks as if it were shot in neutral light.
Read more: 5 Ways to Create Catchlights
The same goes for natural lighting. I did a little test similar to this one when I first discovered Kelvin. I have a “magic number” that I use the majority of time in my home. The “magic number” will be different for everyone depending upon the type of light you are getting in your home, and it can also change depending upon the time of day and from which direction the window light is coming from. But if the lighting is consistent in your home, your “magic numbers” will be consistent too!
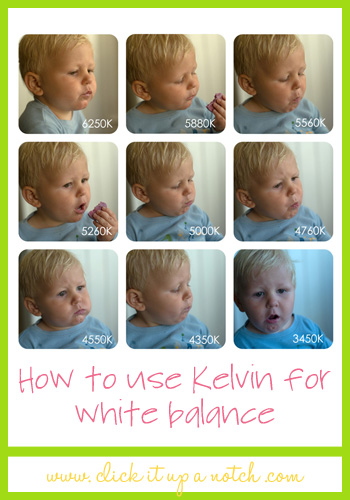
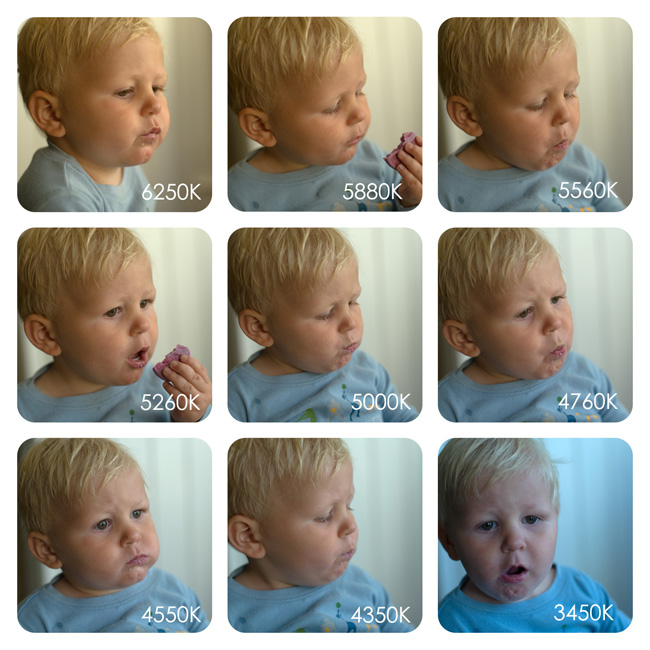
The following is an example of the different setting used on the same subject. These are SOOC images. No adjustments and everything is zeroed out in ACR, Brightness=0, Contrast=0, Blacks=0 (so don’t judge me!!!) ;)
Read more: 5 Reasons to Shoot in Manual Mode
Which temperature do you think looks most accurate?
I tend to shoot on the warmer side. Honestly, most of the time, I find my images too yellow, and in this example I would choose 4760K or 4550K as the most accurate. Also, notice how the images looks underexposed in the last photo with the temperature set at 3450K.
You can also use Kelvin to accentuate colors in a sunset. For example, if you changed the color temperature to 2500K, the beautiful yellows and golds will be neutralized and the image will be lacking. If you change the settings to 6500K the sunset will look warmer than neutral. Play with it and see what a difference it can make!
Here, the sun was beginning to set, so a beautiful warm light was illuminating my little girl. I liked the warmness of the light, so I set my white balance around 5260K because I did not want to neutralize it. In ACR the settings read a little differently, which said I had it set at 4800K.
Advantages when using Kelvin for white balance
1. Less guesswork in ACR/LR/PS when adjusting WB. While it isn’t the end to color correcting, it gets me much closer to perfect than any other method that I’ve tried.
2. Easier to see color casts. When skin looks great, it is much easier to spot a color cast than when using AWB (auto white balance) or CWB (custom white balance). Because you are setting your white balance and the camera is not playing any part, the color cast doesn’t play a part when white balance is being set (which is possible when using a gray card or AWB).
3. Much quicker than getting out the gray card for changes in location!
4. More consistent white balance than AWB.
5. More accurate exposure.
Review of Kelvin for white balance:
*5000K is neutral/high noon light
*Less than 5000K is blue light to dark blue light
*Greater than 5000K is yellow light to orange light
*Indoor natural lighting (window light-no overhead lighting) ranges between 5000K-6000K depending on conditions outdoors.
*For a neutral scene, determine the color of light you are shooting in and change the temperature to match. To accentuate a scene, go the opposite direction than the light you are shooting in.
Poor boy is getting over a cold. Never mind the watery eye and crusties :)
Read more: 6 Reasons Why You Have Blurry Photos
Does my camera have Kelvin for white balance?
I’m not sure which models of cameras have Kelvin as an option for white balance, but I know both Nikon and Canon pro models have Kelvin in the menu and the Nikon D80, which I previously owned, did as well. On the D700, it is really easy to change the setting without going into a menu, which makes using Kelvin for white balance way easier than setting a CWB every time you shoot.
Discover More Photography Tips:
– Basic Photography Tips
– Changing Your Focal Point
– 10 Incredibly Easy Tips to Take Silhouette Photos







AWESOME! Thank you for this.
Thank you for the post! My camera doesn’t have Kelvin settings so I’ve never used it, but to me it seems like this would take longer than using a grey card. With a grey card I snap a picture and then can set all my pictures white balance in that setting at once in LR by copying. With this I feel like I would be setting it, looking at my LCD screen, second guessing myself, changing it, taking more pictures and on and on. Haha. Do you just get used to it and it becomes second nature do you think?
Hey Liz! For me, It has become second nature! Like Laurie mentioned there is a magic number that I start with. I know what number works best in my house, outside, and at night. Really I only have to remember about 3 numbers. I can adjust in LR too, but I love not having to get my gray card out each time I want to snap a quick pic of the kids. I’m glad to hear that the gray card works well for you!! It really is all about finding what works best for you to nail your white balance :O)
Ok, how do you adjust white balance in LR? The only thing I’ve found to do is adjust the colors in the photo…?!?? If there is an easier way of correcting white balance I am so on it!!! :-)
You must have read my mind! I’m actually going to do a video on correcting your white balance in LR in about a week or two :O) Keep an eye out for it.
Yep! I agree with Courtney. At first, there is some second guessing and figuring out what the best settings are for where you are. But like anything else in photography, practicing makes it much easier! Doing a test like I did of my son made it much easier to understand and easier to pick the “magic number” for different spots in my home. Same goes for outdoors, although I’ve found it much more forgiving. If CWB is working for you, then don’t change it! I found that unless I was shooting something really important, I never wanted to break out the gray card, so I didn’t get the WB that I wanted for quick pictures, like Courney said. Call me lazy :) but with Kelvin, you don’t need any special tools. Thanks for your comment!
Oh I could not have found this at a more perfect time! I was starting to get anxious I’d never get white balance! I am trying this tomorrow! Thank you for sharing your knowledge!!!
yay! It is kind of like shooting in Raw, once you switch, you’ll never go back :)
Thank you so much for posting this! I just got the D90, and have been scarred to venture into the Kelvin settings….
Well this is handy! I ‘m looking forward to getting out the camera with some time off this weekend, I’ll have to give this a “shot” … also seems like it would save that editing time to fix the WB issues that AWB sometimes gives.
I have a Canon 7D and I have a Kelvin option. I am pretty sure my Rebel XSi had it too, but I cannot remember. I wasn’t using Kelvin when I had it.
Great post!
Thanks for great articles! They are ever so helpful! I am just a little confused though…I understand about temperatures of light and how the Kelvin scale corresponds. What I can’t figure out is do I find the light I am working in and match that in the Kelvin scale? For instance, if I am shooting at dusk, do I lower the numbers? When I tried this, my picture was blue. On the highest number, the picture was too warm. Does it actually work like the camera…to compensate for the light temperature in the scene, go the opposite on the Kelvin scale? Sorry if this is confusing!
Yes, if you are working in the shade (which is is more blue light) your should set the temperature somewhere between 7000K-9000K as a jumping off point. Check the LCD and determine if it needs adjusting. By using the higher temperatures, more yellow will be added to your image to neutralize the blues. By using the lower temperatures, more blue will be added. By shooting the temperature of the light you are in, you are neutralizing the light so your WB is also neutral. It is sort of confusing looking at the chart. The blue end of the chart adds yellow, the yellow end of the chart adds blue. So, in that line of thinking, it is opposite. The highest and lowest numbers are EXTREMES. The majority of the time, I’m usually around 4800K-5580K in camera (ACR changes those numbers). Inside and outside. I hope this clears it up. If not, let me know!
Oh yes! That is great…now I understand what you are saying!! Thanks soooo much!!
Love this post. Good reminders for what I used to do. Mine is only accessed through a menu so it is a bit slower, but it is faster than color correcting in lightroom. Love your example photos as well. Best part of being photographers is the pictures of our children!
I don’t have the Kelvin menu on my camera, but do have a custom white balance that I want to play with this weekend. Would I set the exposure first and then use my grey card to set the custom white balance? Then what if I decide to tweak the exposure a bit? Do I have to re-set the custom white balance? I’m finding that on auto white balance I’m noticing a green tinge under fluorescent lighting. And it’s too hard to guess what type of fluorescent light I’m dealing with.
Yes, when setting a custom white balance, you would set your exposure first. And you can even set your exposure with your gray card. In any change of lighting, you will need to reset your CWB (custom white balance). I’m not sure if it is the same with every camera, but mine will not let me set the cwb unless exposure is in the ballpark.
And minimal changes in exposure shouldn’t make too big of a difference, but change in location/direction of lighting will. Good luck!
Thank you so much.. This gave me a much much better understanding. Thank you!
Great. Great. Great.
Let’s try this out. Thank you!
Thanks for the awesome post! Can’t wait to try this technique. What does the LCD look like when an image is shot in neutral light?
The LCD should look neutral as well. Some cameras can be changed to “live view” which helps when selecting a temperature for Kelvin.
Greetings! I’ve been reading your web site for a while now and finally got
the courage to go ahead and give you a shout out from
New Caney Texas! Just wanted to say keep up the good
work!
thank you somuch for your post kelvin adj.
Thank you so much for this! I really understood manual mode but I knew that my pictures weren’t really supposed to have a blue tint, and I suspect it was because of this. My only other question is how do you set it?
This has to be the first time I have read and understood what Kelvin’s are. I must be progressing in my photography journey as this was all too much to process before. Now to see if my camera his up to it. Pinning for later thank you enormously.
Manhattan Mold Removal provides quality service in mold inspection and mold remediation to ensure that there are
no medical ailments occurring due to the exposure to molds, be it infrequent or
continuous. I searched the Internet for a service that could help me with this problem
and found Mold Busters. Leaks in your roof or around windows, plumbing problems and even cracks and crevices in the walls allow moisture to seep into
your home’s structure.
Thank you so much for the Kelvin info!! I just took a peek at my d700 and I’m planning on playing around with that tomorrow to see the differences. Loving this site you have!! I too am a stay at home mom of three with a passion for photography!!! Thank you!!!!
Thanks this is useful
Thank you for your basic explanation of white balance. I was having trouble because I kept thinking that blue was cool and yellow warm (painting) so now I just reverse my thinking. Thanks!
Hello everybody,
I also use Kelvin color light values from time to time. However, I am very fortunate that my Digital Camera offers a WB feature that allows me to take a reading of the subject that in turn provides the Kelvin Value plus a registered sample picture of that specific Kelvin Value with or without flash.
In other words, the first Camera reading and sample shot is realtime; you either choose that actual Kelvin value and sample shot or adjust your Kelvin Temp up or down. Without this feature you estimate the initial Kelvin value, check your sample shot and next adjust. The Camera I use is the Sony a6000 which is outstanding in all respects; I am extremely happy with this outstanding camera and the outstanding results.
Oh by the way, you can also bracket for your WB. That’s All Folks!
This is the most precise writeup on White Balance i have read. Been searching for it since a while. Thanks for sharing the knowledge.
You are welcomed. All cameras are set to shoot at a specific Kelvin value at the factory; 5500 or 5000. The Sony a6000 is the same, but this feature provides the actual Kelvin value with your sample shot that does not use the 5000 or 5500 set in the camera. This reading is actual and not based on the pre set value by the factory; its like having a color or Kelvin meter built in the camera when you use this feature. The Sony a6000 is outstanding in many ways and this is one of many advantages.
In other words, 99.9% of the time this feature provides the correct Kelvin value without having to adjust so that it does wonders to peak the colors of the rainbow in full glory; including skin tone.
Oh yes, Before I forget, if your camera has the Kelvin Scale … do it on the fly, take a reading with that as you look through the view finder or screen and stop at your best reading to set it and next take your picture.
Hi there – am curious to know what is best way to adjust WB for indoor ice hockey? As we travel rink to rink and lighting changes dramatically, especially at the older arenas – what is best? I have a Sony A57 with Sigma 70-200mm F2.8 and 70-300mm F4.5
Many times I take photos from both the stands (right against the plexi glass) and on the bench so while I do see a difference – I am still struggling with the preset of WB. I hate post processing but am studying lightroom next month.
Also, best to use RAW no matter if I do post work or continue with JPEG
Still use a grey card? I welcome your thoughts and ideas.
I surprised myself and picked your images of your little boy with different white balance.
I surprised myself and picked your images of your little boy with different white balance.
I surprised myself and picked your images of your little boy with different white balance.
What about the Expo Disc? Would you suggest using this?
I have an expo disc as well. I find that in different situations, the expo disc may work better, or worse. I like kelvin for outdoors. Expo disc is great for indoors with mixed lighting. Gray card also works great! It all really comes down to preference and what works best for you!
I’ve been trying to find a post on how to actually shoot kelvin on my camera. Yours was the first one to say that my camera may not have that setting! I’m bummed because everyone loves it but now I don’t feel crazy for not finding it. I have a canon rebel T3 – would you just recomend me using the custom white balance until I have the ability to upgrade to a new camera?
Yes! Using a custom white balance, like a gray card or an expodisc will help dramatically. I also did a post on white balance :) do a quick search for that :)
I usually use kelvin when shooting subjects with sunset backgrounds as it adds drama to the scene aside from the beautiful color casted from the setting sun..
ynjfyedlsxmvrhuykivnwyfxnuslxbscjyzehuwgvjrjicyysrmkvklltzsrhlsq
home http://www.hoverboardkings.com
you know I am so glad to come upon you I do a lot of crying because I just can not get my pictures right they play sports I have a canon SL1 I droped it brought the lens so for xmas my husband brought me canon t6i he got me 70-200f4 and 18-135f/3.5 and 50mf1.8lens I only had a couple more days for Basketball I try the 18-135 I use a tripod I sit on the bottom of stands and I walk around to take pictures. i dont know that much about shutter speed or Apertures and Iso trying to get some cheat sheets on them thought that might work you have help me on some stuff I am getting there I hope just wanted to say thanks to you :)
The chart, which I believe is correct, shows higher K is blue and lower is yellow. Then he says:
Review of Kelvin for white balance:
*5000K is neutral/high noon light
*Less than 5000K is blue light to dark blue light
*Greater than 5000K is yellow light to orange light
I find this a tad confusing. In fact, it is straight contradictory. He never distinguishes the K of the scene from the K to set in the camera. Matching Ks should give “correct” color balance, but he seems to be describing use of K setting to alter the color away from “correct.” I imagine if you have an 8,000 K scene and you shoot at 3,000 it’s going to get bluer. That must be the clue to what he’s getting at, and why he says below 5000 is blue, when in fact it is Yellow.
Can someone explain what he means here?
Hi! I wrote the article. It seems contradictory, but you are neutralizing the color of light. So if the whistle balance is yellow, you’ll dial in a Kelvin value that is blue to balance it. Hope this helps!
I am going to try this, still new to BGMM. I do a Lot of photography with reflective things like cars- a real challenge in the sunlight. Still working on finding the best settings.
I also have a sony a6000
How do I go about setting white balance that way or using the function where it will read white balance for you? Thanks!
Hey Elizabeth! You will want to refer to your owners manual how to set up custom white balance. It will walk you through how exactly to do it for your camera.
Thank you this was very helpful!
the set of the kiddo pics, do you have that reversed? 3450k should be into yellow and 6250K should be into blue?
Not a mistake! The kelvin is what was in camera. If set to 3500 the image will look bluer. And 6250 will add yellow. The point of Kelvin is to balance the color of light to a more neutral color.