Don’t we all want to know how to take good pictures? The best way to improve your photography is learning how to shoot in manual mode. Your camera can do way more than just auto mode and learning how to use manual mode will allow you to fully experience it. Check out 5 Reasons to Shoot in Manual Mode if you need more convincing. In this post I will break it down maual mode for you, no worries!
Table to Contents
Why would you use manual mode?
Learning manual mode will give you the ability to take full control of your camera and photos. You will be able to capture exactly what you were trying to capture. Whereas if you use the Auto setting on your camera the camera will choose what it thinks is important to capture.
Manual mode settings
When learning how to shoot in manual mode you need to know and understand the “exposure triangle.”
Understanding the Exposure Triangle
This is made up of your aperture, shutter speed, and ISO. You use these three components to get your light meter to be at zero.
Read more: Complete Guide to Understanding the Exposure Triangle
How to use Your Light meter
To find your light meter look through your view finder. It should be that little line graph at the bottom that looks a little like this: – 2 . . . 1 . . . 0 . . .1 . . .2 + (there should be a little flashing vertical line or “ticker” underneath the graph, this is what you are adjusting) **Please make sure you check on your light meter which side the + and – signs are on. My example is for Canons. Nikons look like this + 2 . . . 1 . . . 0 . . . 1 . . . 2 – ** 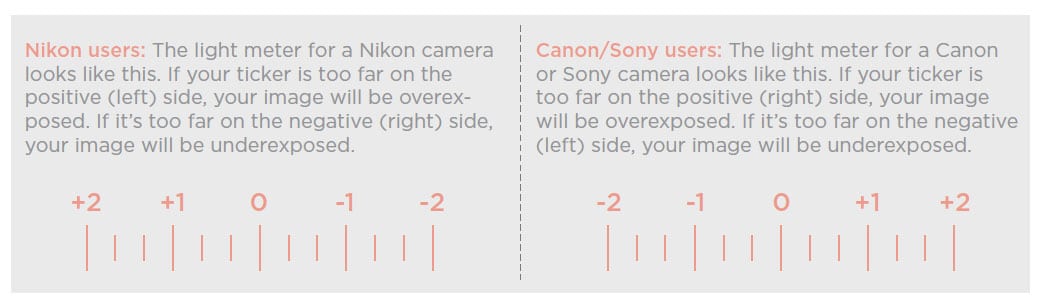
What is aperture?
The aperture or sometimes called the “f stop” is what allows you to have those blurry backgrounds people often ask me about.
The type of lens you use is a big factor as to what aperture you can set it on. When I had a kit lens (the one that came with my camera body) on my old canon, the lowest it went was f3.5. This made it very difficult for me to use in low lighting situations such as indoor shots. Also, with an aperture that high you are less likely to get a blurry background. From the encouragement of a friend, I bought a 50mm 1.8 prime lens. This is an EXCELLENT lens if you are serious about learning how to shoot in manual mode, it is an inexpensive lens with a low aperture. Some cameras are not compatible with this lens, such as the Nikon d3000 and Nikon d5000. For those cameras maybe a 35mm 1.8 would be a better fit. Read more: 6 reasons your photos are blurry
Lower number = More blur
The lower the number (f1.8) only has a small part of your photo in focus and then slowly gets blurrier as you go out from you focal point.
On my 50mm, the lowest aperture I can go is f1.8. If I shoot “wide open” (on the lowest number your lens will go) then I will probably only have one eye in focus but will have a nice blurry background.
Higher Number = Less Blur
The higher the number of your aperture the more of your picture will be in focus.
For example, if you are shooting people and only want them to be in focus then you want to make sure that your aperture is at least at the same number as there are people in the photo.
Read more: Changing Your Focal Point
How to determine your aperture for group photos
If I were taking pictures of both my girls I would want to make sure my aperture was at least at f2.0. I like it to be around f2.8 when I shoot my girls though.

If there are 5 people then you would want to be at least at f5.0 and so on. When shooting landscape you would want your aperture number to be a lot higher so that the majority of your picture is in focus.
How Light Affects the Photo
Changing your aperture affects the amount of light in your shot. The lower the number, the more light is brought in. The higher the number, the less light. Therefore, if you do a lot of indoor shooting, it is nice to have a lens with a lower aperture such as f1.8.
Remember: Lower number aperture = more light and a blurrier background / Higher number aperture = less light and a sharper background
Read more: How to use your f-stop to create amazing photos
What is ISO?
ISO was once explained to me as the worker bees. If you have it set at 100, it is like you are sending out 100 worker bees to bring back the light for you. If you set it higher, 1600 for example, you send out more worker bees, 1600 in this case, to bring back light for you. The lower the number the less light.
ISO Can Add Noise
Something to keep in mind about ISO is it can sometimes affect the amount of “noise” in your picture. Noise is when your picture looks grainy or pixelated.
If your photo is properly exposed it shouldn’t matter what your ISO is set at because it shouldn’t be grainy.
Photographing Outdoors vs. Photographing Indoors

Try to remember that typically if you are outside shooting then you can have a lower ISO such as 100 or 200. If you are indoors with low lighting you may want to increase your ISO to around 800.
Remember: Lower ISO = less light / Higher ISO = more light
More: 7 Tips to Take a Sharp Photo
What is Shutter Speed?
This is the amount of time that your shutter is open. When looking at your camera your shutter speed is written as 1/(a number). This means that your shutter is open for 1/(whatever the #) of a second.
What Shutter Speed Should You Use for People?
When shooting people and especially children try not to go any slower than 1/125. This will help to prevent a blurry picture. Sometimes 1/125 is not fast enough and you still get some movement in your photo, but it is a good rule of thumb.
How to Avoid camera shake
If your shutter speed gets too slow such as 1/40 then “camera shake” may affect the sharpness of your photo. You shake your camera whether you mean to or not, which is why you want to keep your shutter speed as high as possible.
How Aperture affects light
The lower the bottom number the more light will come in because your shutter is open longer. The higher the bottom number means less light will be coming in because it is open for less time.
If you are in a low lighting situation and you are taking a picture of something stationary, you can lower your shutter speed to something crazy like 1/20 but just make sure you use a tripod!
You can use a slow shutter speed to creation motion blur as well.
Remember: Lower shutter speed = more light but your subject may be blurry / higher shutter speed = less light but possibly a sharper subject
Read more: 5 Tips for Freezing Motion in Photographs
How do you shoot in manual mode
After you understand the exposure triangle you will be well on your way to shooting solely in manual mode. I always set my settings the same order every single time. If doesn’t matter what order you use just whatever works best for you. Below is the order and reasoning I use when I shoot in manual mode.
Set aperture
First I set my aperture – that way if I’m trying to get a blurry background I have control over that. I also set this first because I will know exactly hou much I want in focus.
Set shutter speed
Next I set my shutter speed – remember to try not to go below 1/125. I will decide if I need a faster shutter speed based on my subject. If I am taking a picture of my kids, I will go faster. If I am taking a picture of a plant indoors I will go slower but not below 1/125.
Then add ISO
If my “ticker” is not where I want it after adjusting these two, then I change my ISO. I try to do this one last just because I like my ISO to stay at the lowest number possible. Typically, I can get the exposure I want by just changing my aperture and shutter speed. But don’t be afraid to raise your ISO!
By adjusting these three things you will be moving the “ticker” back and forth in your light meter. Ideally, you want to adjust them so that the ticker is on the zero. It is considered a properly exposed picture if the ticker is on the zero. Personally, I like the ticker to be one tick to the positive so my photo is a little overexposed. Play around with it and see what you like.
How your Lens Affects Manual Mode
It is much easier to learn how to shoot in manual mode with a prime lens. Prime lens – does not zoom {you move your feet if you want to get closer}, has a fixed aperture {meaning you control your aperture}, and most people say gives you a sharper image than a zoom lens.
Zoom lens – allows you to zoom back and forth, not all zoom lenses have a fixed aperture {I highly recommend a fixed aperture lens}.
Most kit lenses have a variable aperture so be careful {the aperture changes depending on what focal length you use, not set by you}
I love using a 50mm lens to start off with. It is inexpensive yet a great lens to begin with! I challenge you to go out this week and take your camera off of the green auto square.
Manual mode cheatsheets
 Source credit: London School of Photography Read more: 3 steps for perfect exposure for every photo
Give Manual Mode a try!
Give it a try, shoot in manual mode. You never know, you may love it and never go back! I always say stick your camera in manual mode for 2 weeks and try your hardest to practice it daily. Then let me know how it goes!
Check out this post with over 100 photography tutorials if you have any questions or wish to learn more.


Looks amazing, Courtney! I emailed your link to a friend who just adopted her own DSLR. Love the bowling show pic… Fabulous!
Thanks Angie!!! Glad you stopped by!!!
heyyy !!!
can ya plz juz help me
??
i recently got my DSLR that’s Nikon D5100
n m eager to shoot in manual mode cn u plz jus help me fr improving my tricks and work ??
Check out this post with over 100 tutorials to help you out – http://clickitupanotch.com/best-of/
This is great! No questions yet. It’s so much more fun to read here than in the instruction manual. Thanks for saving me the money of a photography class. I got a fancy camera a year ago (a big reason was so I could take pictures of birds with the telephoto) and am just now learning how to really use it.
Martha, so glad the info is helpful! Let me know if you have any questions :O) I know the feeling about not wanting to read the instruction manual…mine is in Japanese :O)
Regarding increased aperture– Will increased aperture alone allow you to have all subjects in focus? Where should the focal point be? I was trying to take a picture of the 2 kids, but if I put the focal point to the right only T was in focus, when I put the focal point to the left only K was in focus. If I put the focal in the center neither kid was in focus. The camera focused on some random object in between the two children. In this situation do I need to choose all points of focus?
On a different note. Do you find that in our location with the constant changing of the skies that once you get all of your settings adjusted things change? I know that overcast skies are ideal, but we take what we can get on a given day. I have just found that I have a couple of shots that have good color and then the rest are overexposed or underexposed.
Emily these are great questions! I’m going to touch more on focus point next week (you must have read my mind :O) I would put the focal point on one of the kiddo’s eye and if they are not sitting very close to each other have a higher aperture, such as f3.2 or higher. This increases your chance of both of them being in focus. You are right, it is the aperture you are trying to manipulate to make sure they are in focus.
Yes, with the clouds moving a lot on a sunny day I do find myself changing my settings more frequently. If you notice that the clouds move and the kids look like they are in brighter sun, check your settings. Normally, it is something as easy as changing your shutter speed to get it back to “0”. Hope that helps!
What about shooting in aperture priority mode so those slight shutter adjustments happen automatically?
I don’t shoot in aperture priority so I don’t know for sure but yes, I believe you choose the aperture and your camera picks the shutter speed.
This was probably the best advice I’ve gotten so far! You really gave it to us in a way that totally makes sense. I found you on Ashley Sisk’s inspirations page and I’m so glad!!! Thank you so much for making this subject so clear. The video help that went along with this was perfect. I can’t wait to learn more on the focal point as well!
Oh, thanks for that wonderful compliment Marissa :O) I’m so glad you were able to find the info helpful!!
HI COURTNEY,
THIS BLOG IS AMAZING. I DON’T KNOW WHY I DIDN’T KNOW ABOUT IT BEFORE. I WILL BE SPENDING SOME TIME HERE. THANK YOU SO MUCH!
Karren, I’m so happy you like it! Hope you can find some useful tips!!
Hi there! Thank you so much for the tips! I have only recently started using my new DSLR. I have the Canon 60D and I have an f2.8 sigma 24-70mm zoom and a 50mm f1.8 prime. I was a bit confused as to what lens to use and when. I did notice I have sharper images on the 50mm but I like the working distance I can get from the zoom so I tend to use it more. I am going to try and play with my 50mm a bit more. Thanks again as I have trouble getting a lot of my shots in focus. Will keep coming back for more tips!! If you have a chance to give me some feedback would appreciate it! My blog website is attached (very new so quite a few pics out of focus but it’s all a learning curve!). Thanks!
Thanks for stopping by :O) I’m glad you have found some of the tips helpful! I will head over and check out some of your photos :O)
You are an amazing teacher Courtney!! I have had my Nikon D5000 for 6 months and have done a ton of reading and playing, but I have always used P, A, and S mode because I never fully understood how they all worked together. I knew they worked together, but for some reason it would not click …..UNTIL NOW!!!!!
I found you by googling camera settings for Christmas morning. I am so glad to have found your blog! I am going to follow your blog and I can’t wait to read everything!
Thank you, thank you, thank you!!
Thanks for your sweet words! I’m so glad you were able to find my blog and find it useful! Let me know if you have any questions!! Manual mode is so much fun! Hope you love it :O)
Thank you so much Courtney! This was exactly what I was looking for and needed to get me started with the 7D and EF lenses I just bought- my first venture into DSLR’s so it was a bit intimidating! I’ll keep playing, believe me!
How exciting! Let me know if you have any questions!! Have fun with your new camera and lens!
okay, so literally I just tried this and OMG that was soo simple and WOW! can I tell you what a difference it makes (I have a Sony camera a550 and I always shot in P mode not auto but manual is sooooo much better!!) thank you for making it sooo clear and easy! I was always afraid to do this. eek.
You can do it!
So, I know this post is a little older, but I’m seriously going through all of your manual tutorials and cannot thank you enough! I just got a DSLR (finally) for Christmas and was really eager to shoot in manual mode and not just click it over to all of the auto settings, but I was way too scared! I’m seriously sitting here focusing on the same reindeer and playing with my ISO and focal points. Thank you so much for making everything so easy!
I’m so glad it is helpful!! Manual mode is so much more fun then auto!! I hope you enjoy your new camera! Let me know if you have any questions!!
I had a Canon 10d for a long time and have the 50d now, and have always had problems figuring out my settings. I always get underexposed photos with washed out areas where ever light is. Thought that I would finally give manual mode a try after reading this, but my ticker won’t move away from -2 and all my pics (practicing inside with different combinations)are almost black. I get so discouraged that I can’t get these numbers straight. What am I doing wrong? Thanks :)
Mmm..it could be several things. I’ll email you some things to consider and maybe you can send me some photos with your settings for me to check out :O) I’m glad you are switching over to manual mode. You’ll love it :O) We will figure this out :O)
Hi Courtney…Thank you for stopping by my site! I have a question…I just recently bought a Cannon powerShot SX30is and I have a few questions I have tried taking pictures in m mode and I have tried to change the iso, ss, and f, but for some reason my pictures keep coming out pitch black? I can’t figure out what I am doing wrong…I am wanting to get the “blurry” affect, but I can’t seem to do it without using my photo editing programs. Please help! Thanks, Sarah
Sarah, I’ll send your an email and we will figure it out :O)
This just helped me a ton! Thank you for posting the basics! :)
Thank you so much for explaining this in a way I can understand! I have been so afraid to come out of auto, and this gives me confidence :) Great job!!
[…] – you can select the aperature, shutter speed, and ISO. if you haven’t done this give it a try. here is a blog that talks about this and I will talk about it too. clickitupanotch […]
Hi, I tried using aperture,shutter speed and ISO which I tried most of them but still cannot configure out and sometimes even a black page shows on the camera display. I’m adjusting it in f /3.2, shutter speed 1/40 and ISO to 64.
Are you photographing at night? Is there enough light??? Be careful with your shutter speed at 1/40 because you may get motion blur.
I’m so glad I found your site! You explain this in a way that I can actually understand it! I love shooting in Manual and actually don’t even understand how to use the other modes…LOL BUT I soooo need to learn how to use the SS/Aperture/ISO all together and you explained that…YAY…now to get some time to try it all out!!! Thanks! I’ve been just using the toggle to get the meter to “0” and didn’t really worry about the others and it’s been driving me crazy trying to figure it all out.
Yay! I’m glad I could help! Thanks so much for your kind words :O) Let me know if you have any questions :O)
Hi! I am super excited that I “stumbled” across your page. I have been taking photos pretty much all my life, but recently (1 year ago) I decided that I wanted to make a career out of taking photos. The only thing I have yet to learn is to shoot in manual, most of my work is done in Photoshop. I would like to call myself a professional photographer but am I if I can’t shoot in manual? So, this is where you come in! I really hope to gain much needed knowledge in shooting in manual mode and am hoping that my photographs come out 10 times better than they are now. Thank you so much for starting this site!
Yay! I’m glad you “stumbled” upon my blog as well :O) I look forward to seeing your photos as you tackle manual mode!!
I had never even thought that the “Zero” was so important, duh. I can’t wait to try this out, I’ve written up my note cards and I’ll be trying out some manual settings TODAY. ;)
this was sooooooo helpful! thank you soo soo much!
Hi Courtney! I just found your blog and I can’t begin to tell you how excited I am! I have wanted to shoot in manual mode forever! I just couldn’t figure it all out. I needed examples to follow and low and behold, you offer them (for free!).
Thank you so much for sharing all of this wonderful information with us! I don’t want to be a professional photographer, I just want pretty pictures of my kids. I shoot with a canon rebel xsi. The f-stop will not go lower than 4.0. Is the prime lens compatible with my camera?
Thanks so much!
You explained this all so well. I feel clearer myself!
This is so clear and well written ! Thankyou so much .
Hi Courtney. I have recently been playing around with manual mode on my SLR camera. I took a photography class in high school and learned manual with a film camera. However, with time and the digital revolution I lost a lot of that knowledge. Thank you for the refresher course :o)! Your simple explanations and examples have brought back a lot and have me excited about trying some manual shooting on my next outing. I am a teacher as well as an amateur landscape photographer, so I truly appreciate the concept of your site and look forward to exploring to learn more!
Thanks so much Emily!! I’m so glad to hear you are going to tackle manual mode again :O) I love finding fellow teachers…WELCOME!
Thank you so much for all of your great tips and knowledge! I am very new to photography and am loving all of your useful information! I will be checking back regularly for more! At the moment I’m shopping for a new DSLR and lenses. I have been practising with my family members cameras up till now. I have use a Canon 450d and Nikon D60. What would you recommend in terms of whether to buy a DSLR kit or just buy a good body with a few lenses?
Hi
I am using Nikon D60 camera but I don’t know use of aperture mode
Can u pls help me to understand use of A mode
O
Does it work in D60 with 18-55 mm VR lens
Thanks you
Regards,
Guddu
I am so excited I found your blog! Thank you for posting all these tips…I used to be really into photography, and I took several classes, but I lost the time (and my memory on how to do everything). I can’t wait to get back into it!
Love your website. I wish I would have found it much sooner. I bought a notebook and am taking notes on this new journey of photography. Do you have any suggestions on where to buy a prime lens?
I forgot to mention I have a Nikon. Thanks.
Welcome!! I typically buy my lenses from Amazon (I have a link on my sidebar) and B&H Photo. I have bought one used on Clickin’ Moms one time and had luck with it. However, I have heard mixed reviews from buying a used lens from an individual. B&H Photo typically sells used ones with a warranty though. Something to look into!! Good luck!!! Thanks for stopping by and I’m thrilled to hear you found the info useful!! I would love it if you shared some images from your journey!!!
Courtney~~
I love your blog and website. I am a friend of Jessica’s from Frilly Coconut and saw her post on your new blog logo. I do photography so I thought I would look at your blog. I LOVE YOUR WEBSITE!!! I put you in my “favorites”! I loved how you explained how to shoot in manual. The way you explained it makes it so much more understandable! I really never thought about the O thing. My daughter plays high school volley ball and I am having a hard time catch the fast action shots in the gym. I shoot with a Nikon D300 and a 70-200 lens…..so I will be trying the manual mode at her next game!!!
Thanks, again for all your great blogs and posts! Love your site…..and your new branding by The Frilly Coconut!!! :D
Hey Ginna!! I just love Jessica! Didn’t she do a fabulous job on my new blog design!! Thanks for your sweet words about my blog! I’m honored you put me in your favorites!! I bet you can get some great shots of your daughter at her games!! One thing to keep in mind with sports is to try and keep your shutter speed at least at 1/250. I typically say 1/125 if you are shooting moving people but if you are shooting sports I would say the higher the better! I would love it if you shared some of your shots sometime!! Thanks again for your kind words!!
This was very helpful. I have a couple questions though….I am still unclear on how to tell if your meter is at 0….also why on my lenses does it say 1.8g but you can still adjust the aperature? Lastly, how do I install a filter on my lens? Thanks so much! This is great, I will be coming back often!
When you look through your view finder you should see a small graph that looks like 2….1….0….1….2. You want the flashing ticker to be on the zero. Yes, your lens must be able to open up to f1.8. You can change that though to a higher number (more narrow depth of field). The number on your lens is showing you the widest it can go. I’m not sure how to install a filter since I don’t have one. Sorry I can’t help with that one :O) Let me know if these helped or if I just confused you even more :O)
I have had multiple people try to explain how to shoot in manual mode to me and you are the FIRST person that actually explained it clearly, you have an awesome way with words :) thanks for the help, I understand the puzzle a lot better now, now I just need to get the muscle memory down!
That is WONDERFUL news :O) I’m so glad it’s clicking now! Yay!!! Please let me know if you have any questions!
Hi Courtney,
I searched for “How to Shoot in Manual Mode” this afternoon – and got your blog! This is seriously a huge blessing! I just got a Nikon D3100, and while I have a basic understanding of photography, I’ve never seriously shot in (or truly understood) manual mode before. Your descriptions are amazing. I really feel like I could just take on the world with my camera now :) Thanks for taking the time to write this – it’s wonderful (and now saved to my Favorites for reference!)! P.S. – Your little girls are precious :)
Wow, thank you so much for posting this! I have attempted to shoot in manual when I got my D3000 but I couldn’t get myself to understand it. It’s funny that I found your article because I work with a D3000 and I’ve been using my 50mm 1.8 for about three months. Perfect article to stumble upon. :) I’m excited to try this out on my camera!
Okay, this might be silly, but do all the 3 settings work together to really just address the light in the photo? I am sitting here playing with this and I’m so confused but it’s starting to click. Because everything I adjust the light is affected, right? (sorry if that is a totally stupid question)
And also – do you automatically know when going into a photo shoot what setting you will most likely use? Or are you adjusting the whole time during a shoot?
Not a silly question!! Yes, all three work together to get the lighting you want in the image. If one of those is way off it will completely change the look of your image! No, I don’t automatically know what my settings will be. I may know that I don’t want my shutter speed below 1/125 or that I want my aperture at a certain setting for a certain shot, but I have no clue with the magic formula will be b/c it’s constantly changing :O)
Hi Courtney,
Just wondering why you felt that you needed a faster shutter speed on the bowling shoes pic? It looks great to my untrained eye, am interested to know what you didn’t like about it. Thanks heaps. I have shot in priority modes for the last 3 years on my compact, but got my first DSLR yesterday. I am so happy to have discovered your site. I think I might try full manual today…
Well, you are right, the 1/50 worked for that image. However, I know from my own experience that sometimes when my shutter speed is that low then it isn’t a sharp because of the natural camera shake that happens when you are holding the camera. If I had changed my aperture to f2.2 then I could have raised my shutter speed which would have eliminated any worry about a blurry image. I hope you take the jump to manual mode! I promise you will love it :O) Congrats on your new camera!!
I just found your blog and I love it. Thank you so much for taking the time to teach all this confusing stuff to a newbie. I just got my husbands hand-me-down Canon XSi and can’t wait to learn how to take pictures of my son!
I’m so glad you have found the info useful! Yay!! Welcome!!
hi! stumbled upon your site today through katie evans site and i am SO excited! just wanted to let you know that your manual mode explanation clicked with me! i am always harassing my husband for attempting to use the manual mode b/c i have always thought it was disastrous! but now i get it – hooray! this info is SO helpful b/c until now i have just not understood the meter. just wanted you to know you are appreciated:)
Yay!! I’m glad to hear you are tackling manual mode! Yay!! Thanks for your sweet words!
Hi,
i have been reading on your site for an hour or so..you have great information and suggestions!!! I use the same lenses that you use for my outdoor photography. Could you elaborate on whether or not you ever use fill flash outside. I don’t want to have to use it but there have been times where i thought the faces looked dull..not necessarily underexposed just dull. Do you have any suggestions about fill flash or how to get around needing to use it?
Thank you,
Susan
I actually don’t use the flash on my camera. I don’t have a speed light or anything either so I just adjust my settings accordingly. I’m not sure what you mean by a dull face. If you would like to email me a photo like you are talking about with the settings I can take a look :O) clickitupanotch @ gmail . com
Your blog is awesome and packed full of so much great information. This manual mode explanation is so great. Thank you so much!!
You are a godsend! I have been getting into photography for the last two years and after reading so many books have not been able to crack the triangle you speak of. This one article did it for me and yes, I will never go back! My pictures look that much better. Thanks so much!!! xxx Lori
Yay!! I’m so glad to hear that!! I hope you have been able to click your picture up a notch :O)
Courtney, I just stumbled across your blog today, and you really have a great way of explaining and instructing. I have been doing photography for over 20 years, and only went digital 3 years ago, and still feel like I have alot to learn. I live and breath photography and after photographing friends wedding’s, newborns, engagements, family etc., I decided I wanted to start my own business about 1 year ago. I now specialize in newborns, maternity and High school seniors. Its only part time for me because I work full time. I love reading and learning anything photography related, and I just have to tell you that this one article you wrote above, was amazing. I learned more, just in this one article than several books I have tried to get thru on this very subject. I really had an “Ah Ha” moment, after reading this 1 article. You really, write and teach amazing. I learned a whole new perspective on the “triangle”, and I love it. Thanks so much. I will be back daily! Tracy
Tracy, thank you so much for your sweet words! I am a former teacher and my first passion has always been teaching. I’m so glad to hear that this post helped you! Yay! That makes my day!! Welcome! I look forward to getting to know you :O)
I LOVE LOVE LOVE that you shared this, I have just started over the last few months trying to do manual settings, most of the time it frustrates me, because I don’t understand it all. I am totally confused about fstop??? I have a Canon Rebel Digital XT, any helpful info on that? I would love any and all info you may have. I feel like when I shoot in Av mode indoors with no flash, if I don’t have it on 1600iso, then the pics are blurry because the kids are always moving…AND they tend to be grainy… Any tips? Thank you again for doing this I am trying to absorb all the info I can, it is hard for me because I am a hands on learner.
What confuses you about aperture?? What lens do you have?? If you have the kit lens does it change apertures when you zoom in and out (that is super frustrating). If you don’t have a 50mm 1.8 I HIGHLY recommend it. Honestly, I don’t think I would have mastered manual without that lens. Well, with your camera you images may be grainy at 1600 but if your image is exposed probably that will reduce the grain/noise. Here are a few posts I wrote. Let me know if you have any more questions or these even help. I know I had a MILLION when I started shooting on manual :O)
http://www.clickitupanotch.com/2010/11/aperture-the-basics/
http://www.clickitupanotch.com/2010/12/iso-dont-be-afraid-to-raise-it/
[…] have happened had I not been practicing at an “off” time. When you finally decide to make the switch to 100% manual, you’ll never look back! You’ll be ready to get “the moment” and will have […]
Courtney, thank you thank you thank you for sharing your photography tips! A lot of photographers do not want to share anything they have learned in their careers, so I appreciate your tips immensely! I found this tutorial on Pinterest today and it was very helpful in explaining the basics of manual mode. I have been playing around with my Nikon D80 for a few years. My goal is to someday take family/newborn pictures as a side job. But for now I practice on my 2 little ones under the age of 3. I am somewhat comfortable shooting in manual mode but am not “there” yet.
My #1 question is how did you get that perfect shot of the boy on the swing? Every time I take swing pictures of my daughter they are blurry. Did you shoot that one in manual mode? I had a photographer once tell me to use Aperture mode on my camera for quick subjects, but didn’t have any luck. Is 1/125 fast enough? Any further tips on this? Oh and I do have a 50mm prime lens also.
Question #2… editing. Do you use lightroom? I have a Mac and use Iphoto to edit. I also have Photoshop elements. Do you recommend lightroom like most other photographers?
Last question ; ) How many external drives do you back up to? Or do you have a post elsewhere that talks about your workflow?
Thank you sooo much!
Ashley
I’m so glad you found some useful information here! That is wonderful to hear!
I’m not sure which image you are talking about the boy on the swing?? For a swing shot, I would say try to get your shutter speed to at least 1/250. That will help you freeze the motion.
Yes, I use Lightroom and LOVE it!!! I think LR is extremely user friendly and easy to understand. If you do decide to get it, I have several tutorial videos under my editing sections to help you tackle it. I feel like it speeds up my workflow and saves me time. With 2 little ones running around, I don’t have all day to edit. I have PSE as well and don’t get it. I used to use iPhoto but found I wasn’t able to do the things I wanted and needed a little more advanced program.
Currently, I have two external hard drives. One is hooked up to my computer 24/7 b/c it is where I store all my images since I shoot in RAW. I have another smaller one that I try to remember to back up every now and then with the original but honestly, it is more for travel so I can put my images on it. I do use BackBlaze to back up my images each day.
Hope this helps!! Please feel free to ask me any questions!
just found this website and i am so excited! this is what I have been looking for. can’t wait to get out there and turn of my auto mode and shot in manual, thanks! i will be back soon :)
Yay!! Would love to see some of your images posted on our FB page! We’d love to follow along on your journey!
I found this article recently and was so incredibly stoked about it!! I have printed it and read it and read it again and this weekend I am going to try and shoot my kiddies in manual mode for the very first time!! I have read so many other articles and this one “clicked” everything into place for me!! Fabulous job!!! THANKS A MILLION!!
I’m so glad you have found it helpful! I hope you do try to take some images of your kiddos! Try it for a couple of weeks not switching back to auto and you’ll never go back :O) Good luck!! Would love for you to share some of your images on our FB page! We’d love to follow along on your journey!
Thank you for posting this!!!
Thankssssssssssssssss so muchhhhhhhh for your help!!! I cant wait and go Practice with my kidssss!!!!
Yay! Hope you will share some of them on our FB page!!
I am so glad I ran across this while googling manual mode! I have been trying to get used to manual lately but couldn’t figure out how to change the aperture/shutter speed while in manual. I finally figured it out, thanks to you!!! :)
That is fantastic news! I’m so glad to hear you are tackling manual mode :O)
I want to thank you for being so encouraging to so many! Your “you can do it” attitude is infectious and so kind. :)
Oh, thank you!! I hope everyone DOES realize they can do it!!
Courtney,
This is a terrific blog! I’ve been using a SLR for years (20+) I dreaded going digital since I’m a bit of a technophobe. I’ve finally done so with a very tame nikon p7000 gift from my father in law. Someday I’ll move up to a real dslr :) but for now I’ll enjoy your wonderful blog and glean some great tips.
*anna
Don’t be scared to make the jump to a DSLR, Anna! They look scarier than they are. And if I can do it, I PROMISE you can figure it out!!! Welcome!!
Hi Courtney, I’m attempting to work in manual. Took the camera out for a spin and darn if I can not see the image on my screen. I tried everything I could think of, and finally left an email w/ Nikon support. The photography on you blog is so lovely. I’m gobbling up the tips and enjoying the (extensive) reading herein. You are very good at breaking things down/teaching, along with photography. Also, thanks for that sweet encouragement. I’m a little by slowly kind of gal where technology is concerned, however I’ve been on an uptick since starting this whole blog journey :)
Best,
*anna
Anna,
Thanks for your sweet words! I’m so happy to hear you are tackling manual mode. Have you heard back from Nikon? Are you having trouble seeing the picture on the LCD after you take it or while you are trying to take it? What camera do you have? Hope Nikon can help!!
OMG! Thank you very much for this crystal clear explanation! I have never really fully understood how to shoot in Manual Mode until reading this! I tried taking a photo of my little cousin while watching a movie and I did it! Clear photo in Manual Mode! I was over the moon! Thank you!
Whoo hoo!! Look at you go!! Isn’t it fantastic when it all clicks and you start nailing your photos!! So glad I could offer some tips to help!
you rock! so happy i found this page and site! thank you!
Thanks so much! Let me know if you have any questions!!
You did an awesome job explaining this! Thank you so much for taking your time to write this. I just took some pictures of my daughter using manual and what a difference. I will definitely be using it from now on :)
That is fantastic! It is amazing what a difference manual mode can make! Once you try it…it’s hard to go back :O)
I am a newbie to the DSLR world and I just found your blog! Teaching is certainly your gift! I’ve made flash cards to get it in my brain =) Looking forward to reading more of you – – Thanks!
Well, thank you for your kind words! I truly love teaching!! I love the idea of flash cards!! Genius!!
Love your description of manual mode! I am having problems with it though. I am getting entirely black photos when I shoot, even though I am changing shutter speed, aperature and ISO. What do I need to do to fix this?
It sounds like your meter is not in the center when you take your photo. If you would like to email me your photo with the settings I can help break it down for you. courtney @ clickitupanotch . com
It can be a bit confusing at first, but I promise you will get it!!
Hello Courtney,
First I’d like to introduce myself. My name is Lamielle. I was looking for some photography tips on shooting in manual when I bump up to your site. Thank goodness! You just don’t know how your informations made my day today. Thank you, thank you, thank you! Your blog is so cute, cool and fresh. I hope you don’t mind me staying by here for a while. You’ve got a lot of great stuff of informations here, so refreshing and helpful. I hope you know that you are explaining things easily. I had a hard time understanding other photography tips and yours is so easy to understand. Really enjoy it. I just sign up on your newsletter and I am looking forward to hearing from you again. Now, I have a few questions to ask. I am just curious about your ways whenever you experience this challenge. Here it is: Low light situations. I usually set my shutter speed to 100 or more to make it faster and to avoid blurry photos, then my aperture is also set to 2.8 almost all the time and ISO 400. Then my meter won’t move to -2, which means really dark. How do you handle this kind of situations aside from using a really higher ISO, like you’ve mentions?
I hope I am not disturbing you at this very moment. I really appreciate your help and I am loving your blog. Thank you for helping people like us and giving us inspiration. Cheers from Switzerland. :-D
Hello Lamielle!!
Thanks for your sweet words about my blog! Yay!!! Does your lens allow your aperture to go any wider than f/2.8? If so, go even wider (lower number). If not, then it sounds like the only option you have is to raise your ISO. Don’t be scared to raise your ISO. It’s a good thing if your photo is properly exposed. Other than raising your ISO then you would need to add more light, unfortunately, this isn’t always an option. You may want to check out this post about raising your ISO – http://www.clickitupanotch.com/2010/12/iso-dont-be-afraid-to-raise-it/ Let me know if you have any questions! Feel free to email a photo and your settings if you are still having trouble – courtney@clickitupanotch . com
I am just finding this! Great info and so easy to understand! Thanks!
Wonderful! Let me know if you have any questions!!
Hi Courtney! Thanks so much for this post I’m always reading daily to get stuff burnt into my brain! lol! I do have a question, I have a Canon D30 and I was reading others post about changing your meter? how do you do that I thought I knew but I guess I ‘m not doing it right mine is always blinking! And another problem I may have is someone ask me if I shoot in manual I said yes and they ask me if I have my iso set on auto? How does that work!? I thought in manual you set everything!? So far just finding your blog has helped me understand far more easier than alot of other info I have read elsewhere! Thank you for breaking it down in terms where newbies and semi-newbies can understand!
Hey Kelly!!
You are right about the ISO. When shooting in manual mode you set your ISO. As far as changing your meter, you will use your shutter speed, aperture, and ISO and get them to work together to put your meter ticker on the “0”. It is okay that it is blinking. Mine blinks :O) Does that make sense??
Hi i would just like to say thank i was looking around for more stuff on photography so i can learn more. I have been using my manual mode for a while now but i still have problems getting it right sometimes. You are the first persons blog i have come across that has made it super easy for me to understand better how to use it. Thank you so much.
That is wonderful you are starting to tackle manual mode!! Let me know if you have any questions!
Thank you so very much for this explanation, it was easy to understand and learn from!
So glad to hear that! Let me know if you have any questions!
I just found this website and im delighted that i did!i am a single parent of 2 little girls and since having my first photography has become my passion,i did an evening course in basic photography and am waiting to do a more advanced class in september so im really glad i found this site as the basic course didnt give me as much detail as this so at least i won’t be falling behind in the advanced class!thanks for a great tutorial :)
How exciting that you get to take some classes!! I hope you love the more advanced course!! Photography is such a fantastic hobby especially with little ones as home :O) Let me know if you have any questions!
What a delightful and educational website. I found it through Pinterest, which I found through Facebook (wheels within wheels!) I just finished a “basics” class on Saturday given by a wonderful local photographer (Jodie Allen, FreshArt Photography in St. Louis) and spent most of the day Sunday practicing with what I learned. This excellent article enhanced that and added one really great tip (get your light meter to zero) which I will definitely try when I get home from work tonight! I lived in Japan for 3 years with my DH when he was in the Navy and we had our first baby there (and our first 35 mm camera!) It was quite a life-changing experience and now I’m photographing our grandchildren!. Anyway, I’ll explore further in your blog. Thanks again!
How fun you were able to take a class and I could help enhance the information!! I love that you used to live in Japan as well! We have really loved our time here!! Congrats on the grandkids! My mom always says if she had known how much fun they were she would have skipped the kids and gone straight to the grandkids :O) he he Let me know if you have any questions!!
I was taking pictures last week in Manual but they were turning out black :( Can you help out? Thank you!!
Hey Jackie!
Of course I can help! It sounds like your meter was too far to the underexposed side. You want to make sure you are adjusting your shutter speed, aperture, and ISO so that your ticker is on the zero or a little to the positive side. If you want to email me your picture with your settings then I can look at it and let you know what you could do in the future. courtney @ clickitupanotch.com We’ll figure it out :O)
I am so loving this blog!! I stumbled across it a few months back and it has helped cement some of the knowledge I’ve gotten in a few photography classes. But I have a stupid question (I know – no such thing). I have a Nikon D5100 and I just bought a prime lens (50mm f/1.4) and I love it. But I have heard some people saying that they also use a prime lens but at the same time talk about adjusting the aperture setting. You can’t do that can you? I know that on my camera it will let me change it, but the lens aperture is “fixed” so it’s not really changing, right??? Confused?
Melissa
Hey Melissa! First off, Welcome :O)
Yes, your 50mm 1.4 is a fixed aperture lens. What that means is that you as the photographer will pick the aperture not your lens. It is mainly used when talking about zoom lenses. Some zoom lenses are fixed aperture lenses meaning you pick the aperture and even if you zoom in and out then the aperture stays the same. A zoom lens with only one aperture number in the description is a fixed aperture lens, for example, the Tamron 28-75mm 2.8. However, there are some zoom lenses that are variable aperture lenses. These lenses change aperture as you zoom in and out. Meaning depending on your focal length the aperture can only go so wide. You have no control over it (to a point). Lenses that have a range of aperture in the description are variable aperture lenses, fore example the Tamron 18-270mm 3.5-6.3. So, if you are shooting at 270mm the widest open you can shoot is f/6.3. Does that make sense? But since your lens is a prime lens and does not zoom you don’t need to worry about “fixed” or “variable” apertures. You get to pick the aperture on your lens. It is confusing. Does this help??
Hello!
I love your site, thanks so much for posting this! So helpful! One questions, I can’t seem to get my f stop lower than 5.0, what am I doing wrong? I have a Canon Rebel.
Thanks!
Heather
Hey Heather!!
You probably aren’t doing anything wrong. It is your lens. What lens are you using? If you are using your kit lens then at certain focal lengths it may only be able to go as wide as f/5. Let me know what lens you have so we can double check :O)
I have two lenses and I don’t know much about them! One reads: EFS 55-250mm and the other one reads: EFS 18-55 mm. I typically use the latter one. I’ve been trying to shoot in manual mode more – I started a blog in January and have been attempting to take the photos of my food/drinks in manual mode, and my little one turned 3 in June so I have been wanting to take some good photos of him in manual mode as well.
Thank you!
The 18-55mm is your kit lens and is what is restricting you from getting your aperture to where you want it. The 50mm 1.8 is a fantastic lens for what you will be shooting. Happy birthday to your little one!
SOO helpful. Thank you!
Hi Courtney,
I really love your blog, it is so helpful and you explain things so clearly. I have a couple of questions regarding metering…..
How do you meter off a forehead or cheek, as when I fill my frame with these I cant focus so nothing happens !
And I am struggling with manual, to get the pointer in the middle I have just been turning the wheel to move it to the middle… I guess this is wrong as it moves so much and takes ages at times to get it to 0… and I cant quite understand the shutter speed so wouldn’t know where it should be !
Also when shooting with for example a 50mm 1.8 at about 20 feet,with any aperture and the lowest iso I am getting alot of noise and the shots are just terrible, I am tearing my hair out as I so want to get it right !!!
Thank you for your time and patience !
Katie x
Welcome!!
You actually don’t need to fill the frame with what you are going to meter off of. You can put your focal point on the check, the distance you want to take the shot, and it will meter off of that for you.
Don’t tear your hair out!! It takes a while to understand how all 3 things work together. Please feel free to email me one of your photos with your settings. I can help you figure out what you should have put your settings on for that shot. [email protected] You don’t really want your shutter speed to go below 1/125 or your photo may be blurry. If you get it to 1/125 and your meter is still not in the middle, consider raising your ISO or lowering your aperture number. Your photo shouldn’t be noisy at the lowest ISO. Strange. Email it to me so I can help you :O)
On the photo of your youngest daughter where she is alone and the green background is very blurry, how close are you to her when taking the picture and are you using your prime or a telephoto?
Hey Elizabeth!
That was taken with my 50mm 1.8. I don’t recall how far away I was from her. Just a few feet, I’m sure :O)
I’ve noticed that sometimes the aperture can go down to F3.something but sometimes it won’t let me dial it down past F5.0 in manual. If I have the shutter speed or ISO set to a certain number, will it stop me from lowering the F number? I can’t figure out why sometimes it lets me and sometimes it won’t…
Amy
Fashion and Beauty Finds
Hey Amy!
It’s your lens that is preventing you from going that low. Are you using your kit lens – 18-55mm. This is called a variable lens which means depending on your focal length that is how wide (low number) your aperture can go. So if you are at 18mm you can go as wide as your lens will let you. My guess that is f/3.5. Then if your lens is zoomed out to 55mm it probably won’t go any wider than f/5.6. My suggestion would be to get a prime lens or a zoom with a fixed aperture. You will know if the zoom has a fixed aperture because there will only be one aperture number behind the lens instead of a range. For example, the Tamron 28-75mm 2.8 is a fixed aperture lens. That means no matter what the focal length YOU decide the aperture. However, if you use a variable aperture lens it has a range of the aperture like your kit lens it looks like this 18-55mm 3.5-5.6.
I could never understand for the life of me the working of my camera, No matter how many times I read up on it. I could never figure out the Aperture mode, ISO and Shutter Speed. But the way you explained it sounds so easy and I think I finally got it!! :)
Thank you so much and I’m so happy I found this site through Pintrest. your photos are beautiful.
Welcome!! Yay! I’m glad it’s starting to click with you! Thank you for your sweet words!!!
Hi there
Thanks very much for your review. I do shoot manual and I am always looking for tips and photos to inspire me. One question I have, the photos of the girls are incredibly sharp and clear. Were you using your 50mm f1.8 for those shots? I am going out this lunchtime with my Canon 60d and 50mm prime to get shooting.
Thanks very much
Steve
Steve,
Yes, I believe that photo was taken with my 50mm. Hope you had fun on your lunchtime shooting!! Let me know if you have any other questions!
Thank you so much for explaining it so clearly!!! I have been taking pictures in A-Dep mod with my Canon T2i and I was frustrated that I could not change Aperture on my Manual Mode… so Thank you thank you thank you!! I am pregnant with my first and have been dieing to buy a lense that is better than my kit lense but the names of the lenses were all mombo jumbo! SO thank you for explaining it all:) I am going out right now to buy the one you mentioned! I can’t wait to read more of your blog!
Thanks!
Cherie
Congrats on your pregnancy! What a blessing!! We just welcomed our 3rd daughter about 3 months ago! Hope you enjoy your new lens!! Let me know if you have any questions!!
Seriously, you’re a rock star. Your article made it all sound so easy and has given me so much control over my pictures. Thank you, thank you!
Yay!! I’m so happy to hear that you are tackling manual mode!! Seriously, I love the control it gives me over my images!! Let me know if you have any questions!!
hello i love all you work yes i need your help please email me and i will talk to u thank u
Hey Anwar! Feel free to shoot me an email if you have any specific questions! courtney @ clickitupanotch.com Thanks!!
Thank you for the great post. I do have a question. I have a D5000 and I currently use an 18-250mm f3.5-6.3 lens. I am still getting use to manual and usually end of giving up and going back to auto/no flash. My question is, when I do try manual, why does my shutter speed change after each photo? Is there a way to set it so that it doesn’t change?
Alas, i think i figured it out. It was the bracketing setting…..i think.
Oh, good! I’m glad you figured it out :)
just received my new Sony nex f3. I am so ready to get off auto mode!! I am interested in mastering(haha) nature photography. I can walk thru small galleries for hours reveling at photos of trees, paths, waterfalls, leaves, etc
I am so glad I found you here!!
Welcome!! I love walking around and just shooting for me too :O)
So reading your “How to shoot in manual mode” just gave me a serious A-HA moment!!! I felt like a kid on christmas morning. The you tube video with you changing the ISO, aperature and shutter speed was BRILLIANT. thank you so much!!
I’m so glad to hear that!! Let me know if you have any questions!!
What an awesome post! I’m not one for reading I’m more of a hands on show me and i’ll learn but your blog is awesome! Even though I don’t have an SLR camera it has still helped me with my manual settings working with the ISO. I’m still trying to figure out how to set the apeture. Not exactly sure if my camera will do it. My main thing is I want to have the shutter speed and the depth of field (where the background is blurred). I just recelty had a baby 2 months ago and LOVE taking pictures of her but there is nothing like a picture that has the main focus on that special object!!
BTW-I have a Sony DSC-H20 I don’t really want to spend the money on an SLR right now so I’m trying to figure out how to use the camera I have and have had for over 3 yrs and just been using the easy mode.
I’m already starting to enjoy Manual mode!
If you have any suggestions with the depth of field/apeture with my camera please send them my way. :O) Thanks a bunch!
Hey! First off, congrats on your new little one!! We have a 4 month old so I know how fun they can be :) I am not familiar with the Sony DSC-H20 but I was just looking at it online and saw that it does have manual mode and a variety of ISO features. Yay! The blurry backgrounds are created by your aperture. I wasn’t able to see what your camera can do as far as aperture. The lower the number the wider the aperture. You want to be shooting pretty wide open to get the blurry backgrounds. Probably around f2.8 or lower. Hope that helps!! Let me know if you have any other questions.
Hi Courtney,
I’m interested like so many others in switching to manual mode-YAY! I’m going to take your suggestion and buy a new lens that will help me learn. I have a Nikon D3000 and am interested in getting one of the 50mm f/1.8 lenses. I’m seeing two different types for my camera…AF Nikkor 50mm f/1.8D and AF-S NIKKOR 50mm f/1.8G. Do you know what the difference is and which might be best to start with?
Also, I’m interested in taking a few family photos while I save and purchase my new lens. One image I’d like to capture is a photo of my husband, infant daughter and myself. I really like the backlighting in some of your photos especially the ones where the sky is a nice golden hue with great bokeh. I have my kit lens and an 18-105mm lens (not sure what the lowest aperture setting is?!?) any suggestions on how I can capture an image like that with what I have currently?
Thank you,
Faith
Hey Faith!
Check out this post http://www.clickitupanotch.com/2012/04/50mm-1-8-vs-1-4/ I talk about which lens you are should get for the D3000. You would want to get the 50mm 1.8G because it will autofocus where the 50mm 1.8D will not autofocus and you would have to use manual focus. Check out this post for the backlighting – http://www.clickitupanotch.com/2011/03/6-steps-to-create-a-haze-effect-in-photos/(I emailed it to you but I thought I would post it here as well :)
I am using the sony nex 3 and I am not sure if it has a tickler?
Any one know
Mmm…I am not familiar with that camera. Check out this post. Maybe it will help – http://photographyconcentrate.com/three-steps-creative-control-sony-nex/
I’m an aspiring photographer and have to say that you have been so helpful. I’ve read my manual, articles online (probably hundreds…literally), tutorials, and so many other things, and this is the first time that I FINALLY understand how to use ISO, Aperture, and SS together to shoot in manual. It just hit me! I’ve always known what they do alone, but now I can practice shooting in Manual (versus Aperture Priority) and not feel like an idiot! My exposure meter is actually doing what it’s supposed to now! Thank you so much for explaining this! You did a wonderful job! :)
Lauren
Hey Lauren!
I’m so glad you found this helpful!! Yay!! So glad you are tackling manual mode!! Thanks for your kind words!!
Just discovered your blog and immediately signed up for rss. This is the best explanation (by far!) of aperture, shutter speed and ISO I have ever seen. My favorite tip was in ‘aperture’ about if you’re shooting 2 people vs 5 people. It’s such a simple way to remember.
Welcome!! I’m so glad you found those tips to be helpful! Please let me know if you have any questions along your journey!!
Thanks so very much for the information! So here’s the question…what if I want a lower aperature, but want to change the focal point of clarity (ie. what I want in focus is say in the bottom left corner, and I want the rest to be blurry)?
Hey Charissa! So, do you want to change your focal point?? Check out this post – http://www.clickitupanotch.com/2010/09/changing-your-focal-point/ By changing your focal point, what you put the focal point on will be the sharpest part of the image and the rest will slowly blur out if you have a wider (lower number) aperture. Does this help??
thanks SO much!!
I just found your site via pinterest and LOVE it! I have pretty much given up on using my camera any more because any time I try to take pictures of my toddler indoors it is a disaster! My husband bought me a Nikon D3000(with the kit lens) about 4 years ago, and I used to think it was wonderful…this was when I never attempted to take it out of auto mode. When we had our son, 2 years ago, I quickly became obsessed with learning how to shoot in manual mode so that I could take breath taking pictures of him. I learned that it is best to always keep the shutter speed around 1/125…which was no problem if I was shooting out doors in day light…but any time I try to shoot indoors with that shutter speed, no matter how I adjust my iso and aperture, my picture ends up just being completely black. I am so discouraged by this and feel so defeated that I don’t even try to take pictures any more. Sad, I know. Am I just not figuring out the correct aperture and iso formula to keep that shutter speed, or is it just not possible due to my cheapy kit lens?
Hey Lacey!!
Don’t give up!! It could be a combination of your settings and your lens. Kit lenses are such a challenge indoors with low light. Please feel free to email me one of your images with your ISO, SS, and aperture settings and I can look at it and let you know if it is the settings or the lens/llighting situation.
We will figure this out!! courtney @ clickitupanotch.com
courtney …. i have an olympus e420 could you possibly help me with the “where is” of the f stop and apeture and iso etc. im just new at this and been having fun i am starting my own photography buisness so i probably need to know these and i have found your information the most useful and soooooo thankful for it …. again thank you so much ….chris
Hey Chris!
I wish I could tell you. Without the manual in hand or the camera in hand I have no idea where it is on that camera. Do you have your manual?? Look up where to change you shutter speed, ISO, and aperture or some call it f-stop. Wish I could help you!
Good luck!
you totally make this “make sense”,however i got lil confused again, on your bowling shoes pic.. when u said to use 2.0 or higher when shooting 2 people on apeture ect… u had the bowling shoe pic set on 3.2 but it still had a great blur without it being on a 1.8 or even 2… why was that pic different then the “people” rule?
)Lovin your blog btw! u make learning so do-able! lol
That is a great question! The reason the background is still blurry at f/3.2 is because background is really far away. The background can still be blurry at f/3.2 depending on how far away the background is from the subject. How that makes sense :)
Definitely the best article I’ve read so far about the exposure triangle, neat, easy to understand and remember! Thank you!
Thanks so much!! Please let me know if you have any questions!!
I’m trying to take a picture of my daughters on the floor with Christmas lights in front of them (in the dark). I have NO idea what I am doing! I have a Canon Rebel, but always use it on automatic! Is there any hope for me?!
It will be a challenge with automatic. I would check out this post – http://clickitupanotch.com/2012/11/christmas-tree-lights-photos/ Also, if you are shooting on automatic I would still turn off all the lights and turn off your flash. I don’t know how it will work but you can give it a shot :)
I love how you explained this!
I have a Nikon d5100 what do you have set for auto focus?
Hey Natasha!
Thanks! Have you checked out this post about changing your focal point? http://www.clickitupanotch.com/2010/09/changing-your-focal-point/ Does this answer your question??
Hi Courtney! Thanks soooo much for these tips! It makes sense…but I keep changing these things to match your examples and such, and I still can’t get my little “ticker” to be at zero. I have a Canon Rebel T3Ii and the lens I use (only one I own at the time) is an18-55 mm. Right this second, my “triangle” settings are at 1/125, F5.6, and ISO 200. What should I do to get my ticker at zero? Is there something else I should look at changing?? Thanks SO much!
*T3i :)
Hey Haley!
Unfortunately, my settings will only work for you if you are in the same lighting as I was when I took the shots. I would suggest shooting during the day so you can take advantage of the daylight. If your ticker is still on the ” – ” that means your image is underexposed and you are not getting enough light. I would bump up your ISO or lower your aperture if you can. Hope this helps! Feel free to email me your image with the settings and I can help you figure it out in :) [email protected]
Oh duh!:) lol I tried it out today in better light, and it did much better! Thanks so much!
Yay! I’m glad it worked out better :)
I just read this for the umpteenth time. I am sure I will be coming back to it over and over and over until I get enough practice in….so simple to read for a beginner.
So glad to hear you found it easy to understand! Yay! And congrats on tackling manual mode :)
[…] need to shoot on manual mode for this […]
[…] This is one of my favorite images I captured last year. Let’s talk about how to get a photo like this one shooting in manual mode. […]
Hey I would like to say thank you for me and my wife who is taking a photo class . We never even thought of using our camera in the manual mode but since the class I can see all the benefits. I was looking for someone to better help me understand the using of the camera and here you are.
How fun that you and your wife are tackling manual mode together :) Let me know if you have any questions!!
Just saw your mood lighting post on pinterest, followed it over, and now I’m hooked on your site! You just put that all out in a way I could finally grasp, thank you thank you thank you!
I’m so glad to hear that!! Welcome! Let me know if you have any questions!!
Hi there, you make this all sound so easy. I just started using a Sony a55. I actually have no idea how to change the aperture number. Please help if you know!
Hey Kerry!! I’m not familiar with the Sony a55 but check out this discussion. http://www.flickr.com/groups/1507977@N21/discuss/72157625562950151/ Let me know if you have any other questions!
Thanks for teaching me! I finally grasp the “exposure triangle” and understand the rules to proper lighting and sharp photos. :]
Yay!! I’m so glad to hear that!!
Hi I just passed over your site and find it very useful. I have a GE X2600 camera. I’m trying to shoot most of the time in and manual mode as in auto mode they don’t show well. The problem is that from loads of shoots I take only a couple will look ok and by fortune!. I’m asking myself if this camera is a good one or not. I’m using it to take pictures of hamsters inside a room and till now i cannot figure out how to set the manual mode can you please help me as it’s making me so crazy.Thanks in advance.
Hello!
I’m not familiar with that camera. However, if you are photographing hamsters, I would recommend putting the cage by the window when photographing them so the lighting is great. Good luck!
wow! i have been looking for articles that will really explain to me how to use the manual mode..well there are helpful sites and articles but yours made it easier for me to understand..i just got an lx5 i dodnt purchased a dslr “yet” because i wanna know how to work with the different modes and i think i can learn it using my LX5..
at first i thought the “1/something” that i see on the screen is the ISO hahaha now i know why i dont get the image i want to have…IA is good but i know if i will be accustomed to manual mode..i can have better pictures..
again thank you so much ..:) happy new year!
So glad you found it helpful!! Best of luck with manual mode :) Let me know if you have any questions!!
hi ! yesterday i literally took note of your “remember:” and this morning i took photos again using manual mode and i also relied on the light meter..i remembered that it should always be at “0”
if you have time can you check those photos and i hope you can give a comment on those.
i want someone who is a pro like you to criticize my pictures so i know what to do next time.
http://www.flickr.com/photos/91283861@N06/
the first 4 photos are the pics i took this morning
thanks:) btw im from the philippines
So glad you got some shots!! They look good :)
Courtney, Thank you for having such a wonderful blog!! I just read your post and all the comments and believe it helps me more to understand shooting in manual, which I need to learn. I just need to make notecards so I can remember everything. I take all my photos in P and on RAW. Then use my Paint Shop Pro to edit them. I’m so comfortable taking in the P mode. But I think if I switched to manual I could get even better shots. I take mostly nature shots. Lots of bird photos. I’ve tried in manual mode taking pictures of birds, but they are so fast and I don’t seem to have time to be playing with all my settings to get a decent shot. Most of my shots are blurry or dark or over exposed. I give up and go back to my P setting. Maybe I just need to have more patience and keep trying.
Welcome! Birds are tough b/c they don’t sit still. Maybe practice on trees or leaves :) They may be more cooperative :) he he Let me know if you have any questions!!
Thanks so much for this. I have been taking a lot of pictures for two years now and have been pretty much afraid of trying the Manual mode. I will try it soon! This really helped me understand a lot about Manual, so thank you for taking time to write this.
I have a Canon SX40 HS that I haven’t played around with much; just used the auto, and then used photoshop for the rest. I really want my photos to be “real”.
Should there be any different settings in the aperture, ISO, and shutter speed, for water photos?
~Emily Albertson
Hey Emily!
I’m excited to hear you are going to tackle manual mode! The settings change each and every time you take photo depending on the light. So, yes, it will change with water photos depending on the amount of light in your images.
I shoot M through the live screen. is this a bad habit?
Hey Denise,
No, that isn’t a bad habit but I don’t recommend it. It does drain your battery life faster and since your arms are out stretched instead of close to your body by looking through the view finder you are more likely to get camera shake in your image. Is there a reason you shoot through the live screen??
Thank you so much for this! It was just what I was looking for. I needed explications that were shorter than what is in the manual… so thanks! The info you provided was just right. :)
I’m so glad you found it useful! Those manuals can be hard to understand :)
WOW …this is the best and clearest explanation of Manuel mode i ve seen so far ! Thank you so much !
That is so good to hear!! Thank you! :)
Hello Courtney, great tutorial I do have a question, I’m a beginner photographer, I’ve been doing it for a year now, and I’m getting the hang of it, but the one problem I’m having with my prime 50mm lens is getting enough detail on my subjects face. On my lcd screen the face of my subject looks fine. Yet when I upload my pictures to my computer I realize that there seems to be lack of DOF in my subjects faces making them look unfocused. I’m not sure if this is because my shutter speed isn’t quick enough, or if I’m doing something wrong. I was wondering if you can help me out, I have a client who wants Head shots, and I’m worried some of their pictures will come out unfocused. Thank you for your help.
Hey John,
I’d have to see your images with the settings to know for sure but it sounds like your shutter speed may not be fast enough and/or your aperture may be too wide and not getting enough in focus. Have you seen this post?? http://clickitupanotch.com/2011/02/how-to-take-a-sharp-photo/ Feel free to send me an email with your image and settings and I can look at them – [email protected]
This is the best reading of learning how to shoot in manual mode that I’ve came across God bless you for this info you put up for free and also these photos are awesome I have to get a 50mm canon lens now LOL.
So glad you found it helpful! You’ll love the 50mm :)
[…] Not committing to manual mode. Okay, this one may hit a nerve with some of you. When I first learned to shoot in manual mode, my […]
how to focus the written letter in video option by using cannon d3000 cam
I’m not sure what you mean. Could you be a little more specific? Thanks!
Hi Courtney,
I have been shooting manual for 6mon now. I own a Nikon D90 and 50mm 1.8f lens. I wish I found your blog before. These 3 tips of yours helped me improve the sharpness in my pictures.
1. Don’t be afraid to increase the ISO in low light. — If the exposure is right, there should not be grain in the pictures.
2. Keep the shutterspeed at or above 1/125. — I used to not increase my ISO fearing grain in the pics, I was using low shutter speed and used to get not so sharp pics of my toddlers in low light.
3. Use backbutton focusing. — I just started this few days ago and I am loving it.
Your articles are very helpful and easy to understand. Thanks so much.
That is so great to hear! Those three tips are key for sure! Thanks for the comment :)
[…] can’t leave this question without addressing exposure. When metering a black dog you need to underexpose by at least a stop or two. Make sure you check […]
When shooting a black dog, I would meter off a neutral object nearby. I use spot metering.
Hi! This blog is fantastic! I am a fellow photog, and I need to get out of Auto Mode! I have been playing with manual for awhile now but I just can’t seem to get the settings right. First of all, I can’t seem to get my lens to focus on anything in maual mode. Is this normal?
Is your lens on auto focus or manual focus? I shoot on auto focus with manual mode most of the time. Is that the issue you are having?
[…] asked her to teach me the basics to get me started. We met at a local park and there she showed me how to shoot in manual…a lesson that still affects my photography […]
I’m so so so glad I found this website, via CM! This just adds one more thing to my arsenal of trying to get better with my camera! I can’t wait to go thru this site, post by post, and suck it all in! I’m getting ready to take the Best Darn Beginner class as a SA, so I’m looking forward to that! Thanks so much for this site and being such a great help for people like me!! ;)
Yay! Welcome! You are going to love Shooting 101! That was the first workshop I took at CM and it has so much great information! Let me know if you have any questions along your journey! So excited you are tackling manual mode!
Hi Courtney!
Well I bought a BODY only, Nikon D90. Playing with it, as much as I can. I have a few questions. As I play, I can find the ISO & the f-stop…but confused as to where to look for the ss? I don’t see the 1/1600…etc… Also…should I have it on iso-auto? I am shooting/learning to shoot in manual mode.
Blessings,
Shelly
When looking through your view finder the shutter speed won’t read like 1/125 it will just say 125. Does that make sense? If you are shooting in manual mode I don’t leave my ISO on auto. I like to be the one in charge of all my settings (I’m a control freak ;) Let me know if you have any other questions along your photography journey :)
This is a great blog! It made me take out my Cannon SI 3 purchased in 2006, and use it to its full capacity in 2013. I just bought the 50 MM lens and hood and can’t wait to use them. I shot a few photos this past weekend outside in manual mode and LOVED it. Thanks for this easy explanation. I can’t wait to keep using my camera in manual mode.
Yay! That is awesome you tackled manual mode! So glad you loved it :)
I do have some additional questions. Since my initial post, I found out that my camera is technically not considered a DSLR. So, I have to purchase a telephoto lens with adapter in order to achieve a similar effect that a 50mm lens would achieve. I did purchase them and I am eagerly waiting their arrival. I have been trying to get that blurred background effect but have a few questions. (it may be due to me not having the correct lens at this point) How far away from the subject(s) (my children) should I be? How much of the zoom on the telephoto lens should I use to achieve this effect?(mm) I am now familiar with the ISO, Aperture, and shutter settings.(thanks to your awesome blog) FYI, I am just an amateur who wants to take great photos of my children. I am not looking to start a business. Thanks so much!
Getting the blurred background is all about the aperture. http://clickitupanotch.com/2010/11/aperture-the-basics/ Hope this helps :)
I actually played with it this weekend and got a great headshot of my husband. I used f/2.8 and shutter speed of 1/300 or so and it came out great! Thanks so much for the tips on your site! I am now playing with photoshop elements and light room to see which one I like better. I know I can’t afford both. So much to learn!!!
Thanks again!
Venessa
Found your site the other day and I have to say you’ve inspired me to try manual more. Even bought my first lens with your suggestion. Thank you! I can’t tell you how many years I’ve taken photos with my DSLR and still haven’t tried shooting in only manual mode.
Yay! So excited you are jumping into manual mode! Welcome!
Thank you so much for your tutorial! I have read lots of tutos but this is perfect! Thanks for your work! :)
Fantastic to hear! Thanks!!
Hi Courtney,
This must be one of the best articles I have come across on photography. You have brilliantly dealt with one of the most complex subjects in photography and with equally good examples. I will definitely switch to Manual Mode ASAP. I am sure that I gonna be bugging you with a lot of questions once I start shooting.
On another note, I am visiting my dad’s village this week end for a festival. It would be great if you can give me some tips on shooting night photos.
Description of the festival:
Annual temple car festival (Rathotsava). Thousands of people would have gathered around the chariot. The event usually starts after 7:00 PM. The next day there would be a festival of colour’s where in people spray friends and family with colored powders and water, and generally go a bit wild in the streets.
Cheers,
Bharath
Hey Bharath!
Thanks! You can check out this post on night photography – http://clickitupanotch.com/2011/09/6-tips-for-night-photography/ Have fun at the festival! It sounds like a fantastic time!!
Just had to say this was a great post! I just finally got my first “real” lens (a Nikon 35mm 1.8) after using my D70s with it’s kit lens for probably that last 5 years! I used your tutorial and it actually makes some sense to me for the first time in my several attempts to understand how to shoot in manual. Thank so much – love your site!
I’m so glad to hear that! I’m sure you will adore your 35mm! Thanks!
This was very helpful and in terms that I can understand. I have been using my kit lens for over a year. I have a Nikon D5100. I was wondering if I should go for the 35 mm or the 50?
Thanks! That is a tough choice. You can see the difference between 35mm and 50mm here – http://clickitupanotch.com/2011/01/comparing-at-20mm-35mm-and-a-50mm-on-a-crop-sensor-camera/ and http://clickitupanotch.com/2012/03/everything-you-want-to-know-about-camera-lenses-part-5-comparing-different-lenses/
Just wanted to say this is the first time I have ever understood what you are trying to do in manual. Usually I got to F-stop got confused and gave up. Now I get it, a little anyway. Fab tutorial and I will be sending my readers here from my blog too.
My post on my blog today I shot in manual and I love the results, much better than what I did before.
Now I just need a 50mm lens so I can get my aperture open low enough, I don’t seem to be able to get below about 4.5
Thanks again Eva
Thanks so much! I’m so glad it is starting to make sense for you. I know how confusing it can be :) Yes, the 50mm 1.8 is a great lens :)
Hi Courtney, your blog is really helpful, I’m having a bit of problem though using the manual mode on my canon 600d, I’ve put the right settings for aperture, ISO and shutter speed or so I believe but my pictures are completely black, please help, thanks!!
Hey Andy!
Is the ticker on your meter on “0”. Your settings will be different each time you pick up your camera since it all depends on the light you have available. Make sure you are exposing your image correctly so your meter is reading at the zero through your viewfinder.
I had this SLR of mine for about 3 years and i just used the auto function of it.. then until i read your blog about and try the tips .. it really work and now i enjoy this set up I can experiment more on my own mix what mode and scene what I like.. thanks and God Bless
That is great to hear! Thank you! Glad you are tackling manual :)
Hi
I am using Nikon D60 camera but I don’t know use of aperture mode
Can u pls help me to understand use of A mode
O
Does it work in D60 with 18-55 mm VR lens
Thanks you
Regards,
Guddu
Hey Guddu!
I haven’t used Aperture mode as I only shoot in manual mode. Have you thought of giving manual mode a try? Aperture mode should work with the D60 and whatever lens you have. Good luck!
Hi can anybody help me!
I am using Nikon D60 + 18-55mm lens camera but I don’t know use of aperture mode.
pls help me to understand use of A mode
Thank you
Regards,
Guddu
I am so happy to have found you last night. I know this post is 3 years old, but thank you! I feel just like you, I want to learn how to take some amazing photos and I know I have it in me. But i’ve been reading for months and trying to find the time (between two kids under 3) and it wasn’t until I read your articles where it started to click. My current lens only goes down to 3.5 (its a 18-200mm 1 3.5 5.6). I have such a hard time photographing indoors. its always blurry and I do my best to find light but I bet I can do better. ;) I took your advice to increase the ISO, and that helped when I took some shots this morning. I’m determined to learn so that I can take better photos of two girlies and product shots for my new etsy store.
That is awesome! I’m so glad to hear you are raising your ISO to get better shots of your girls! I learned manual mode when I had 2 kids under the age 3 too. You can do it :)
Thank you so much for this helpful tutorial, I have been look forward to taking my pictures to the hext level.
That is fantastic! I know you will totally rock your images!
Thank you for this super helpful article! Even though I’m not using a DSLR (bought a Lumix LX7 a few months ago), you’ve made it easy for me to understand the key concepts of apperture, ISO, and shutter speed. I’ve been using automatic mode ever since but now I feel more confident to try manual mode :)
Whoo hoo! So happy to hear you are taking it off auto! You will love the freedom of manual mode!
How absolutely wonderful this article was! I have pinned about 18 different explanations of shooting in Manual mode, and yours is the only one that makes absolute sense! Thank you!! I loved your examples of setting the aperture to the number of people in the picture, and the explanation of the ISO worker bees. Going to go play now. Thanks for giving me the courage to turn that dial to M!
That is great to hear! Thank you! Have fun playing with manual mode!
Hi, I’m Hannah, I’m 19 years old and I like to consider myself a budding amateur photographer. I especially love portrait photography. My website is very much still under construction; it’s coming along slowly but surely. About 2 years ago I started shooting in manual and I’ve definitely noticed some improvement in my pictures, but I’ve felt that some of the consistency was compromised because I didn’t fully understand how to shoot in manual mode. I absolutely LOVED this article, it has helped me improve my shooting skills SO MUCH and has helped me find that consistency that I felt I lacked. I thought this article was very clear and gave an excellent explanation on how to shoot in manual mode. Thanks again! :)
I am so excited that you have found photography at such a young age! That is awesome! Best of luck!
This is the most well explained advice I have read on the internet! you have made it so simple and easy to understand! #1 fan!!
Thank you so much!
What a great site! I’ve never, ever been able to shoot in manual mode. Even my other “mode shooting” was often poor quality. I’d just about given up even after a local university photography class. But your simple encouragement and explanation changed everything. The sentence where you said keep adjusting until the ticker is on zero. Why oh why has no one ever told me that before. I went out today and took every. single. photo. in manual mode and they are far better than most of the photos I’ve taken in a long time. I will be a regular visitor to your site. Can’t wait to learn more. Thank you Thank you.
That is awesome! Glad to hear some things are clicking and you are off playing with manual mode! Enjoy!
Thank you so much ive been shooting in auto for the last 3 years and decided its time to take the plunge. after googling many many things i came across your easy info!
Yay! You’ll love manual mode! Good luck!
Have taken so many mini classes over the years and never really understood Manual Mode. Your wording is wonderful and I have sent a link to so many friends that have asked me for help and I didn’t know what to tell them. Thank you.
That is fantastic!! Glad to hear it’s clicking :)
Can you please help me?
I dont have a speed light i realy whant to take a powder paint shot i do know it must be in manual setting S Shutter speed but futher its confuseing….please can you help me?
Hey! I don’t know what you mean by powder paint shots. I don’t have a speed light either so you can definitely get the shots you want without a speed light. If the light is low and your need your shutter speed really fast make sure your ISO is high and your aperture is at a low number.
THANK YOU SO MUCH! I have read many articles about shooting in Manual since buying my T2i last year, and this has been the best one! Thank you so much for mentioning keeping the meter at 0, I had never heard that! And your aperture tip about 2 people in a pic and have it at f/2 is a great trick!! I have been shooting in the no-flash auto mode all year, time to switch to Manual! I also just ordered a 50mm 1.8, my first lens other than the stock, it’s coming Friday, so I’ll have fun using all the stuff I learned from your post! Thank you so much for the clear tutorial! I’m such an amateur but I’m really trying to develop this hobby of mine. I have some friends who want me to take their senior photos, so I’ve got to get practicing!
Yay! How fun you are getting a new lens and tackling manual mode! I hope you love it!!!!
[…] Learning technique is paramount to ultimately being able to express your vision as an artist. Shutter speed, aperture, ISO, white balance, focus points and so on. They are all important to learn and even […]
I, too, had an “a ha” moment after stumbling upon this article on Pinterest! I have a great camera and lens but could not consistently take good pictures. I somewhat understood aperture, shutter speed, and ISO separately, but did not know how to put them all together to get a good picture. My pictures were all too dark or too light. Your mentioning of the “ticker” suddenly made it all make sense to me! Thank you for simplifying it for me! Can’t wait to read more of our tips!
I’m so glad to hear you had an “a ha” moment! Yay!! Now go out and tackle that ticker ;)
[…] don’t want to spend all your time editing. Think of the time you will save if you nail your exposure and white balance in camera. Then, when it’s time to edit, there are just a few tweaks here […]
I was wondering if you could tell me what the best setting would be to take pictures during a football game at night. Thanks!
Hey Molly! Unfortunately, there aren’t any magic settings for a certain event. It really depends on the lighting. Just make sure your aperture is fast enough to free the game. I’d say at least 1/250. Good luck!
WOW!!! FINALLY—-someone who explained the ‘triangle” in English!!!! Well, other articles were in English, just not what I could understand. Your article is the first one I finally fully understand and can relate to! Now, for the first time since I purchased my first DSLR 6 months ago, I am looking forward to learning how to use it!! THANK YOU!!!!!
That is fantastic to hear! Glad it is finally start to click!
Question: In this article, are you referring to shooting in full manual mode or choosing one of the three A,P or S priority?
Yes, I am referring to full manual mode :)
HI! First of, LOVE your site! I am a *hopeful* photographer who has been amateur-ly been shooting small families and children of friends, but was recently asked to shoot my first wedding! There is another film student shooting it as well, so not 100% pressure, but I am still scared! Your articles are helping me a lot but I had a few questions as I venture further into Manual mode.
1) Is there a standard A:SS combo that I should start with? i.e. If you chose a ss of 50, start at f3.2, or ss100 and f2.8… Or can the numbers be a bigger gap?
2) I am still using a kit lens which is now why I feel like I haven’t been able get this, but am in the market for a new (yet reasonably priced lens). From reading your articles I’m thinking I need a Prime, but is that a dumb move for shooting a wedding? I’ve never used one so I’m not sure if the footwork will pose a problem…
Any advice is greatly appreciated!! Thanks in advance.
Lia
Hey Lia!
Unfortunately, there is no standard setting as it all depends on the light you have available and the look you are trying to achieve. I’m not sure what you mean by the “numbers be a bigger gap”. Depending on the light you can shoot at SS 1/380 with an aperture of f/2.8 or SS 1/125 with an aperture of f/2.8.
Check out this post on lenses for wedding photography. You may want to rent a lens or two for the wedding. Good luck! http://clickitupanotch.com/2013/01/wedding-photography-lenses/
Courtney, I am setting a goal for myself to start using my DSLR camera again. I took a class a long time ago when I first moved to Oki, but did nothing with what I learned. I will be started at the top and going down your tutorials so expect to hear from me. -Brooke
That is an awesome goal! Enjoy the journey :)
Wow what a great start to a tutorial!!! Only just recently got a DSLR and need a good step by step to help me get the most out of it and if this is how it starts then this looks perfect, though aperture still rattles my brain a bit, up, down, bigger, smaller…I keep forgetting which is which. Will get a handle on it though, thanks so much for taking the time to have written this up.
Thanks! Yes, it takes some time to figure out what you want to do with each setting but if you set your camera to manual for two weeks and don’t switch it back, you’ll figure it out :)
[…] I would. I have captured so many shots I will treasure forever. If you haven’t started shooting manual mode yet, PLEASE give it a try. I promise, you will surprise yourself at how it will eventually become […]
Often you might want a slower shutter speed to show movement, as in running, hair blowing in the breeze … Looks natural. But, hey, that’s just my opinion. Every photographer has their own preference. It’s also a good idea though today considered primitive but I still use them, to learn on a 35mm film, something like a Nikon or Canon SLR. Decent film is now at about $6-10 a roll and the Canon has AE-1 has a built in meter, advising what f-stop to shoot … Set your shutter speed, take it off Auto, get your reading from the LED viewer, change your f-stop maually and shoot (use 100ASA film). After awhile one will get the auto feel, then investing in a high-end DSLR and prime lenses and using ‘M’ mode will be a snap. Even then one might want to stick with film – I love it especially B&W, and after using a roll or two it’s like twisting my own arm to go back to the DSLR. Just additional info from another perspective …
Thanks!
Im new to a DSLR, and I really want to learn to shoot manual! Ive read tons of blogs, asked my photog friends but this explanation was hands down the best Ive ever read. Comparing ISO to worker bees is BRILLIANT. I know the next time Im shooting Im going to be like..ok, how many worker bees do I need to go fetch some light for me! :) I actually took notes off this page like I was in a school course. It will be a helpful tool when Im out practicing. Thank you so much!!!
So glad you found it helpful! Enjoy your photography journey :)
“For example, if you are shooting people and only want them to be in focus then you want to make sure that your aperture is at least at the same number as there are people in the photo.”
I have looked up this basic, basic photography information SO MANY TIMES and I swear this is going to be the first bit of information that will actually stick with me on how to pick an f stop. Love it!
Awesome! I’m so glad that makes sense. Remember that is just a rule of thumb :) I typically pick a higher number just to be safe :)
Hi there! I want to THANK YOU for your wonderful blog. I have been an amateur photographer for years and have decided to turn my hobby into a business with lots of encouragement from family and friends. I am still in disbelief that people want to pay me for taking their photographs. I have SO MUCH to learn, especially about the basics of my camera. I noticed in this article above you said the 50mm 1.8 lens is not compatible with Nikon D3000. I have that camera and lens and it works well. I am getting to know this new lens of mine. Can you explain why you think it is not compatible? Thanks so much!
Hey Renee!
Thanks for your sweet words :) I can’t see where I mentioned that the 50mm 1.8 doesn’t work with the D3000 in the post. It depends which 50mm you get if it will auto focus with your camera. It will work with your camera it is just a matter of whether or not it will auto focus :) Here’s a post that might help clarify – http://clickitupanotch.com/2012/04/50mm-1-8-vs-1-4/
Maybe I am misunderstanding totally. I would not doubt it. :) Like I said, I am really new at figuring out my camera. Here is what you said in the paragraph below the picture of the two girls on the beach: From the encouragement of a friend, I bought a 50mm 1.8 prime lens. This is an EXCELLENT lens if you are serious about learning how to shoot in manual mode, it is an inexpensive lens with a low aperture. Some cameras are not compatible with this lens, such as the Nikon d3000 and Nikon d5000. For those cameras maybe a 35mm 1.8 would be a better fit.
No, you understand it correctly. Thank you for pointing that out. I wrote this post 3 years ago and have better info now on how the cameras work with different lenses :) I’ll update that. Thank you!
Also, I have been searching and can’t seem to find a way to adjust SS and Aperture on my Nikon D3000. I can only find the ISO setting to adjust and it is limited to only going up to 1600 or Hi 1. Since you have a D3000 in one of your videos I am hoping you could help. thanks!
The first video is actually a Nikon D3000 :) I show how to change the SS and aperture :) Yes, the D3000 ISO may only go to 1600 or Hi 1. Good luck!
What a fantastic blog Courtney Slazinik,
Really great points in there, no wonder you have over 290 comments here.
Thank you for sharing, you gained a follower.
Thank you!
Hi! I recently stumbled upon your site and I’m so excited about working my way through each of your posts. After reading all about aperture, shutter speed, and ISO, I took my Canon 60D outside with the 50mm 1.8 prime lens and attempted manual mode using my dog as the subject. I set my aperture first, followed by shutter speed, then adjusted ISO to 100 since outdoors. It seemed that even with the slightest movement, my ticker would jump all over the place beneath the graph, even though I felt like I was all set. How do you handle this with moving subjects, such as animals or children? I’m often chasing my kids for pictures and can’t imagine constantly making adjustments as they move. Any advice would be appreciated! Thanks! :)
As long as your subject is staying in the same light you shouldn’t worry too much about them moving. however, if they are jumping in and out of shade to bright light that will affect it. Eventually, it will become second nature but to start with, focus on one type of light. If they run out of it, wait for them to come back into it.
this was absolutely the best article I have ever read. honestly. the. very. best. I shoot in manual very often and this article confirmed some suspicions I have had for a long time but wasn’t sure if they were true. I also learned a new word. thank you for a concise and informative post!
Thank you so much for your sweet words! I’m so happy to hear you found it useful!
I LOVE your blog. It’s more helpful than any other source I’ve found! It’s definitely my go to for…everything. Haha. I finally was able to successfully do a blurred background (on purpose) all thanks to you. =D The simplicity and the picture examples help tremendously! Thank you so much!
Yay! That is fantastic to hear!!!! Congrats! And Thank YOU!
OMG! I love this BLOG! I have my Nikon D3100 for almost 2 years now and I don’t know how to shoot in Manual. I have seen other blogs that teaches how to use manual and I don’t understand a thing, (maybe because of the terms they’re using. I’m not good at CAMERA terms, if you know what I mean.) My camera was given by a friend as a gift. Though I love taking pictures so I really want to learn more. Thank you for this. This is such a big help. I’ll always be on this blog from this day onwards. Looking forward to learn more from you. :D
I’m so happy to hear things are starting to click! Yes, figuring out the terms will open up a whole new world. Best of luck!
I love this blog! It’s very easy to understand. I’ve been looking for this kind of tutorial since I received my camera. After 2 years, I can say this is the best blog I’ve seen. I’m looking forward to learning more from you. I’ll share this with my friends as well. :)
Thank you so much!
this was so helpful! I read a few other blogs and articles about manual mode, and this was the easiest to understand!
That is wonderful to hear! Thank you!
Hi i have a passion in photography and i have always wanted to buy nikkon d90 but at the moment am using canon s3is and am always inspired by blurry background photos or out of focus photos can that canon achieve that effect advise please
The blurry backgrounds come from the lens and aperture you use. Check out this post – http://clickitupanotch.com/2013/04/what-lens-should-i-buy-first/
sir its great!!! i want to ask if kids are running and we waant to clik running pic so what aperture we will set for it… or shuttr speed…
???
I would make sure your shutter speed is at least 1/125 or 1/250. Good luck :)
Hi Darlene,
Thank you for this article. I am a fashion blogger and I use 50mm f1.8 lens to shoot my outfit photos (the whole body). I almost always use f1.8 in order to get the background blurred so my outfit can stand out.
The problem is that I very often come out blurred as well. I have tried taking photos of my photographer as well just to make sure that it’s not the shake that causes the blur of the subject.
I wonder if it is the distance between the camera and myself that makes me blurred.
What would you suggest be the best maximum distance away from a subject in order to prevent the blurred subject.
Thank you so much!
Hey! I’m glad you enjoyed the article! When I photograph myself I typically have the aperture around f/4 to make sure I’m in focus. If you are too close then the 50mm 1.8 won’t be able to focus correctly. I don’t know the best distance but if your camera can’t focus then you are too close.
[…] on her site. One of my favorite posts, and definitely one I’d like you to check out is How to Shoot in Manual Mode – The Basics. I’ve heard far too many people say that they’re afraid to take their camera into manual […]
[…] How to Shoot in Manual Mode – The Basics […]
HELP!!!! My daughter has her cheer competition this weekend. I just got a Nikon D3000. I have te lens it came with 18-55 and a 70-200. I am a SLR virgin. I do not know anything about it and I need help. Please let me know some basics in terms I can understand.
Thank you in advance.
I would say don’t tackle manual mode on a moment that you want to capture for sure. Practice it for a while before tackling a moment that can’t be recreated :)
I’ve just bought my first camera (been using my mobile previously), but I can’t take a single photo. I bought it yesterday and want to take it back :-(
It’s a polaroid is2132; I’ve read and read and re read the instructions and nothing takes a photo even close to what I’m capable of with my my Samsung galaxy s3.
I know it must be something I’m doing but I don’t have a clue. I’m not even sure what to ask you. I just want a dummies guide like press this this and this and voilà! Lol
All I want is to take sharper photos of my son and my dog.
Hayley, I’m sure that is super frustrating. I wish I could help but I’m not familiar with that camera. Is it on? Does it have a battery? Honestly, that is all I can think of. I would take it back to the store and ask for help :)
Wonderful post wonderful photos thank you so much
Thank you!
Just like everyone else has said — (I read through all 300+ comments!) ..I absolutely love your tutorial! It really is the first thing that has finally clicked for me after having my DSLR for 2 years and I thank you! I do have a question though.. I have the Nikon D3100 with the standard kit lens. I think I read that the 50 mm lens you highly recommend isn’t compatible with the 3100? Or that it won’t autofocus? Is this going to be hard for a beginner like me.. is there a specific 50 mm lens that will work and autofocus with my Nikon3100?
Thanks!
Wow! I’m impressed you read all 300 comments :) You did your homework! Here is a post with another option for the 50mm. http://clickitupanotch.com/2012/04/50mm-1-8-vs-1-4/
Yes, I think it would be a challenge to tackle manual mode and try to auto focus.
[…] a fast shutter speed. If you have a sports mode on your camera, you can use that. You need a fast shutter speed to […]
Hi I just wanted to say first that I found all
Your tips very helpful but I just had one question I have a canon rebel xsi and in manual mode I cannot get my exposure right the ticker will not move they are under exposed at -2 and I have changed aperture and ISO and won’t move at all does it have any thing to do with the size of my flash oh I’m shooting inside under medium low light. Thanks for all your tips
Hey Kristen,
It is hard to help if I can’t see the photo with the settings. Feel free to send me the photo with the settings so I can see what is going on. [email protected] :)
[…] you're shooting in auto you'll want to move to manual mode in order to get the best results. Shutter priority and aperture priority are also good options, and […]
As I was shooting this Christmas, I was having problems with my settings. I was getting pretty frustrated. I was shooting in manual mode..I am just now learning to shoot in this mode because you have more freedom in your settings..I had a person come up to me and say “Oh here is your problem…your camera isn’t set on the green box” I just had to laugh. I politely said I know I am shooting in manual trying to learn this setting. But the way she said it was just made it sound like shooting in manual would never work and that it is taboo..Thanks for the post. I am having a problem with grainy pictures so I went back to read your tutorial to see what I am doing wrong..I think I my aperature and iso are too high. I am sure I will be back to learn more.
That is funny someone thought you were doing something wrong because you were off auto. Way to go on tackling manual mode :) The key to making sure your images don’t have too much noise is to make sure they are properly exposed to start with. It’s okay to raise your ISO as long as you are getting a good exposed image :) Check out this post – http://clickitupanotch.com/2010/12/iso-dont-be-afraid-to-raise-it/
Thanks for all the useful information. I have a Nikon D5000 with three lenses (24-70mm, 55-200mm, and 18-55mm) and just received a Nikon SB-700 flash. I have taken OK photos on auto mode in the past by really want to improve. I’ve tried some of your tips here (mostly with the 55-200mm lens) and am still not sure I’m getting the hang of things. Inside in moderate light, I’m leaving my ISO at 800 then adjusting the aperture and shutter speeds to get 0 on my display. I’m coming up with blurry photos at any given range and am struggling with the Manual vs Manual/auto settings that are on my lens as a potential source of this issue. Adding the flash (because so many of my indoor photos have had the shadow of the lens in the way :( ) complicates things even more. I’m determined to figure this out but am open to any hints that might make this work a little better.
Hey Summer, I don’t have an external flash so I can’t help you there but I have a guest post coming with some tips. I set my aperture first, then make sure my shutter speed is at least at 1/125 to prevent a blurry image and then set my ISO after that. Hope that helps :)
This helped so much! Thank you. I am a fairly new photographer based out of Louisiana, I have tons of questions if you can email me. Basic camera settings and trying to capture movement or capturing in depth images of people. Also, I wanted your advice on a good editing software. I’ve heard the best of course is Photoshop and then lightroom. Which would you recommend? My overall aspect of the photgraphy theme Is more vintage old looks and natural versus an airbrush appearance. Can you please help and give feedback regarding these matters? Thanks a bunch! I can be reached at [email protected]
Hey Terri,
I know photography can seem overwhelming at first. Check out my “start here” page. It has over 100 tutorials and that might help answer some of your questions – http://clickitupanotch.com/best-of/ I prefer Lightroom over Photoshop but that is me :) Best of luck!
Nice Article..!!!!
Thank you!
Thank you so much. This was very clear, and explanatory to me. I’m a momma of 1 year old twins, and a 3.5 year old, and don’t have a lot of time to learn my camera. Thank you for making this seem so easy to me!
Enjoy those little ones :) Capture their everyday!
[…] aperture, shutter speed, and ISO. Your creativity will skyrocket once you learn how to really use your instrument. -Jennifer […]
Very clear post! I’ve had my Nikon 5100 for about a year and I’m just starting to delve into manual shooting. I’ve already had some success with auto and with the presets but understanding these basics is the key to having better control over your shots.
Thank you! Glad you are tackling manual mode.
This is great blog for photographers especially novices in DSLR.
I need some help when shooting landscape. When I shoot the greenery part mountains with the sky in the upper part in the photo, I don’t see the full details in the sky, such as clouds, and blue sky. It’s all white. The greenery is ok. It is just the sky. clouds that came out all white. Would be grateful if I could have some guidance on how to resolve this problem.
Camera: Nikon D3200, Lens: Nikkor 18 – 55 mm
We have a post coming about shooting landscapes but it sounds like the reason that is happening is because the light is different. The sky is much brighter than the landscape so it is hard to expose to get them both exposed correctly.
I loved the way you explained the exposure triangle. Just amazing you are….. hats off:)
Thank you!
Thanks you so much for this wonderful blog post above here.I am searching this type of information from long time.
http://www.ChicagoNature.com
Thanks! Glad you found it useful.
[…] – How to shoot in manual mode: The basics […]
I am addicted to your site. Its my second day and i have started to love my camera. Thankyou.
Just wanted you to note that the word ‘may’ is misspelled as ‘my’ in this text:
Remember: Lower shutter speed = more light but your subject my be blurry / higher shutter speed = less light but possibly a sharper subject
Thanks :)
Hello.Thank you for all of this information. I am using a Nikon D80 w/ a 50mm lens and experimenting with indoor lighting (no natural lighting). But i cannot get beyond the yellowish color. I set the aperture, ISO and shutter speed but cannot achieve a photo that isn’t yellowish. Any suggestions?
Hey Yvonne,
The yellowish tint is from the white balance. Check out this post – http://clickitupanotch.com/2013/05/white-balance-comparing-different-methods/
I just stumbled across your blog the other day and I’m so thrilled about it! You’ve explained aperture, ISO and shutter speed in a way I can finally grasp and I’m actually getting some decent photos in manual mode. I love that you label your photos with your settings. So helpful. Thanks so much!
Welcome! Thanks!
[…] post that covers the basics with some fab examples and a video […]
What about just setting your camera ISO on auto? That’s what i’ve done on my D5000, and I never have any issues.
Hey! If that works for you, awesome! I like to be able to change it and have complete control over everything.
[…] 1: – Learn manual mode – Get the photos correct in camera – Focus on understanding aperture, shutter speed, and ISO and […]
I just found your web site and wanted to let you know that I found your blog so much easier to read and understand than any I have come across. Thank you so much for simple and easy directions. Thank you, your husband and your families for his service for our country!! It not only affects him, but the families also. May God Bless You and Yours as you continue your journeys together.
Thank you so much for your sweet words! I’m thrilled to hear you have found the website so helpful!
Just starting to get into better photography. I can’t get enough of your website-although my brain and memory can’t take it all in!! Would you give your opinion in a good mid level dslr camera? I am in the market for a new camera, my old one died. I am looking at the Canon t3, t4, 6d or the Nikon 5100 and 5200. Do you have any opinions on these? I’m not going in to photography as a profession but love taking pictures of family, etc. thanks so much!
Hey Kelly!
That is a tough one and I always recommend heading to a camera store to play with the different cameras. See what feels good in your hands and if you like where the buttons are for changing your shutter speed, ISO, and aperture. I had a Nikon D90 which I LOVED when I invested in a mid-level camera. Not sure about your budget but it was a great camera.
Doesn’t higher iso mean less light (brighter pictures because camera needs less light to produce them, since the bigger grain) needed?
The higher your ISO the more light you are bringing into your camera. This is why if you don’t have a lot of light available to you, then you will raise your ISO.
[…] back to the early days, just after mastering the manual mode, I remember being totally intimidated by open light. I spent the better part of my first year or so […]
Wow you made things, especially the exposure triangle much easier to understand. Thank you. I find myself scrambling to shoot photo’s (say a concert) because of the lighting. I own a Canon 7D and have two lens, the 18-55 and the 100-400. Can you please give me some examples of settings to shoot in low indoor light for a concert using both lens. Starting points for example with each lens. I am very appreciative of this site and your help.
Kimberley
Hey Kimberley,
I’m glad you found it helpful. Unfortunately, there aren’t any magic settings when it comes to light and certain lenses. It all depends on what you have available and how wide your lens will let you get your aperture to. Just play around :)
Thanks so much. This article has been such a blessing to me. I almost gave up on Manual after all my attempts resulted in very bad pictures (some of the shots I couldn’t recompose and the scene and memory are lost forever). But your article has given me confidence to try again. I’ve practiced a few times now after reading your post and my shots have been wonderful. Thank you.
My question now is: How do I get out of auto-focus? Is it really a good idea to use auto-focus while in Manual mode? I’m asking because my camera fails to focus sometimes when I really need the shot badly. And sometimes I get the subject waiting unduly with my camera failing to focus/shoot.
Thanks.
An additional piece of information: I use a nikon D3100 and I got a 50mm f/1.8G AF-S NIKKOR FX Lens. I took your advice against the kit lens although I also got a 55mm – 200mm zoom lens.
Thanks so much and I look forward to your reply on the manual focus.
It is up to you if you want to get out of auto-focus. I still use auto-focus but choose my own focal point. Sometimes cameras take a second to focus but if you think there is something wrong with your camera I would suggest sending it in to be repaired. If you want to shoot with manual focus by all means give it a try. :)
Thank you very much.
Wow, I have been wanting to understand this for so long…been shooting in aperture priority since 2009. Now, I finally get it! You rock girl!!
Yay! I’m so glad you get it now! Have fun in manual mode!
I’m not sure how I stumbled across your site but I love, love, LOVE it! I bought my first DSLR camera (Canon Rebel T3i) in December and have had a hard time getting the hang of it. After just reading two of your posts, I already understand way more! I am starting to tackle Manual and am learning a lot here. Thank you SO much!
Wonderful! Enjoy!
hello, I have just discovered your website a few weeks ago and have been trying to shoot manual ever since. I really knew nothing about photography so bare with me…I have a Pentax with a lens that goes as low as F4.5, I have 3 boys under the age of 4 …they are always moving, running, jumping, yelling (ok..ignore that last one). I really like a bright picture (too bright my husband says)many of my pictures are blurry….if I got another lense..the 50mm you speak of in your article..would that help with blurriness in indoor pictures?
Great Blog! thank you so much.
Hey Corinne,
I’m not familiar with your camera. Does Pentax sell a 50mm? Also, the lens does help by allowing you to shoot with a wider aperture (lower number) which brings in more light and lets you raise your shutter speed. If you are photographing your kids make sure your shutter speed is at least at 1/125. Maybe this post will help – http://clickitupanotch.com/2011/02/how-to-take-a-sharp-photo/
Yeah, all well and good but for the vast majority of situations, Aperture Priority is just fine. In fact, that’s not too dissimilar from PS either.
Manual should only be used when you know the meter is telling you lies.
Hi Courtney,
I totally love this article. I got a Nikon D5200 for Christmas and have only read the manual it came with. Then gave into buying the field guide for it and most of both still leave me with alot of questions. But since I found your website through a pin on pinterest I have been so happy to learn more in a few weeks than what I have in the past months. Thanks again for writing this one. I am definitely going to make shooting in manual a habit. I was wondering though if you have any recommendations or tips on using the kit lens in manual mode until I can give in and get the 50mm?
Hey Rachel,
I don’t have any tips for the kit lens other than just play around with it :) Just keep practicing. Glad you have found our information useful.
I was the girl that said never in a million years would I get off Auto…but guess what? I did, and am LOVING every moment of it!! :)
Way to go! Awesome!
I have a nikon fm2 ; what can you tell me about pushing film speed
Hey Steven,
I wish I could help but I don’t use film. Maybe check out the book – Film is Not Dead
[…] and learn how to actually use the camera. I read a few tutorials online this past week. I found this one most useful. When I took the knew lens out of the box today, I adjusted the settings in manual […]
[…] more about shooting in manual mode: – How to shoot in manual mode – Aperture – 8 tips to take a sharp […]
Thanks a lot for the wonderful blog.I’m just loving it to shoot in Manual mode. Its so much fun experimenting in different scenarios..I would never want to use the Program mode again :) Glad I found your blog..Thank you
That is awesome! Love that you are tackling manual mode and don’t want to go back! Whoo hoo!
[…] Click it up a Notch This site is full of amazing goodness. I linked to the post speficially on learning the exposure triangle, but make sure you check out some of her other awesome tutorials. Also, the gal who runs it is a military spouse! […]
This is very useful information that will help me a lot. I appreciate it…thanks for sharing!
You are welcome :)
[…] […]
[…] http://clickitupanotch.com/2010/09/shooting-in-manual-the-basics/ […]
Hi,
Have just stumbled across your website, fantastic information, I am just starting to put my nikon D5100
onto manual mode. I think I need to purchase a prime lens as my kit lens will not let me go down any
lower than f5.30. Would appreciate any suggestions as to what would be a good one to purchase? Well done, what a great website Courtney.
Hey Denise,
I suggest the 50mm 1.8. You can read more about it here – http://clickitupanotch.com/2013/04/what-lens-should-i-buy-first/ Thanks!
I have read many article about how to (master) use the Manual Mode and quite honestly they all said pretty much what you said BUT for some reason I was able to grasp the concept better after reading this article. Thank you and all those self taught beginners thank you too.
Wonderful! Enjoy manual mode :)
I can’t believe I’m admitting this, but I’m FINALLY making the switch to all manual mode . . . after having my DSLR for over 10 years! I’ve read book after book after tutorial after tutorial and just never seemed to understand the *science* of it well enough to feel confident that I could tackle manual mode. Late last year I came across your site and it feels like the light bulb has finally gone off! I understand! Everything makes sense and I wonder why it seemed so foreign before. At the beginning of June I started a 365 challenge and so far I’ve shot every photo in manual (except for one, which I took with my phone). I feel so proud of myself! I can do this! I’ve always wanted to become a good photographer, and now I feel like I’m on my way. Thank you soooo much for sharing your own story and for your incredible explanations. I’m so thankful for this site. :)
One photo in particular that I never would have attempted before, is one I took of my toddler sleeping in a nearly pitch-black room. Because the exposure triangle made sense, I felt confident enough to try shooting in the dark, with just the light from outside the door, with my kit lens, on day 5 of shooting in manual. Thank you! (The photo, if you’d like to see it – http://www.honeyandcheese.com/2014/06/05/5365-sweet-dreams/)
You can do this! That is awesome you took the leap and tackled manual mode and a 365. I did the same thing when I started and the 365 made the world of difference :) What a lovely shot of your little one. I’m so glad you have the confidence to tackle the harder type of images now :)
Thank you so much for auch an informative well written post!! I have been trying to learn manual mode for weeks and it was so confusing and frustrating!! This is so easy to understand!!! Thanks again!
Glad you enjoyed it :)
[…] started late one night looking on YouTube, and googling photography tutorials. I came across Click it Up a Notch, and read a few of her posts. It helped me understand the basic terms/functions of my camera so […]
Thank u…so much
Thank you so much for sharing this information. I am just a hobbyist and have been very intimidated to shoot in manual mode. After reading this I felt so much more confident to make the switch and I love it! Thank you!!!!!
Don’t be intimidated :) If I can figure it out anyone can, I promise! Best of luck!
This is my favorite photography website! I’m in awe of the time and energy you put into it!
My question is about setting exposure, using the exposure button. I was setting ISO, Apeture and SS, then adjusting exposure on the meter until it’s around zero… After reading this article I may be doing that all wrong?
Thanks!
Thank you so much!
You are not doing it wrong :) If setting your settings in that order for you works it is not wrong. I wanted to share the order I do it. That doesn’t mean my way is the only way to do it. Just another option.
[…] of effective badges include the one in this photography tutorial from Click It Up a Notch and this organizing series from Home Storage Solutions […]
[…] How to Shoot in Manual Mode – The Basics […]
[…] I just got a 50mm lens for my camera and will be using these tips to help me learn manual mode […]
Thank you so much for all of your great information! I’ve improved in taking photos but still have a ways to go. I feel like my photos are definitely holding my blog back and I just need to finally learn what I’m doing instead of occasionally getting lucky. I was totally stuck when it came to adjusting the Aperture and Shutter Speed independent of one another until today! A serious dum-dum moment when i realized that you have to hold down the +/- button to adjust the aperature. So I just spent an hour taking pics of the same thing with different combos of all those things and I think I might be starting to understand all of this stuff! Hooray for my first day in manual mode! Thank you, thank you!!!
It’s amazing how much good quality images can help a blog grow. I’m so glad to hear you are tackling manual mode! Yay!
PLEASE HELP I NEED ADVICE!! I have a Nikon d3200, I have a 18-55mm and a 55-300mm lense… im new to shooting. I have tried practicing these settings in my room, which doesn’t have the best lighting, using my 18-55mm lense.When i put my ISO to 800 or higher my aperture is 4. The thing is my shutter speed becomes extremely low which causes my picture to be blurry due to camera shake. When i change my shutter speed to a higher setting the lighting gets extremely dark in the picture. The lense i use won’t let me lower my aperture to a low enough setting to make the lighting better. It seems that i either have shaky pictures because my shutter is so low or if i bump up my shutter the lighting is almost black in the photo. I only have this problem when in low/bad lighting settings. Is this due to the lense i’m using or am i doing something wrong?
It sounds like your lens is holding you back from being able to open up your aperture to a number that will let you get more light in. If you lens will only go as wide as f/4 then make sure your ISO is as high as possible in low light situations.
[…] learn more please see How to Shoot in Manual Mode – The Basics by Courtney […]
Where have you been all my life! The way you explain things are so incredibly simple to remember and practice. Thank you
You are so sweet! Thanks!
Wow…what a great refresher…been out of my business for a while and jumping back in feet first. Wanted to refresh my self on my Manual Mode….such a good thread! Thank you.
That is wonderful to hear! Thank you :) Good luck as you jump back in!
Hi, I have a Nikon D7100. I am really trying to work on Apeture setting. For some reason some shots are perfect and some are very dark or BLACK. Even if I shoot in multi burst one will be great the other black. Most shots in Auto are OK. Why when I take two identical shots in A seeting will one be black or very dark and the other fine?
Many thanks
Mark
Hey Mark,
I wish I could help but I never shot in Aperture mode so I’m not familiar with how that one works or what might be causing the difference in your photos. I would suggest making the jump to manual to have complete control over your images.
[…] portrait photography settings, specifically aperture, shutter speed and ISO. I particularly liked this one. I felt like she explained the different settings clearly and simply, with 1-2 sentence […]
Hi Courtney. Just got a new 50mm 1.8 lens, and I can only shoot manually, as the AF doesn’t work on my camera model with that particular lens. I am trying to shoot wide open, but only getting about 10 percent or less of pictures in focus. I shoot only portraits. Am I having this problem because the aperture is too low? I try to stay very still when shooting, using all the techniques to avoid shaking. Help!
Yes, when you shoot wide open you only get a small percent of the image in focus. Consider increasing your aperture number (stopping down) to f/3 or f/5
Wow! This is the best description I have read regarding shooting in manual mode. It has me inspired and super excited to dive into manual. I actually understood your explanations and it didn’t just read like gibberish to me. THANK YOU!!! The poor families that are getting pics with my rookie self in a few weeks also thank you! : )
Thank you so much! Glad you found it useful :)
Hello Courtney!
It is really inspiring to read articles on your site. Even though I’m no longer DSLR-camera user I again wanted to pick it up and shoot! Thank you for your advices it is truly thorough support for beginners and intermediate.
As I decided to switch to film-cameras could you please recommend me some material that would be as usefull as yours?
Thank you in advanse and all the best in future!
Nelli
Thanks! I don’t know of any sites that focus on film cameras. I do know that Film Is Not Dead – FIND is a good book and they may have a site.
I just bought a new camera & I can’t thank you enough for this post. You make things SO much easier for me :) Plus, the girls are way too cute!!
Thank you :) Have fun with your new camera!
[…] Learn manual, or at least learn the terminology of manual mode. I understand manual, but don’t shoot in it. I shoot in Av mode all the time. But when photos aren’t turning out, I can make adjustments as necessary if I believe the ISO needs to be slightly higher or the F-Stop lowered. Click it up a Notch has an excellent starting guide to shooting in manual mode. […]
Best tutorial I have seen – loved the YouTube video on how to actually change the settings – crazy that Nikon manuals don’t share this information. Thanks so much!!
Thank you so much! So glad to hear you found it useful :)
[…] Choosing the correct exposure. Exposing correctly is always important and always a hot topic among photographers. When […]
[…] of the biggest hurdles you had to overcome when learning the technical aspects of photography and shooting in manual mode. I would read explanations online, see links to calculators, hear it described as “shallow” or […]
[…] I’m still a beginner when it comes to the DSLR, but I am able to shoot in manual, so I feel pretty good about that. These photos were shot at f 3.5, ISO 100, and 1/160 shutter speed. So what does that gobbledygook mean? Well there’s tons of information out there on how the DSLR trifecta of ISO, aperture, and shutter speed work together. I like this one. […]
[…] Here’s a link to the original article that I read on how to shoot in manual: http://clickitupanotch.com/2010/09/shooting-in-manual-the-basics/ […]
I just got my first DSLR camera for Christmas!! I’m Slowly learning how to take gorgeous photos. I loved your blog on this :) it explained so much to me. I’m really excited and can’t wait to get out and play with the camera on Manual. I have the kit lens that came with my Nikon d3300 which is the 18-55mm lens 3.5-5.6. Will I still be able to take good quality pictures with the kit lens or do I need to invest in a 50mm 1.8?
Yay! It will be more of a challenge to achieve tack sharp images with that blurry background with the kit lens. If it is in the budget I’d suggest getting a 50mm 1.8.
[…] How to shoot in manual mode […]
[…] How to shoot in manual mode-the basics – click it up a notch […]
Thank you!! I guess il need to ask for one for valentines :)
Hope you get it :)
[…] going to use it on Auto. Personally, I think everyone should challenge themselves to two weeks of shooting on manual mode. Don’t do it when there is a major event like a birthday that can’t be recreated if you […]
[…] I had my mind blown today while reading Click It Up a Notch blog. It was just a basic post about shooting in manual mode. It mentioned what the -2…1…0…1…2+ meant on a DSLR and that it should be on […]
I think I just found an amazing blog!! The article is all that I need now! Explained so simple and its very easy to understand.
Thank you! Have fun playing around with manual mode!
You stated thst a 50mm 1.8 isn’t compatible with a nikon d5000? Why is that? Ive used those two together for a few years now. Woukd a d7100 be better??
The 50mm 1.8D will not auto focus with the D5000 however the 50mm 1.8G should work just fine :)
I just got my camera and started shooting in Manuel mode right away! I thought my photos looked great once I did all the right settings, but when I uploaded them to my computer they appeared slightly blurry. I was very upset given that they would have been such great shots! I’m really glad I read this article though since it helped me understand it a lot better. Learned so much already.
Thank you!
Wunder Bliss
Thanks! Glad you found some useful tips. This post may help you with the blurry images – http://clickitupanotch.com/2011/02/how-to-take-a-sharp-photo/
[…] is a completely different topic and I would suggest you check out this blog for some insight. Essentially it’s all about balancing your ISO, shutter speed and aperture […]
[…] list of things to learn this year in photography? I want to continue to improve on photography on manual mode. Then I would love to focus on photographing in low light […]
I just wanted to post that I am so thankful for this website. I am a beginner photographer and had a moment of “freak out” is what I like to call it. I have 3 weddings booked this year and had no idea what an “f stop, shutter speed, or ISO” even was! I am feeling so much more confident in my work right now, because I have this website to help me! THANK YOU!
Glad you found it so helpful! Good luck with your weddings :) Remember if you aren’t 100% confident on manual don’t stress about doing the wedding on manual, maybe try aperture mode if you are more comfortable with that :)
[…] her blog tutorial titled, simply, “How To Shoot in Manual Mode: The Basics,” Ms. Slazinek first refreshes our knowledge of the exposure triangle: aperture, shutter […]
[…] learned the basics of shooting in manual mode from this blog post on ClickItUpANotch.com, and I am currently working to master those techniques before I move onto […]
Hello.
I am SO HAPPY I stumbled upon this website. I am a full time working Mom who is obsessed with photography! Thank you so much for this website. I am going to pick up my camera every day, and do the challenges.
Does anyone know of a way I can submit my photos, and they can be critiqued?
Thank you!!!
-Sandy
Thanks a bunch!!! helped a ton!!!!!!!!!!!!!!
Hi, I just want to say thanks so much. I’m busy studying photography and you helped me understand so much that I couldn’t. I’m glad I found this blog and can’t wait to learn more
I LOVE this basic explanation of all things manual! THANK YOU!!
[…] Before snapping away make sure the base is right. This doesn’t mean you should spend thousands on camera equipment. I shoot with a simple Canon 500D of which an equivalent can be bought for around 400 euros nowadays (body only). Of course you can splurge on a more fancy body, if you can, please do so, but personally I think you should save the splurging for a good lens. A great camera lens makes your pictures so much more beautiful. For neat close-ups with a lot of depth (pictures where you have a few very in focus parts and most of it out of focus) you can already find a nice lens for about 100 euros (the Canon EF 50mm f 1.8), but this is less suitable for shots on which you for example are featured in total because it doesn’t have an image stabilizer. The further away you stand from your object the more the object will be out of focus. Therefore I recommend going for a slightly more expensive lens that has an aperture of 2.8 minimum but has image stabilizer too. And oh… last but CERTAINLY not least, spend some time and effort into learning how to shoot pictures in manual mode. You can only achieve the result you want if you know how to get it, in other words, if you know how to set your camera for it. I have found a simple tutorial here. […]
What’s Happening i’m new to this, I stumbled upon this I have found It positively helpful and it has helped me out loads. I hope to contribute & assist other users like its helped me. Great job.
http://www.dilioptim.com/
This post helped me a lot! I was taught when I got my DSLR about how to adjust the aperture, ISO and shutter speed and a little about what they do. But I was always just guessing on where they needed to be in different settings. I had no idea abou the light meter and that makes a world of difference! Thanks for sharing!
I’m glad you found it helpful! :) Yay!
[…] article talks about these things and goes into much better detail than I ever can. Read through it and then […]
I have been so lost in how to correctly take good photos.. this helped me,
Thank you so much.
Hey! In need of urgent help! I have a Nikon D3100 and have a task to complete for school, where I have three objects and I must let the first object Benin focus then the second then the third. My f stops will not go lower than 4 which doesn’t allow me to focus the objects, please help!
[…] manual, all you need to know are three settings: aperture, shutter speed, and ISO. I found an article here that explains it pretty […]
Hi there!
I love your blog! I recently came across it while trying to learn how to shoot in manual mode and I love it! I have a fashion and lifestyle blog and realized my photos were looking very grainy and unclear lately. I’m hoping they will start looking a lot better now that I’ve learned so much about manual already!
Thank you for sharing!!
Shelby
http://www.prettyinthepines.com
Hi,
I found your site after much reasearch and I’m glad I did. From all the talks and tutorials yours was the easiest to understand and spot on info. I just bought nikon d3100 and was finding it very difficult to take good pictures, I almost regretted the decision of buying a dslr and my iphone pictures look better. Hopefully I get more info from your site
Thanks a ton
Marwa
http://www.enthrallinggumption.com
Hi Courtney,
I love your blog – your tutorials have helped me so much. I purchased your PDF and its great as well.
I just wanted to point out one thing that might be misleading…
When you say “You use these three components to get your light meter to be at zero.” what metering mode are you using? For spot metering, if you’re metering for something white, you actually want your meter to be at +2, for black -2 (and of course there are variances in the middle depending on skin tone, etc. – you want to keep an eye on your histogram to be sure you aren’t under or over exposing).
If you always meter to zero, its possible to under/over expose by 2 stops, or more…
Can you comment on this?
Hi,
im not a mum but this will not stop me from writing this.
thank you so much for this great simple easy to understand information about manual photography. Ive been reading about manual shooting from many different websites for more than a month now and they never gave me so much confidence in playing around adjusting the three key elements than i have now after reading your blog. more power to all
I have using your tips for shooting manual for a week now, and am loving the images I’m producing… I even got a ‘nifty fifty’ lens!
Quick question… When shooting in manual, do you also flip the switch on your lens, from AF to MF?
[…] PRICE: $19 by Courtney Slazinik from Click It Up a Notch (I love her blog and read her Getting Started in Manual Mode tutorial at least a dozen times when I first got my […]
I’ve currently walked away from a job of 15yrs to pursue my dream of Photography. It’s sites like this that keep me motivated and helping me along the way. I appreciate all the info you provide. Please keep up the awesome work.
Thanks so much! Best of luck following your dream :)
Great Post, Courtney! as always!! In fact much needed to keep me inspired this summer:) Thank you for another great inspiration in photography
xoxo
Epsita
http://www.thepositivewindow.com
[…] it, I had read countless articles without being able to understand. I came across this article from Click it up a Notch and finally, it made sense. Find someone who is willing to help you learn. I wish I had, I would […]
Thank you so much for sharing not only your gift but your beautiful skill with us. im extremely eager to get started on my journey.
This was one of the easiest to understand Manual Mode Tutorials I have come across. Thank you so much Courtney, I learned some great tips from this post! Pinning for future reference.
Courtney,
Thank you for your blog. I am a beginner photographer and I am trying to master manual mode myself. This was very helpful. On the picture of the bowling shoes, I am curious why you would want to open up the aperture when your ISO was 1000. Wouldn’t that over expose the picture if your aperture and ISO are letting in more light? Or does making your shutter speed higher make up for that? Hopefully that makes sense.
It seems that most of the time you are switching your aperture and shutter speed, and keeping your ISO the same, right?
Thank you for your input!
Jenna
Hi, how are you?
Do you need a De Nature Indonesian herbal medicine can please contact our customer service directly via SMS or phone. We always online 24 hours to serve the purchase of medicinal herbs de Nature.
Hi!
This is really a marvelous insight on manual mode of photography. As you said, a 50 mm lens is a good buy. What is the ideal distance to get food photos clear and sharp. Please do mention the range of Aperture that can be used …food photography in particular.
Thanks in advance.
Cherie
[…] Before snapping away make sure the base is right. This doesn’t mean you should spend thousands on camera equipment. I shoot with a simple Canon 500D of which an equivalent can be bought for around 400 euros nowadays (body only). Of course you can splurge on a more fancy body, if you can, please do so, but personally I think you should save the splurging for a good lens. A great camera lens makes your pictures so much more beautiful. For neat close-ups with a lot of depth (pictures where you have a few very in focus parts and most of it out of focus) you can already find a nice lens for about 100 euros (the Canon EF 50mm f 1.8), but this is less suitable for shots on which you for example are featured in total because it doesn’t have an image stabilizer. The further away you stand from your object the more the object will be out of focus. Therefore I recommend going for a slightly more expensive lens that has an aperture of 2.8 minimum but has image stabilizer too. And oh… last but CERTAINLY not least, spend some time and effort into learning how to shoot pictures in manual mode. You can only achieve the result you want if you know how to get it, in other words, if you know how to set your camera for it. I have found a simple tutorial here. […]
Jual Obat Herbal
Do you need a De Nature Indonesian herbal medicine can please contact our customer service directly via SMS or phone. We always online 24 hours to serve the purchase of medicinal herbs de Nature.
That´s the most clear explanation I have got so far! :) Thanks a lot!
Thanks! Glad it was helpful!
Hey there, Courtney! This is a GREAT explanation, for sure. I’m the proud owner of a Canon Rebel T3i, and I’ve had the most trouble trying to shoot in Manual Mode. Nothing I’ve read has really helped, mainly because I’m more of a “hands on” person. But, this has definitely helped me realize a lot. I’ll be trying this out and playing around in Manual Mode for the next few days, for sure!
Thank you!!
Hey Tatum, I’m so glad to hear that! I hope you have fun playing with manual mode!
Hi Courtney, there is some fantastic information here, thank you.
Just wondering why is the Nikon 50mm f1.8 prime lense not compatible with the Nikon d5000?
[…] look like and how I want them exposed! Starting to learn Manual mode and need a little extra help?! Here is a great post on click it up a notch to get you […]
[…] the number, the smaller part of your photo will be in focus. This is known as having a shallow depth of field. The bigger number is known as having a deep depth of field. More light is let in with the smaller […]
I stumbled across your blog a week or so ago, and I just can’t leave (sorry… fan girl here). I just launched a food blog and have been dying to take better photos. I also just bought my first DSLR and have been rather intimidated by it. I am challenging myself now to shoot only in Manual in hopes to figure this thing out! This post is so extremely helpful!! I can’t wait to try it out! Hopefully my food (and my wiggly toddler) cooperate so that I can practice. Thank you!!
Welcome! How wonderful! If you are into food photography you need to check out one of our contributor’s Trisha’s website – http://eatyourbeets.com/ She has great tips!
Hi Courtney,
Thanks for the great blogging.. Everything explained in very very easy way.. This is the one I was looking for so long.. I went through all your links in last two days.. I didn’t used my DSLR for the last two years .. But after reading your pages, I am very eager to use my camera now..
Thanks again..
Regard
Moosa
That is fantastic to hear! I love that you are picking up your DSLR again!
Thank you, thank you, thank you! I am slowly trying to teach myself how to use my camera and kicking the habit of the auto settings. Your post was just what I needed today to get started on working in manual.
Thanks again!
Sae
I love that you are challenging yourself with manual mode! You can definitely do it!
Great tutorial, liked the video
Thanks
[…] Before snapping away make sure the base is right. This doesn’t mean you should spend thousands on camera equipment. I shoot with a simple Canon 500D of which an equivalent can be bought for around 400 euros nowadays (body only). Of course you can splurge on a more fancy body, if you can, please do so, but personally I think you should save the splurging for a good lens. A great camera lens makes your pictures so much more beautiful. For neat close-ups with a lot of depth (pictures where you have a few very in focus parts and most of it out of focus) you can already find a nice lens for about 100 euros (the Canon EF 50mm f 1.8), but this is less suitable for shots on which you for example are featured in total because it doesn’t have an image stabilizer. The further away you stand from your object the more the object will be out of focus. Therefore I recommend going for a slightly more expensive lens that has an aperture of 2.8 minimum but has image stabilizer too. And oh… last but CERTAINLY not least, spend some time and effort into learning how to shoot pictures in manual mode. You can only achieve the result you want if you know how to get it, in other words, if you know how to set your camera for it. I have found a simple tutorial here. […]
I wanted to take pictures of my son in manual mode for the fist time. I had read a bunch of articles and watched a ton of videos, but when it came time to use it, I was still lost. I was having issues adjusting the brightness and was about to give up. I found your article, and it helped solve my problem. Your article, by far REALLY helped me understand manual mode. It makes sense. Thank you for making it really easy to understand manual mode.
How wonderful! Have fun photographing your little one :)
[…] A great link by Click it Up a Notch : The Basics of Manual Mode […]
simple, concise and easy to understand! thanks so much for the tips!!
WoW items in low price an biggest stock wow gold d fast delivery. Buy now, quickly increase your gear score,biggest stock wow gold, level your profession up and strengthen your hero.
App Store Optimization Services help to improve v increase app installs isibility in app store and search engine. We offer app store seo for ios apps,increase app installs, and we will also increase the number of downloads your app gets using app marketing and app store optimization.
Cheats for Castle Age HD. Use our Cheats, Tips, Walkt clash of clans gems for sale? hroughs,clash of clans gems for sale?, FAQs, and Guides to get the edge you need to win big, or unlock achievements and trophies.Find the castle age hd army codes on cocgems.com!
Looking for a trusted agency to market your app? Appsto app store optimization companies reaso is always your first choice,app store optimization companies!
Looking for a trusted agency to market aso app store optimization your app,aso app store optimization? Appstoreaso is always your first choice!
I know this is a really old post, but you’ve explained aperature, ISO and shutter speed in a way that I FINALLY understand it! Thanks!
[…] (shooting-in-manual) learn about my camera, […]
Hello.my name is Florina and I have a big problem.I have nikon d 5100,which have 11 autofocus points,but I noticed that I have to have my central point to get my phots sharp.So,is true,or what?How do I use mt 11 point of focus manually?Thanks.
You should be able to use all your focal points for focus.
I’m very impressed, just followed all you steps and I’m way better than supper photographer! I’m speechless! Thank you so much Courtney Slazinik.
Oh that is wonderful to hear! Yay!
Out of all the explanations I’ve heard…the worker bees was the best!! Thank you. Now I get to go play 😁
This was a fantastic description of Manual Mode photography! If you don’t mind, I’m going to link this article on my blog! I’m the creator of #mlmanualmonday, promoting shooting in manual mode each monday – sort of an addition to a typical Photo 365! http://www.movinglivesphoto.com/photo-365-digital-photography-blog/
Hello mam….i recently buy new camera Nikon d3200… And I dont know how to click pic manually…..can u help,me how to oprate camera in,manual way…step by step with photo example…..plz mam teach,me….i,m very grateful,to you…
Hey Courtney, I had been scouting for an easy to understand article to understand how to use my DSLR. I have to say, you are spot ON!!
Thanks a lot!!
Thanks so much!
Thoughtful comments – I learned a lot from the specifics . Does someone know if my assistant could obtain a sample CG 20 15 example to use ?
This helped me allot! Thank you soo much
Wow what a great post! I just published a post with 3 steps to shooting in manual mode. Check it out at https://sproutedolivebranch.com/take-better-photos/ Your post was so detailed and informative! Keep up the great work :)
Generalnie bardzo dobrze że tu trafiłem
http://28dni.pl/arts/fam-i-nastolatki
If someone loves to take photographs or even wants to be a professional photographer, this article is should be their holy grail. I have read tons of different articles that tackles almost the same topic but they way this was written put it above all the others. I love how this topic can reach millions of people and does not only limit to those photographers but even to teenagers, young adults and so on and so forth that wants to take a great photo without getting technical with its settings. Great Job! I hope to read some more in the future.
Is there a way to print this article? this is the best written article i have read and easier to understand then anything i have read to date. I would love a copy of it to take with me to the park to practice learning manual mode.
thanks!
I just have to tell you that I just found this post and it has helped me so much! I had no idea how to do any of this and your video was so helpful too! I can’t thank you enough for this post and making it understandable. I have it saved so I can read it over and over again until it is engraved in my head and I fully understand it. Thanks again!
I have had a Canon Rebel T6 (my first DSLR) for a few months now and made the switch to manual mode right away–what a difference! Anyway, I have kit lenses (oops) and as you say, they only go to 3.5. I’d love to get a lens that goes lower without totally breaking the bank. I realize you now shoot with Nikon, but is there any lens in particular you would recommend for me?
Thanks so much for your helpful blog!!!
[…] How to Shoot in Manual Mode-The Basics […]
Hi Courtney!
This article is amazing! The best I had heard. It is very well explained and detailed.
Thank you so much to help people like me and sharing your knowledge.
Eliane V. Trovo
I really appreciated your article and it motivated me to go out today and try to shoot in manual. I did fairly well, but I’m still trying to figure out when to adjust shutter versus ISO and what values. I then came inside to practice and all my shots are almost black they are so dark. I was shooting a stationary toy and the meter looked centered, but when I looked at the shot it was dark. Can you help me understand what I need to address differently indoors. Thank you so much! I
[…] it low, but in the darkest conditions use those high numbers like ISO 1600. Dig more in depth into using manual modes here, then head out and practice, watching how the different settings change your […]
[…] it low, but in the darkest conditions use those high numbers like ISO 1600. Dig more in depth into using manual modes here, then head out and practice, watching how the different settings change your […]
[…] it low, but in the darkest conditions use those high numbers like ISO 1600. Dig more in depth into using manual modes here, then head out and practice, watching how the different settings change your […]
[…] it low, but in the darkest conditions use those high numbers like ISO 1600. Dig more in depth into using manual modes here, then head out and practice, watching how the different settings change your […]
[…] aperture, ISO and shutter speed are all components of achieving proper exposure in your images. How you set them, and in what […]
[…] is the best way to control your exposure, to avoid overexposing. As well, the f-stop you choose dictates what your backlight will look like. […]
[…] Good for explaining Manual mode on the camera. https://clickitupanotch.com/2010/09/shooting-in-manual-the-basics/ […]
[…] with other photographers, I knew I wanted to learn how to shoot in Manual mode. Check out her tips for getting started > 2. Practice: I really have not had too much time for this yet but I have managed to squeeze in a […]
Great guide! I love shooting in Manual mode.
http://www.alydawnphotography.com
Ditto, I love your blog. But just wondering if the illustration for shutter speed is incorrect? Shouldn’t the blurry bike picture be over the long exposure of 30”? And then the crisp bike picture correspond the the fast shutter speed of 1/1000?
The illustration is trying to show how fast the subject is going. Saying if the subject is moving fast then you need a faster shutter speed :)
Most beneficial blog out of them all. Really like following your entire web site. Thank you so much.
https://lostboyofprovidence.tumblr.com
Just bought my first DSLR..found your article very helpful .and have just started using manual mode a lot more..your diagrams have really helped ..great read.
I went to a family reunion last weekend and used your suggestion of only manual mode the whole trip. On most shoots I took 4 or 5 picks at different settings to dial in the look I wanted and then deleted all but one. Then, I took a few more shoots at the setting I dialed in before moving on.
I can see I need to do this each week to really learn manual mode on my older Nikon d300 which I shoot with my 25 year old kit lens from my, Nikon 5005 film camera.
I still can’t part ways my original Nikon film model.
Lawrence
Charlotte, NC
Thank you so much! So clearly written for a beginner.
Made me feel more confident and encouraged to continue practicing my photography.
Very insightful and indeed it was worth the while.
[…] تمام عکاسان حرفهای که حالت دستی را درک میکنند، از هر زمانی که عکس میگیرند، گامهای […]
Wow ! Excellent . I am always confused about these manual mode settings ,But now I can use it perfectly .Thanks to you ,Courtney! . No one can teach photography better than you .
Hi Courtney,
Great article covering all the basics of manal mode shooting.
On the use of 50mm lens, it might help to explain that the Nikon D3000 & D5000 are crop sensor cameras. That would explain why you want to use the 35mm rather than a 50mm on them, since the crop makes a 35mm a 52.5mm, or basically a 50mm lens.
Love the articles and thanks for sharing.
Doug
Thank from Theo Sahni
https://vi.m.wikipedia.org/wiki/EXO
At this time it appears like Expression Engine is the preferred blogging platform available right now. (from what I’ve read) Is that what you’re using on your blog?
The Definitive Guide to case
[…] was in pattern yesterday will hold no esteem tomorrow. That is the means by which patterns change. Staying aware of these patterns is imperative to prop your business and brand up. Likewise, remaining in front of the patterns will give you an edge over […]
[…] First things first, turn off your flash, always and forever. Don’t ever use it. If you are still using auto mode, I highly recommend you switching to manual mode. […]
[…] First things first, turn off your flash, always and forever. Don’t ever use it. If you are still using auto mode, I highly recommend you switching to manual mode. […]
Hi! Great article. I just bought my first Sony a7iii and for some odd reason when I set the shutter speed higher there’s this pause from the moment I click the button to take the pic and when it actually takes the picture. I’d say a good 5 seconds. I’m using a kit lense and practicing with objects at home to learn how to shoot in manual mode. Sony said this is odd… I’m using the right SD card too. Any thoughts? Thanks so much!
Mmm…I wonder if you need a faster SD card.
Thank you! I am a complete beginner at shooting in manual mode and this tutorial has given me more clarity than all the blogs and tutorials I have gone through. Thanks again!